Connect to a MongoDB Source
This article will guide you through an example of connecting to a MongoDB source, using Teiid Designer. It is assumed that you have already installed Teiid Designer version 8.3 or higher.
1. Set up a MongoDB test source
- For this article, we set up a local instance of MongoDB for our testing. See this link for instructions on how to setup a local MongoDB source. If you already have a MongoDB source, you can use that instead if you wish.
- If using a local MongoDB source, you can start the instance from the command line:
- $ service mongod start
- To verify the mongo instance started successfully, view the contents of
/var/log/mongo/mongod.log
2. Test MongoDB Connectivity from MongoDB shell
- Once you've started the local MongoDB instance, the MongoDB shell is a good way to verify connectivity
- Type mongo at a command line, then in the MongoDB shell, show dbs will show the default local db - as shown in the example below
$ mongo
-------------------------------------
Welcome to the MongoDB shell.
For interactive help, type "help".
For more comprehensive documentation, see
http://docs.mongodb.org/
Questions? Try the support group
http://groups.google.com/group/mongodb-user
> show dbs
local 0.078125GB
3. Start your local teiid server instance
- Launch Teiid Designer. Designer requires a running Teiid server to deploy and query our VDB.
4. Create a MongoDB DataSource on your Teiid instance.
- One way to create the MongoDB DataSource is In Teiid Designer, using the 'Teiid Connection' importer. Alternately you can create the source manually in your teiid server by editing the standalone.xml. We'll create the DataSource in Teiid Designer:
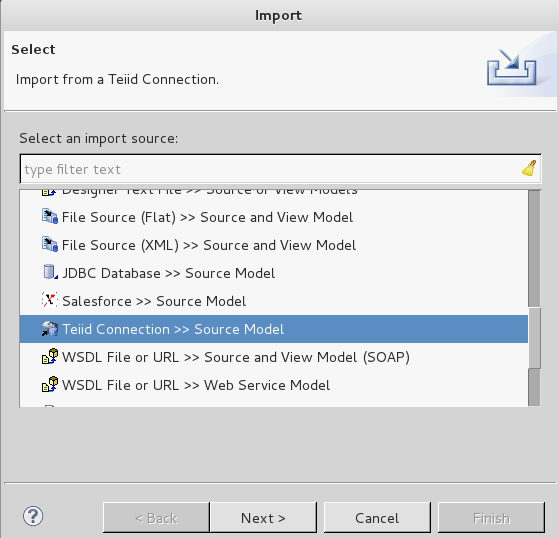
- Select File > Import... > Teiid Connection >> Source Model , then click Next
- On the first page of the wizard, click New... to create a new Data Source
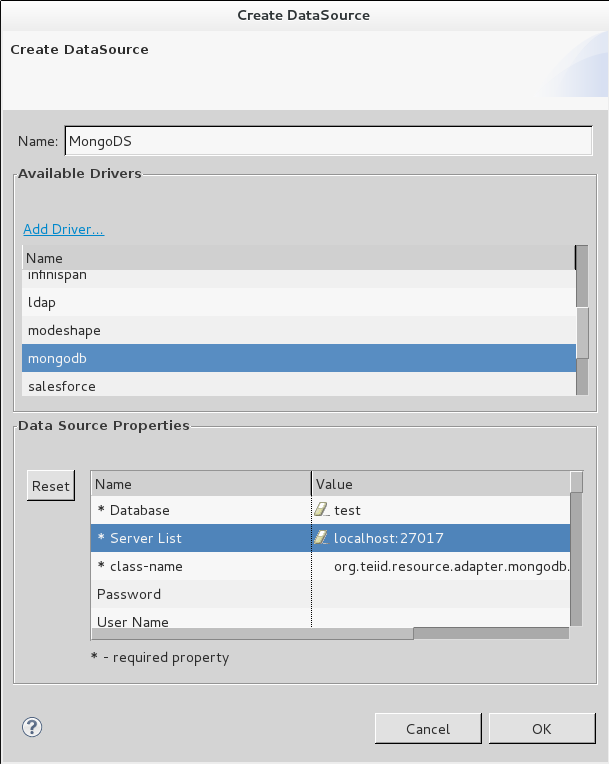
- On the 'Create DataSource' dialog:
- Enter MongoDS for Name:
- In the Available Drivers list, select mongodb
- For the Database property, enter test
- For the Server List property, enter localhost:27017
- then click OK
- Back on the first wizard page, the MongoDS should show up in the data sources list.
- At this point, click Cancel to exit the wizard. You will not be able to proceed in the Teiid Connection importer since Teiid cannot generate the schema DDL for Mongo.
5. Create the Relational Source Model
- Create a Model Project in Designer. File > New > Teiid Model Project Enter MongoProj for the project name, then click Finish
- Create a new Relational Source Model in MongoProj. Click on MongoProj in ModelExplorer, then Rt-click > New > Teiid Metadata Model.
- Enter MongoSrcMdl for the Model Name
- Select Model Class : Relational
- Select Model Type : Source Model
- Click Finish to create the Relational Source Model
- Create a relational table in MongoSrcMdl
- In ModelExplorer, select MongoSrcMdl then Rt-Click > New Child > Table...
- In the Create Relational Table dialog
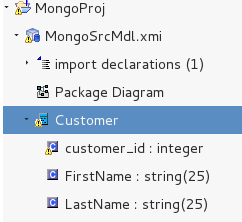
- Enter Customer for the table Name
- On the Columns tab, add three columns:
- customer_id : integer
- FirstName : string (25)
- LastName : string (25)
- Click OK to exit the dialog
- The model should look like this:
6. Create a Virtual Database (VDB) including the MongoDB source
- In ModelExplorer, create a VDB in MongoProj
- Select MongoProj, the Rt-Click > New > Teiid VDB
- In the New VDB dialog
- Enter MongoVDB for the VDB Name
- Click Add, then select MongoSrcMdl to add it to the VDB
- Click Finish to create the VDB
- Edit the VDB
- In ModelExplorer, double-click MongoVDB to open the VDB Editor
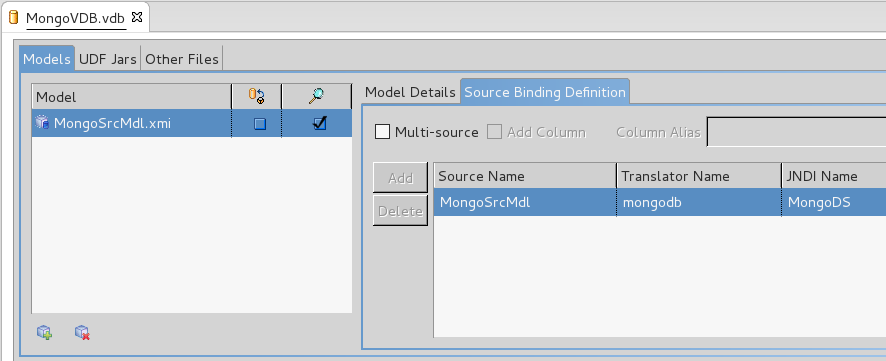
- In the VDB Editor, select MongoSrcMdl, then select the Source Binding Definition tab.
- On the Source Binding Definition Tab, select the Model then use the dropdowns to select:
- Translator Name : mongodb
- JNDI Name : MongoDS
- Click Save. The VDB Editor will look like this:
7. Deploy / Execute the VDB - insert data into Mongo and test
- In ModelExplorer, select MongoVDB, the Rt-Click > Modeling > Execute VDB
- The VDB should deploy and the SQL Scrapbook open
- Insert a record into the MongoDB source:
- In the SQL Scrapbook enter the SQL: INSERT INTO Customer(customer_id, FirstName, LastName) VALUES (1, 'John', 'Doe')
- Click on the SQL line, the Rt-Click > Execute Current Text . The row will be inserted.
- Query to verify the inserted record:
- In the SQL Scrapbook now enter the SQL: SELECT * FROM Customer
- Again click on the SQL line then Rt-Click > Execute Current Text . The record that you inserted should be returned.
8. Verify the inserted data from Mongo Shell
You can also verify the inserted data from the Mongo Shell:
a. Show the available dbs
> show dbs
local 0.078125GB
test 0.203125GB
(The 'test' db now shows up - the db name was defined in step 4 and was created when you did the insert)
b. Select the 'test' db
> use test
c. Show the collections for db 'test'
> show collections
Customer
system.indexes
(The Customer collection is available)
d. Show the record you inserted in Designer
> db.Customer.find()
{ "_id" : ObjectId("52a1fd3ce62016b3baf7b263"), "customer_id" : "1", "FirstName" : "John", "LastName" : "Doe" }
(This is the record you inserted in step #7)
9. Conclusion
This completes the MongoDB source example! Please read the Teiid MongoDB Translator documentation to find out more about the connectivity and modeling requirements for MongoDB sources.
Comments