Teiid supports various kinds of caching
- Caching of final results of a user query, called result set caching.
- Caching contents of a virtual table, called "materialized views". The queries written using this virtual table are served from the cached contents instead from original source.
To learn more about caching, please read the "Caching Guide" on Teiid. This article is a step by step guide in defining and using "materialization views" in Teiid and Teiid Designer. The diagram below shows the concepts behind the Materialization views.
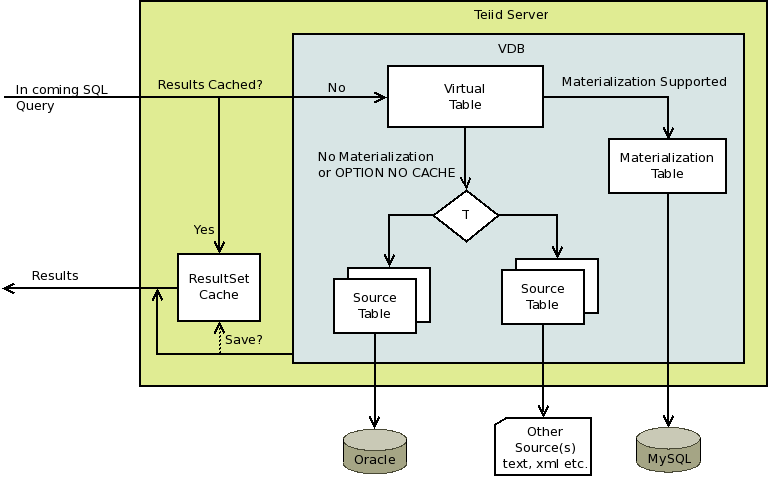
The "Materialization Table" is nothing but cached view of a virtual table. When a query is issued against this virtual table, the contents can be served from memory space or redirected to a another table or in can fetch results from orignal sources. When results are served from memory it is called "Internal Materialization". When a external database is used to store the contents of view, then it is called "External Materialization". When it using the original sources then it is normal case scenario or NO CACHE mode.
This guide will provide working instructions for both of these materialization methods. Note that Dynamic VDBs currently do not support materialization.
Internal Materialization
- Build a VDB using the Teiid Designer for your usecase normally.
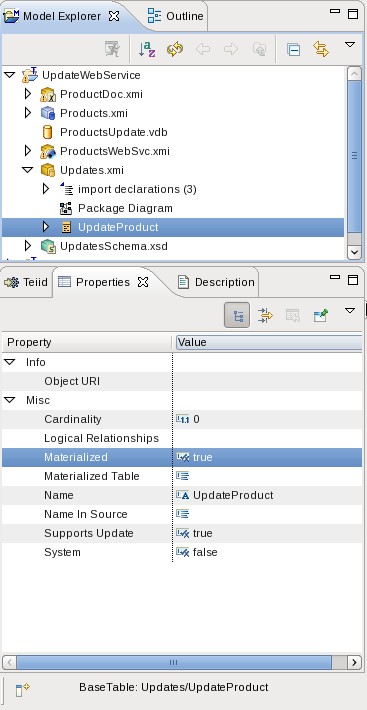
- Identify all the "Virtual Tables", that you think can use caching, then click on the table, then in the properties panel, switch the "Materialized" property to "true". See below.
- That's it. However, by default the results are cached for the life of VM, unless you force the cache refresh through admin-console or by executing a system procedure. However, if you like to invalidate the cache after a pre-defined time add the following cache hint to the transformation SQL that makes up your view.
/*+ cache(ttl:300000) */ select * from Source.UpdateProduct
- The above cache hint is set for 5 mins (300000 milli secs). TTL = time to live
- Deploy the VDB to the Teiid server. When next time you use the virtual table directly or indirectly by issuing a user query against this VDB, the virtual table contents will be cached. The cached contents will be used for any future queries.
Load/Flush/Refresh
There are few different ways to load/refresh the contents of the Internal Materialized tables.
1) Loading of materialized contents is automatic when the user query is executed like the one below. It is assumed for this example that you used the cache hint from above.
SELECT * FROM Products.UpdateProduct
which will retain the contents of the materialization table for 300000 millisecs (5 mins). After the defined cache time expires, any user query like above will see that the cache time has expired and will start a new asynchronous job to load the contents of the view into materialization cache.
Note: It is VERY IMPORTANT note from above that, the user query started a new refresh/load job, however it did not invalidate the current results. So, in the mean time while the load/refresh job is running, the user queries continue to return the expired results. When refresh/load job completes, then the old results will be flushed and new results will be used for any future user requests. The main idea is here is not to block user queries while the refresh job is running. This is mainly due to the fact that you can not predict how long a refresh job going to run. This is "implicit" materialization loading, if your usecase does not allow this kind of refresh then use below techniques for "explicit" materialization load.
2) To start a load/refresh job on internal materialized view immediately, use "admin-console", and go the "content" tab of that VDB and use "Refresh Materialized View" option. This option offers immediate "invalidation" option. When you choose invalidate option, then any user queries that come in against this materialization table will be blocked until the cache contents are fully loaded. If the invalidatation is not choosen then the behaviour is same as in (1).
3) You can also issue SQL command "EXEC SYSADMIN.refreshMatView(viewname=>'Portfolio.UpdateTable', invalidate=>true)" from any JDBC query tool or through Admin Shell to clear the contents of materialization table and start the refresh of contents immediately. The same invalidation rules apply here as in (2)
Using (3) the "refresh" process can be automated/scripted, that can be scheduled to run in frequent intervals. See example of scheduling below in external materialization section.
External Materialization
- Follow the same steps as in "Internal Materialization" process in defining the "Materialized" tables.
- Right click on each materialized table, then choose "Modeling -> Create Materialized Views". This will bring up the following dialog box
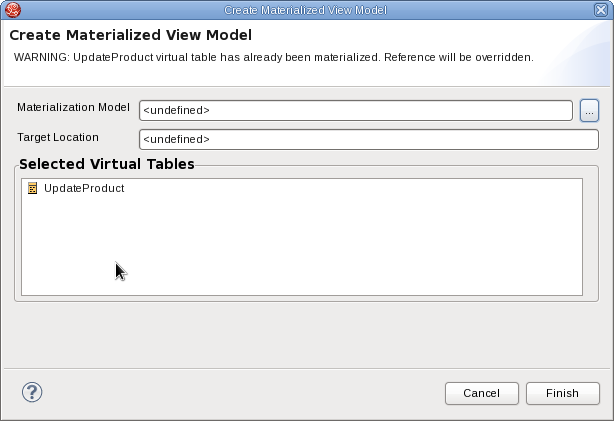
- Click on "..." button on the "Materialization Model" input box, select a "physical model" that already exists or create a new name for "physical model".

- Click "finish", this would create the new model (if applicable) and a table with exact schema as your selected virtual table. Verify that the "Materialization Table" property is now updated with name of table that has just been created.

- Navigate to the new table materialized table that has been created, and click on "Name In Source" property and change it from "MV1000001" to "mv_{your_table_name}". Typically this could be same name as your virtual table name, for ex: "mv_UpdateProduct"
- Save your model.
- Note that the data source this materialized view physical model represents, will be the data source for storing the materialized tables. You can select different "physical models" for different materialized tables, creating multiple places to store your materialized tables.
- Once you are done creating all materialized tables, right click on each model (most cases a single physical model used for all the materialized views), then use "Export -> Teiid Designer -> Data Definition Language (DDL) File" to generate the DDL for the physical model.
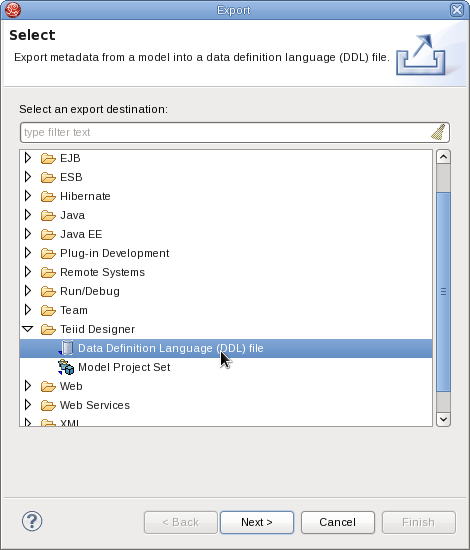
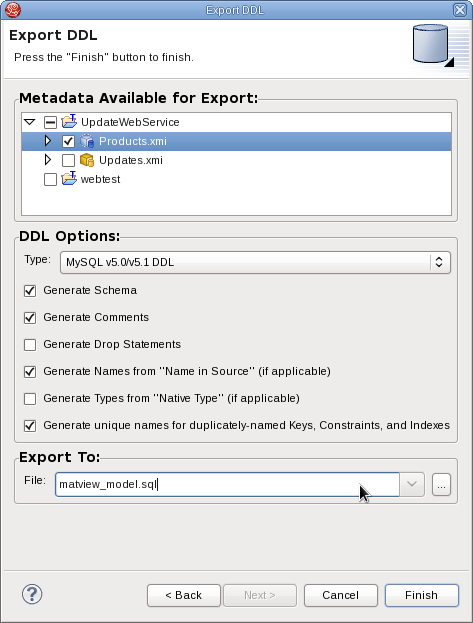
- Select the type of the database and DDL file name and click "Finish". A DDL file that contains all the "create table" commands will be generated.
- Use your favorite "client" tool for your database and create the database using the DDL file created.
- Go back to your vdb, configure the data source and translator for the "materialized" physical model to the database you just created.
- Once finished, deploy the VDB to Teiid Server and make sure that it is correctly configured and active.
Load/Flush/Refresh
- All the operations in this mode is manual and user defined. We will show how they can be accomplished.
- For example, if you are trying to load the materialized table "Portfolio.UpdateProduct", for which the materialization table defined as "mv_view.UpdateProduct", use any JDBC Query tool like SquirreL and make a JDBC connection to the VDB you created and issue following SQL command.
INSERT INTO mv_view.mv_UpdateProduct
     SELECT * FROM Portfolio.UpdateProduct OPTION NOCACHE
- If you like automate loading of materialized table, then you can use AdminShell scripting like below
load.groovy
sql=connect(${url}, ${user}, ${password});
sql.execute("DELETE FROM mv_view.mv_UpdateProduct");
sql.execute("INSERT INTO mv_view.mv_UpdateProduct SELECT * FROM Portfolio.UpdateProduct OPTION NOCACHE");
sql.close();
- Execute the above AdminShell script by using command below.
adminshell.sh . load.groovy
- If you want to set up a job to run this script frequently at regular intervals, then on Windows use "Windows Scheduler" or on Linux use "cron tab" to refresh the rows in the materialized table. Every time the script runs it will refresh the contents.
- This job needs to be run only when user access is restricted. for advanced loading setup look at "Using Staging tables to load data" section below.
- For more information about passing the parameters to your script, check out the Teiid "Admin Guide".
Using Staging Tables To Load Data
The above process of loading cache is very simple and may not work in all situations. For example,
- It is updating all the rows in the materialized table, and you only need to update only few rows to avoid long refresh time.
- If it takes an hour for your re-load your materialized table, queries executed during that time will fail to povide correct results.
- Also ensure that you create indexes on your materialization table after the data is loaded, having indexes during load slows down loading of data, especially when you are dealing with large number of rows.
How to setup staging table to use them for loading
- As in the previous section, during the "Create Materialized View" step, create two identical tables, one with "mv_" prefix and another with "st_" prefix. "mv_" for materialized view and "st_" for the staging table.
- Make sure that the "Materialized Table" property is set to the table with "mv_" prefix. Also make sure that both these tables have their "Name in Source" edited and renamed with respective prefixed name.
- Create DDL file and create the database. This difference now is there are two identical tables for each materialized view.
- Load the contents into staging table with following query ( below uses the same example from before, substitute with your tables)
INSERT INTO mv_view.ST_UpdateProduct SELECT * FROM Portfolio.UpdateProduct OPTION NOCACHE
once the above is loaded, then use database "RENAME" table command to rename the staging table ( st_xxx ) to materialized ( mv_xxx ) table. For example, in MySQL you can use
ALTER TABLE ST_UpdateProduct RENAME MV_UpdateProduct
The reason for "rename" command is, except for the very first time, the statging table can be used for loading the data, meanwhile materialized table will serve the user queries. Once the staging is loaded, rename will switch the identity of staged with the materialized such hat any future queries will be against newly loaded contents. You can keep repeating this cycle in regular intrvels and never serve empty results or wait for results to load. If you want to populate the results through an ETL tool, you can do that too in this step by ignoring the above SQL command.
For more information on RENAME command syntax take look at documentation of this command in each database.
You can script all the operations above and make them run on regular intervals. The below example shows the script using MySQL database. Make sure you provide the MySQL jdbc driver in the AdminShell classpath before running the script.
load.groovy
// connect to mysql first
mysql = Sql.newInstance("jdbc:mysql://host_name:port/dbname", "username","password", "com.mysql.jdbc.Driver")
mysql.execute("TRUNCATE TABLE ST_UpdateProducts");

// use the Teiid connection and load the staging table
sql=connect(${url}, ${user}, ${password});
sql.execute("INSERT INTO mv_view.st_UpdateProduct SELECT * FROM Portfolio.UpdateProduct OPTION NOCACHE");
sql.close();

// issue the rename command, so that materialization takes into effect
mysql.execute("ALTER TABLE ST_UpdateProduct RENAME MV_UpdateProduct");
mysql.close();

// create any indexes you need to
now as before make this script run through your scheduler or cron tab at required intervals to keep your data fresh.
Hopefully this article showed you how to use materialized view using Teiid and Teiid Designer. Please let us know if you have any questions or comments through Teiid Community.
Comments