Starting in JBoss Tools 3.2 and JBDS 4, we are including a new tool to help with web service testing that's called - the Web Service Tester. Not the most original name, but it does state pretty clearly what it does.
The idea behind this tool is to provide basic web service testing capabilities. We're not trying to compete with other web service test tools like soapUI, but provide a basic test facility within our tooling to simplify common development tasks.
For JAX-WS, we wanted the ability to create a sample SOAP request message by selecting an operation in a WSDL file. We also wanted to be able to invoke the service, passing the request message in, and not only see the response message sent back, but also look at the response headers.
For JAX-RS, we wanted the ability to use REST and standard HTTP operations to interact with a RESTful web service on a framework like RestEasy. And again, we wanted to have the ability to see the response headers and any response message that came back.
Starting the Tester
So if you have JBT 3.2 or JBDS 4.0 (M1 and beyond) installed, you already have the Web Service Tester (WST) available. To open the view, go to the Window menu at the top and select Window->Show View->Other... In the "Show View" dialog, look for JBoss Tools Web Services --> Web Service Tester. Double-click on the "Web Service Tester" line or select it and click OK. The view should appear.
Note: Depending on which perspective you open the view in, you will probably have to move it around or resize it slightly to see enough to make it useful.
The WST view can be broken into three distinct parts:
- WSDL path and button bar
- Request Details
- Response Details
WSDL Path/Button Bar
The WSDL path and button bar consists of an editable drop-down list, a combo box, and two toolbar buttons.

- The editable drop-down list provides a place to enter the location for the WSDL or HTTP address of the service you are testing.
- The combo box contains two categories of operations. "JAX-WS" is the default, which provides the ability to test SOAP-based web services. And the other items in the list pertain to testing RESTful (JAX-RS-based) services via different HTTP operations (GET, PUT, POST, DELETE, and OPTIONS).
- The first button on the toolbar pops up a dialog to select a WSDL from a URL, from the file system, or within the Eclipse workspace. Once you have a valid WSDL, it will allow you to specify which service/port/operation combination you want to test. It will then create a SOAP request message that you can edit by hand to specify any needed data.
- The second button on the toolbar invokes the service based on the information the WST currently has. If it needs additional details, it will pop the WSDL selection dialog up so you can explicitly specify which service/port/combination you want to test.
Beneath the button bar are two sections with a resizable splitter between them (yes, it's there, it's just invisible). These two sections focus on Request Details and Response Details.
Request Details
The Request Details section consists of four discrete bits - a checkbox and three collapsible sections.
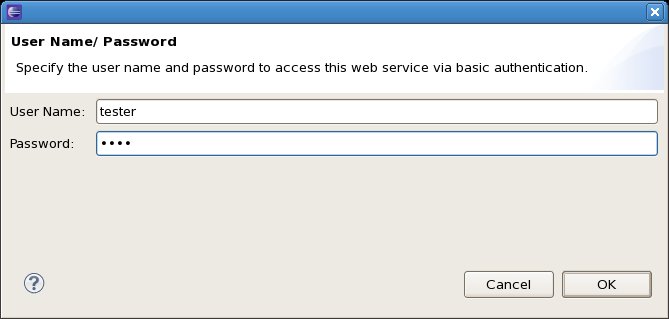
- The "Prompt for Basic Authentication" checkbox enables you to send a user name and password along when you invoke the web service. If checked, you will be prompted with a user name/password dialog before you can continue. The dialog remembers the last values entered between invocations so you can simply hit OK to reuse the existing values.
- The Headers collapsible section contains a set of controls that allows you to add one or more name=value pairs to a list. These headers will be passed along in the invocation request at the HTTP level where possible.
- The Parameters collapsible section contains a set of controls that allows you to add one or more name=value pairs to a list. These parameters will be passed along in the invocation request at the HTTP level where possible.
- The Body section contains a large, scrollable text box for JAX-WS SOAP request messages and input for JAX-RS service invocations.
Response Details
The Response Details section consists of two collapsible sections to view any information coming back from the service invocation.
- The Response Headers section is simply a list of the HTTP headers that came back from the invocation.
- The Response Body section, like the Body section on the Request side, contains a large, scrollable text box for JAX-WS SOAP response messages and JAX-RS responses.
Unlike on the Request side, you can do a few things with the response text. There are four buttons at the top right of the Response Body text box.
- Save to File - Save the response text as a text file somewhere in the file system.
- Open in Editor - Opens the text in an XML editor in Eclipse if it's XML or in a plain text editor in Eclipse if not.
- Show Raw - Shows the raw text coming back from the web service invocation.
- Show in Browser - Shows the text in an embedded HTML browser instead of as plain text.
Using the Tester
Now that the WST view is open and available, you can choose to test a JAX-WS service or invoke a JAX-RS service using one of the available HTTP operations.
Testing a JAX-WS Service
To test a JAX-WS service, you need to be able to tell the WST where to find the WSDL file. In many cases, the file is available at a publicly-accessible web address. But in some cases, for example if the WSDL is password protected, you might have to use a web browser to access it and save it to your local file system or to a project in an Eclipse workspace before it is accessible by the WST.
The combo box requires the path to the WSDL be in URI format.
To access a file in your file system, you would need to include "file:" before the path. To reach a file in my local workspace in Linux, my file URI might look like "file:/home/WSDLs/MyWSDLFile.wsdl".
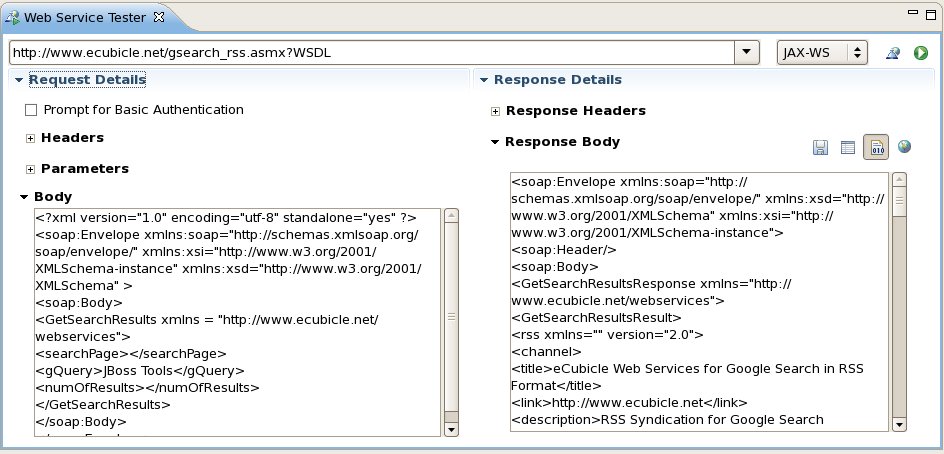
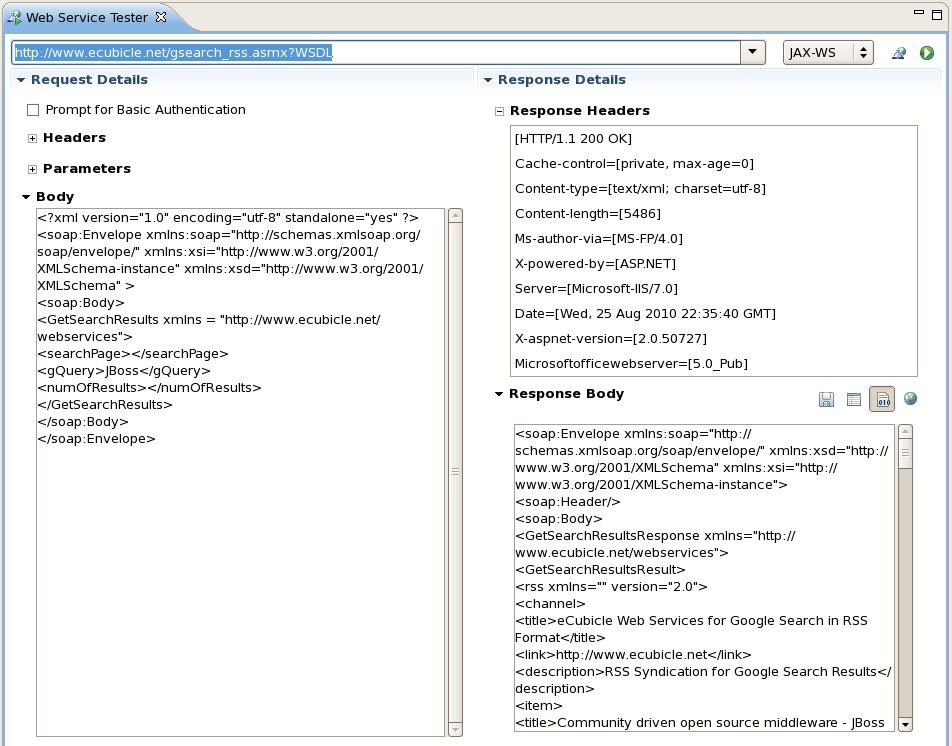
To access a file at a typical HTTP path, you can simply provide complete URL. That might look like "http://www.ecubicle.net/gsearch_rss.asmx?WSDL".
You may type the URI directly into the combo box or click the "Get from WSDL" button. If you use the WSDL dialog, the WST will create your request message for you.
Once you have your request message the way you want it, click the Invoke button to see your results.
For example, use the eCubicle Google Search RSS service. This service does a Google web search and returns the results as an RSS feed.
- Click the Get from WSDL button.
- Copy and paste this URL (http://www.ecubicle.net/gsearch_rss.asmx?WSDL) into the "WSDL URI:" text box. If you are connected to the internet, you should see the service, port, and operation drop-downs populate.
- By default, the first service, port, and operation are automatically selected. For other WSDLs, you may have to specify SOAP or SOAP 1.2 ports or from the list of available operations to indicate what you want to test.
- Click OK. When you are returned to the WST, you should see the request message appear in the "Body" section.
- Clear the question marks ("?") from the fields in the message and provide a query of your choice. For our example, you might search for "JBoss".
- Click the Invoke button.
If all goes well, you should see your web service SOAP response envelope appear in the Response Body text box. If errors occurred during the invocation, you'll see them show up in there as well.
You should also see any HTTP header information returned in the Response Headers list.
Secured Services
In the case of testing secured services, you will want to try using the "Prompt for Basic Authentication" checkbox. If checked, it will pop up a dialog prompting you for a user name and password that will be passed along.
Note: Secured services are still a bit of a work in progress, so this section may change a bit before our Beta release in Sept 2010.
Testing a JAX-RS Service
When used to test a JAX-RS service, the process is largely the same as when testing a JAX-WS service except that there is no WSDL involved. Instead, you can use the OPTIONS operation to figure out what a particular JAX-RS service will support operation-wise.
Getting your OPTIONS
Figuring out what a particular RESTful service will support is pretty simple. All you need is the URI for the service, select "OPTIONS" in the operations drop-down at the top of the WST, and click Invoke.
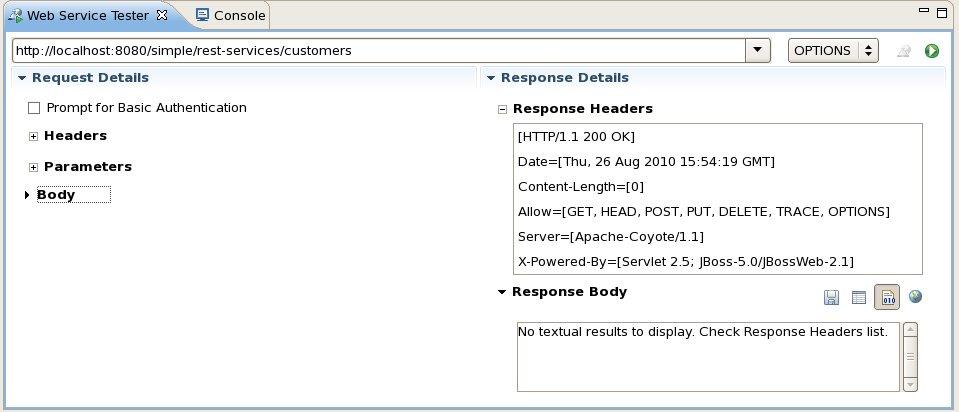
In this case, if you look in the Response Headers, you can see in the "Allow" header that it allows GET, HEAD, POST, PUT, DELETE, TRACE, and OPTIONS. At this point the WST doesn't handle HEAD or TRACE, but everything else is fair game.
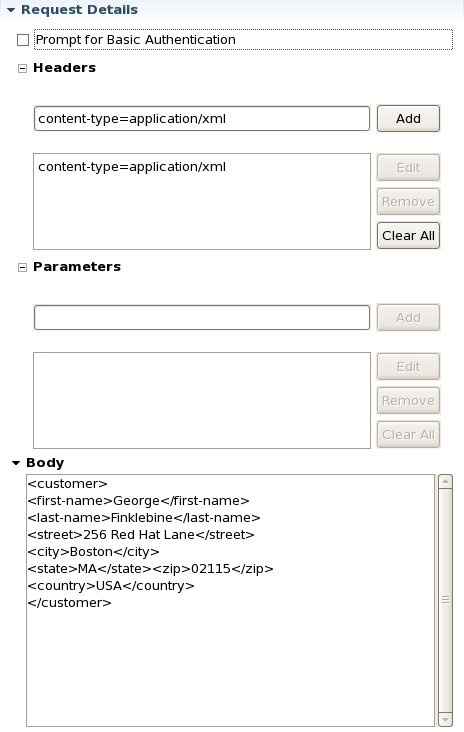
POSTing some Data
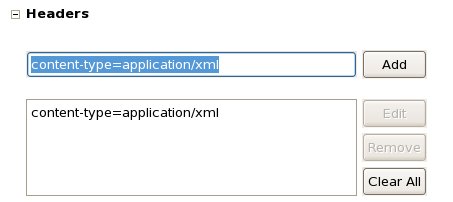
Now that we know we can POST to the service, let's do that by setting the operation drop-down to "POST". For this particular service, I know that we need to provide a header indicating the content type we're dealing with is XML.
Expand the Headers section and add "content-type=application/xml" to the Headers list. Type into the text field to the left of the "Add" button and then click "Add" to add it to the list.
Once that's done, we'll type our XML input into the Body text box, and click Invoke.
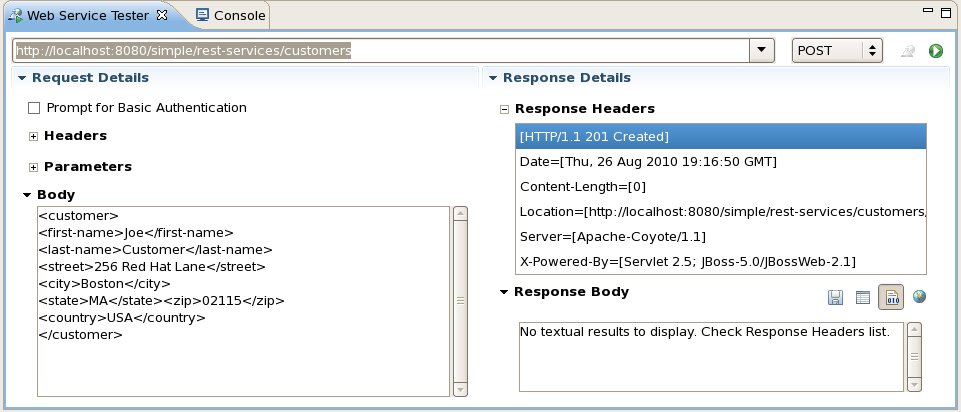
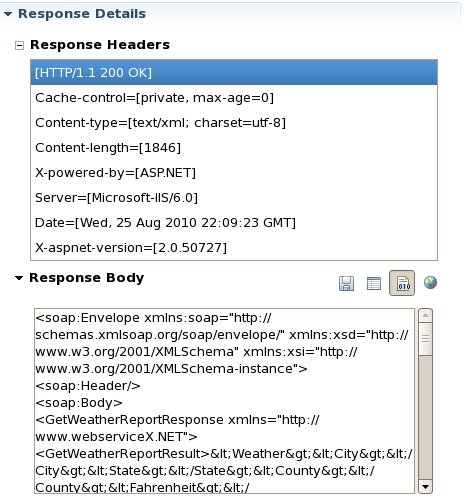
In this case, we know it was successful from the HTTP/1.1 header - 201 Created. This means that our record was created successfully. By looking at the Console view, I can see that record 1 was created successfully. Each RESTful service may handle this differently, so be sure to keep an eye on the Response headers and body and possibly even your Console view
13:16:50,591 INFO [STDOUT] Created customer 1
Now that we have a record, we can try to GET it to see if the data was saved successfully.
GETting some Data
To GET data, we switch the URL a bit to provide a parameter to the service indicating which record to retrieve. Some services do this using parameters in the URL (if you add parameters, they will be appended to the URL when the service is invoked), while others handle it directly in the URL. In this case, we don't need any parameters and can just indicate which customer record we're after in the URL.
Once we specify the request parameters and click Invoke, we see the data retrieved as we POSTed it.

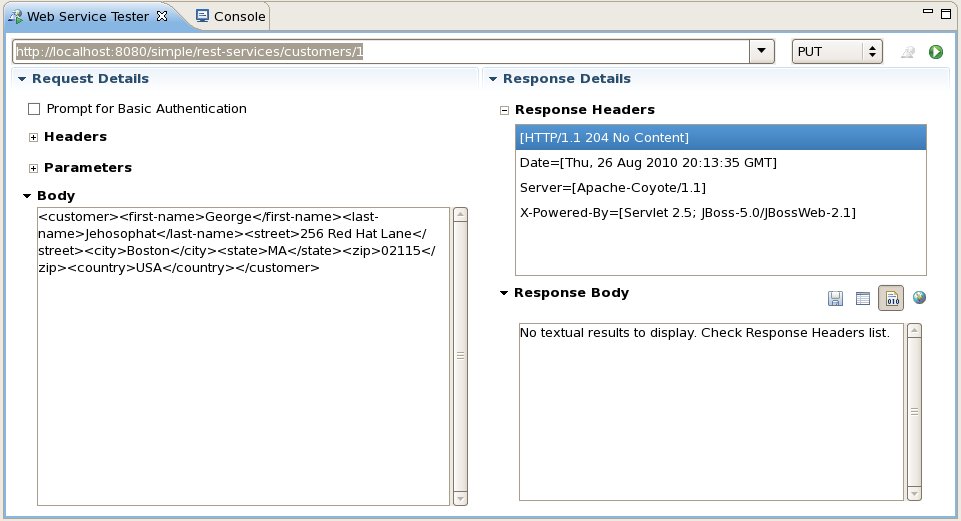
PUTting some Data
Unlike POST, PUT is used to update an existing piece of data. In this case, we're going to update our data from "Joe Customer" to "George Jehosophat." To do that, we change the operation to PUT, set our Request data, and click Invoke.
Like the POST, you may not see anything appear in the Response Body and should check the Response Headers and console to make sure the PUT was successful.
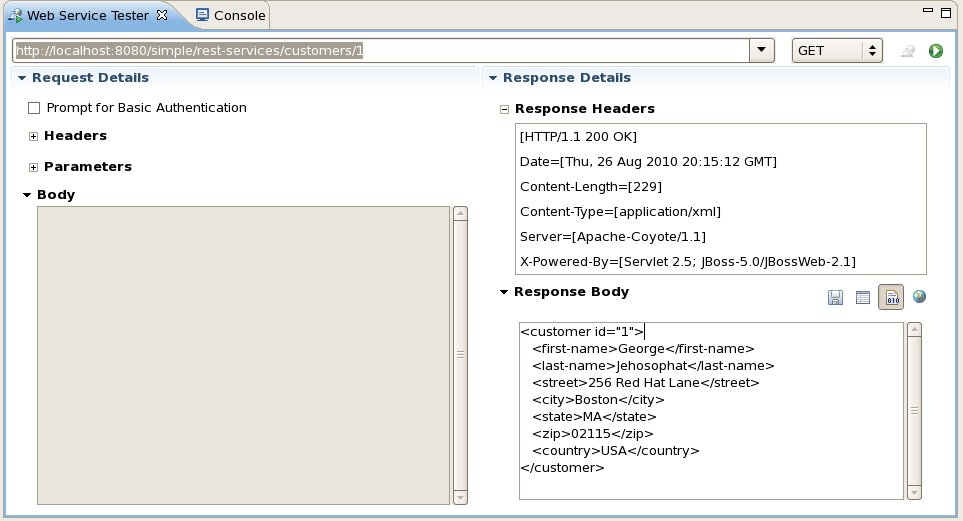
To verify that the record has been changed, you can do another GET:
DELETEing some Data
DELETE works the same as GET. Basically you need to specify which record you want to delete and it will remove it from your application if the request is correct and the data exists. To use DELETE, provide your URI and Properties defining what you want to delete, set the operation drop-down to DELETE, and click Invoke.
Like the POST, you may not see anything appear in the Response Body and should check the Response Headers and console to make sure the DELETE was successful.

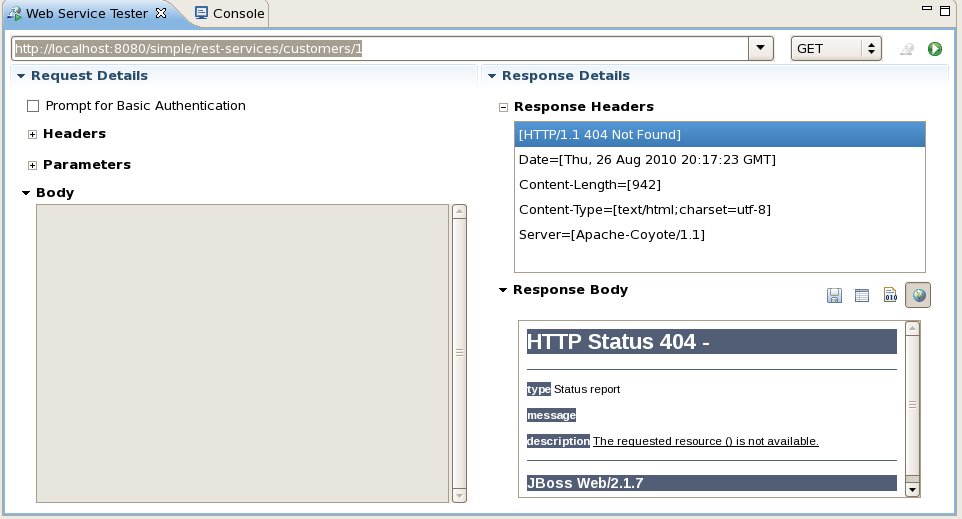
To verify that the record has been removed, you can do another GET. When you do the GET, it should fail since you removed the record.
Comments