This page describes the process for deploying a JBoss project release, or deploying a patched and rebuilt thirdparty project.
Build Configuration
For required Maven settings, see Maven Getting Started - Developers
In order to deploy to the Maven releases repository, your project POM (or parent POM) will need to be configured with the appropriate information. This includes required fields in your project POMs, and required source jars included with your release (Maven Project Configuration Requirements). The recommended practice is to inherit the basic information from the JBoss parent POM (version 6 or later).
  <parent>
    <groupId>org.jboss</groupId>
    <artifactId>jboss-parent</artifactId>
    <version>6</version>
  </parent>
If you are not able to inherit from the jboss parent pom, you will need to configure the required POM information along with the the following distribution management configuration.
  <distributionManagement>
    <repository>
      <id>jboss-releases-repository</id>
      <name>JBoss Releases Repository</name>
      <url>https://repository.jboss.org/nexus/service/local/staging/deploy/maven2/</url>
    </repository>
    ...
  </distributionManagement>
Verify Project POMs
In order to deploy your project to the releases repository, all POM files must contain ( or inherit ) the the required configuration.
Maven Project Configuration Requirements
Your deployment will fail if the POM does not meet these requirements.
Deploying a Rebuilt Thirdparty Project
Information about deploying a rebuilt thirdparty project is availble here: Maven Deploying a Thirdparty Release
Deploying to the Staging Repository
Depoying a Maven Project
Detailed information about the release process is available here: JBoss Project Release Process
Once your Maven settings and POMs are correctly configured, you can use "mvn deploy" or "mvn release:perform" to upload your project to the Nexus staging repository.
mvn deploy
This will generate a temporary staging repository which can be used for testing before the artifacts are moved to the releases repository.
Deploying a non Maven Project
Project that use Ant or other build tools can use the maven deploy plugin ( http://maven.apache.org/plugins/maven-deploy-plugin/ ) to deploy artifacts to the staging repository. The command should look something like the following.
mvn deploy:deploy-file -DpomFile=pom.xml -Dfile=myproject.jar -DrepositoryId=jboss-releases-repository -Durl=https://repository.jboss.org/nexus/service/local/staging/deploy/maven2/
Make sure that your Maven settings (~/.m2/settings.xml) is configured similar to what's described in Maven Getting Started - Developers. Specifically the "repositoryId" on the command line should match the server id in your settings. You can run mvn:deploy several times to upload all release artifacts to the temporary staging repository. When you are finished, follow the instructions below for using the staging repository.
Closing the Staging Respository
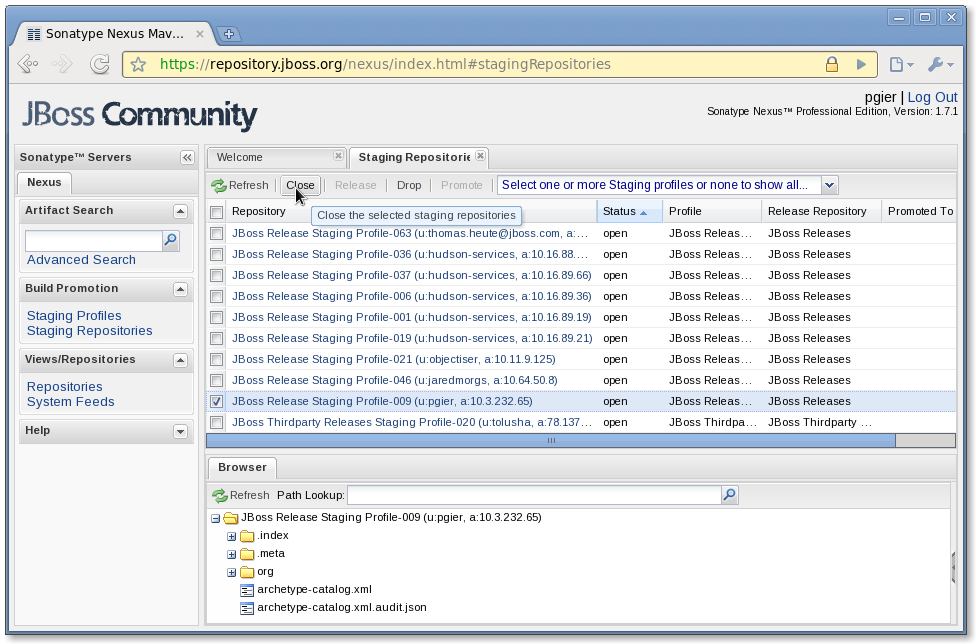
When you deploy/upload your release build, Nexus will automatically create a temporary staging repository for testing. After all the uploads are complete, you will need to log into Nexus ( https://repository.jboss.org/nexus ) using your JBoss.org credentials and close the staging repository. "Closing" the repository does not mean that the artifacts are promoted, it only means that no additional artifacts can be added.
Click on the link "Staging Repositories" on the left side under the section called "Build Promotion". Next, select the checkbox next to the staging repository which contains your jboss.org userid. To find your staging repository, there is a hidden column in the list with the owner. If you click on the triangle on the columns header, you can display the hidden column. Then you can sort by this column and find your user name:
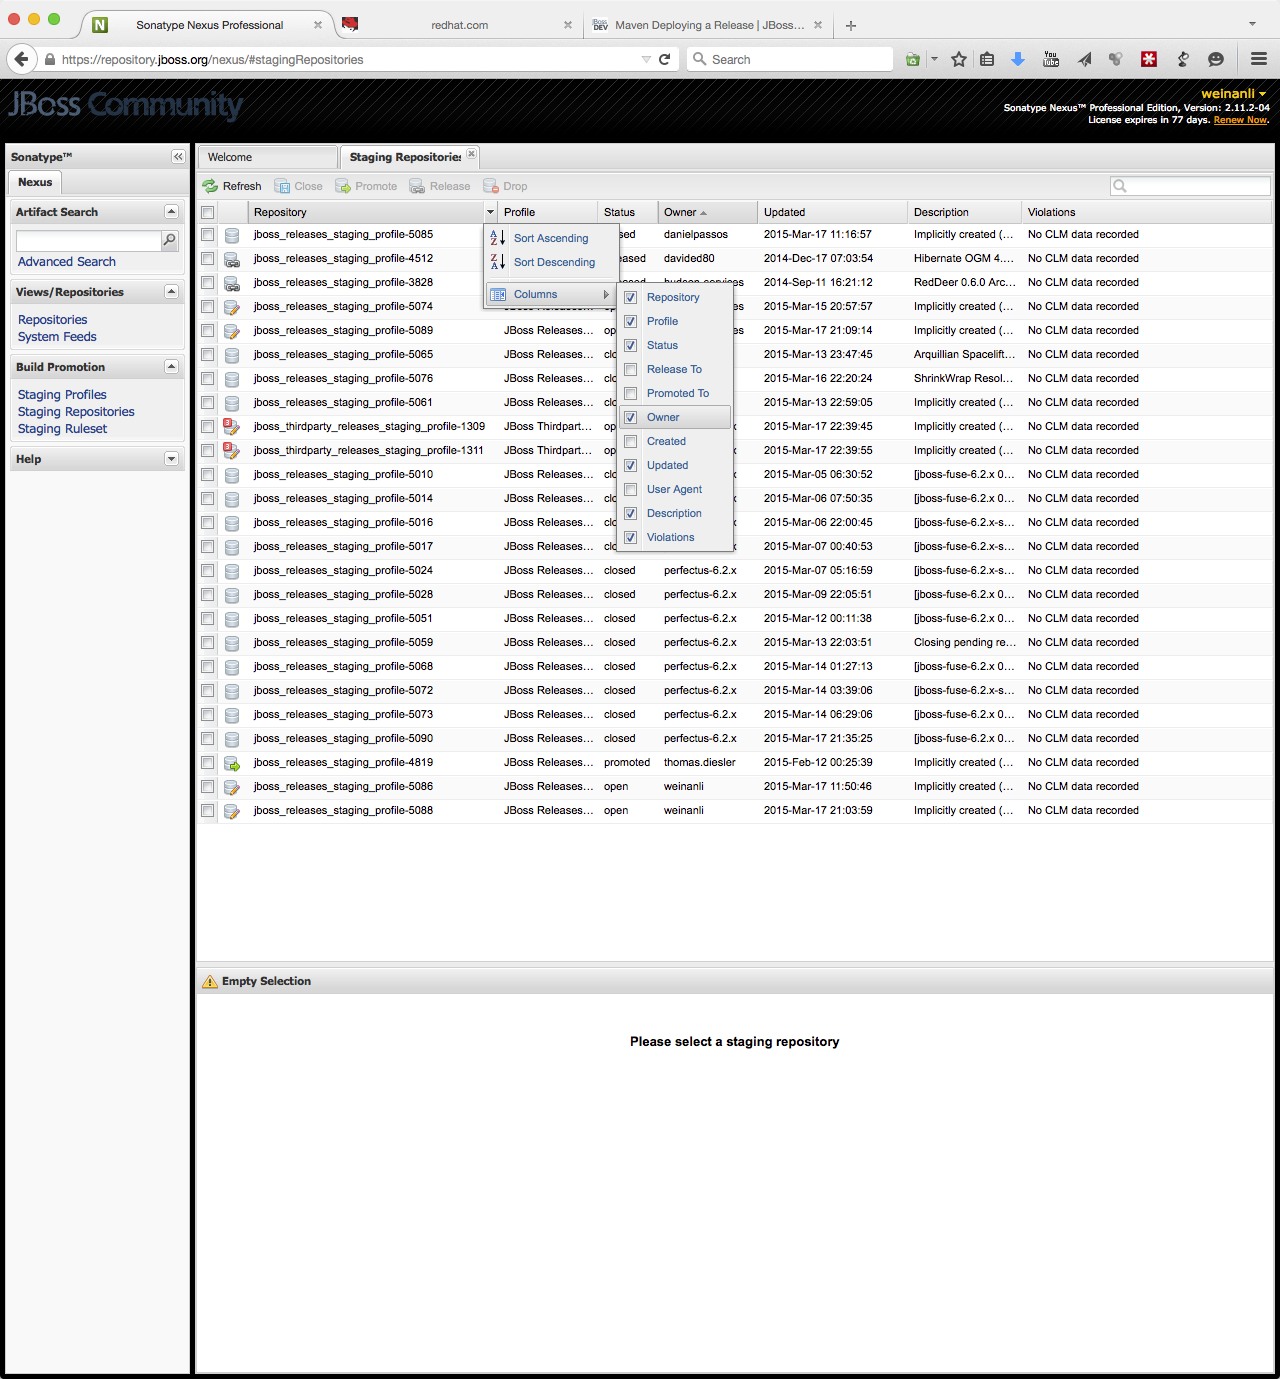
Then click on the "Close" button at the top of the repository list.
When the staging repository is closed, Nexus performs several steps to validate the release. If you receive a validation error when closing the repository, check that you have supplied all of the relevant information and content in your release. (Maven Project Configuration Requirements)
At this point, the contents of the repository need to be verified. Depending on the needs of your project, this can be a quick visual verification by browsing the repository, or a more formal testing process using the staging repository. If there is a problem with the release, simply click the repository check box in Nexus and then click the "Drop" button.
Using Staging Repository
The staging repository is a repository group in Nexus which contains the temporary staging repositories and all JBoss and thirdparty release repositories. The staging repository URL can be configured as a Maven repository via the settings.xml (Maven Staging Settings) .
https://repository.jboss.org/nexus/content/groups/staging/
For information about how to use the staging repository during a Hudson build, please contact the QE team.
Releasing the Staging Repository
If the release has been verified successfully, select the checkbox for the repository and click the "Release" button. The artifacts will be moved to the releases repository, and the staging repository will be deleted. Please be patient as it may take several minutes for Nexus to move the artifacts from the staging repository to the release repository.
Comments