Skip navigation
1 4 5 6 7 8 9 Previous Next

JBoss Tools

121 posts

jbosstools_as7_logo.png

3.3 M2 (Rabbit Chaser)

[Download] [Update Site] [What's New] [Forums] [JIRA] [Twitter]


We've worked around the speed bumps I talked about last time, and can now announce the release of JBoss Tools 3.3 M2, the first milestone that will work with Eclipse 3.7 "Indigo" and the just released JBoss "White Rabbit" AS 7 CR 1.


Note: Since this blog was written, AS 7 Final was released and is now available and works with JBoss Tools 3.3 M2 and higher!


JBoss Tools is a set of plugins for Eclipse that complements, enhances and goes beyond the support that exist for JBoss and related technologies in the default Eclipse distribution, in this release we are especially moving the AS 7 and CDI/Solder integration forward.

Installation


First off, go download & Install Eclipse 3.7 (Indigo) JEE bundle - you can use some of the other bundles too, but with the JEE bundle you save bandwidth and you'll have less problems getting the right dependencies.


Once you have installed Eclipse, you use our update site directly.


The updatesite URL to use from Help > Install New Software... is:


http://download.jboss.org/jbosstools/updates/development/indigo/


Important: If you are running on recent released Linux distributions or 64-bit distributions you might be bumping into an Eclipse 3.7 regression bug that prevents the visual page editor to load and result in a hard crash of the visual VM. To avoid this problem you can run eclipse with a property to disable the visual page editor.


eclipse -vmargs -Dorg.jboss.tools.vpe.loadxulrunner=false


Alternatively you can try using

http://anonsvn.jboss.org/repos/jbosstools/workspace/snjeza/swt.xulrunner.patch

as updatesite to install temporary SWT patch that works similar to the planned Eclipse 3.7.1 patch.


Where are my SOA Tools ?

We are working on splitting out the SOA functionality (Teiid, Modeshape, Drools and jbpm) from the core distribution since the SOA tooling historically are not following the same release cycle of the core and thus at times it is beneficial that they can release their final version a bit delayed from the core. That means that for this milestone the main updatesite does not contain SOA tools but will for now be on a separate updatesite.


JBoss Tools - SOA Tooling updatesite:


http://download.jboss.org/jbosstools/updates/development/indigo/soa-tooling/


The final layout and distribution mechanisms might change as we collect feedback, but for now SOA is separate from the core.


JBoss Application Server 7

This morning JBoss AS 7 CR1 was released and JBoss Tools are ready to support it. The best way I can imagine showing what this means is by giving you this very short screencast showing how easy and fast AS 7 is and how easy it is to use when using from JBoss Tools.


Another additional new feature for this release is the option named "Do not exectue startup or shutdown commands".


dont-execute-start-command.png

This option allows you to start and stop your server outside of Eclipse but still be able to use the deployment, debugger and Run As.. features.

Ideal for when you want to run your own custom startup scripts and maybe even more interesting for remote servers where the server might be started/stopped by service scripts instad.


JAX-RS

Xavier Coulon contributed JAX-RS standard tooling to JBoss Tools shortly after M1 and I'm now very proud to include it in this milestone.

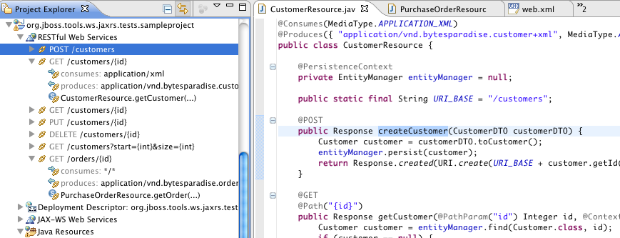
Xavier will be blogging about this shortly but in short it provides a explorer to navigate your JAX-RS resources and it comes with basic validation and code completion related to JAX-RS.


jaxrs_explorer.png


The tooling will evolve more over the upcoming milestones/betas; if you have input/questions we are very interested in hearing about it.

Context & Dependency Injection (CDI)

For this release the Seam Solder support is more complete by adding support for @Generic beans which is used by most Seam 3 and many CDI extensions out there to customize their framework CDI integration. This allows JBoss Tools to be more precise in its validation but also to provide better and improved content assist and navigation for CDI components.


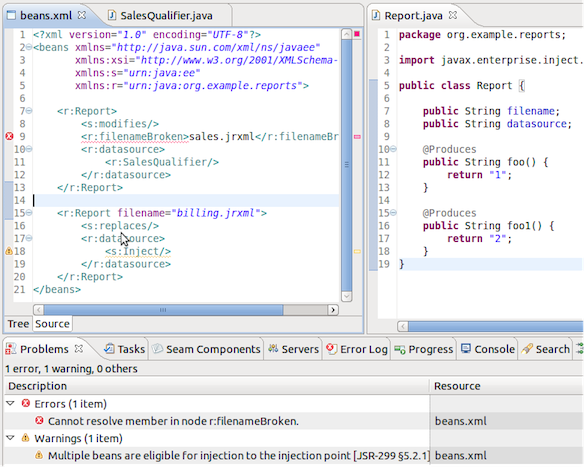
Other extensions like Seam Config also got improvements and we now provide better validation of the Java backed schemas in the XML file format for CDI.


seam_config_validation.png

Maven & AS 7 Quick Starts

With the release of Maven Integration For WTP (org.maven.ide.eclipse.wtp) 0.13 a few days ago Maven works even better now together with Eclipse WTP projects - in particular, there are fixes concerning having manifest and other descriptors generated by Maven according to pom.xml and  much better handling of classpath which make this a huge improvement over previous versions.


On top of these enhancements we've added further automatic configuration of your projects based on your pom.xml and its dependencies making it super easy to import existing Maven projects using technologies like JSF, CDI and Hibernate.


This all is coming together with the AS 7 CR 1 release which comes with a set of Quickstarts and archetypes.

Both the quickstarts and archetypes will automatically get configured when you import them to have all the JBoss Tools enhancements ready for you to use.


Give them a try.


And more...

There are a bunch of other improvements in this release and you can see descriptions and screenshots in What's New


Over the next few days/weeks we will be blogging more about the new features and usecases this release of JBoss Tools and AS 7 enables.


Feedback

As always we crave for any feedback you can give, especially if you have a project that causes performance issues or wrong validations. We've done a lot of work testing but we are sure we haven't covered all possible combinations - if you find something we missed let us know!


Thanks, and now go chase that White Rabbit! with JBoss Tools!


Have fun!

Embracing Indigo

So, Eclipse 3.7 a.k.a. Indigo has been released. This year, 62 Eclipse projects were  made available on the same day. Part of the release train is M2E 1.0.0, which succesfully graduated from the Eclipse incubator. Congrats to all the teams involved!


m2e-wtp 0.13.0 is finally available as well. Last minute bugs prevented an earlier release and made our lives a bit difficult, but thanks to Igor Fedorenko, we made it. As you will discover, the WTP integration with Maven is thighter than ever! The complete release notes are available here, but let's take a quick look at what's new and noteworthy :


Discovery / installation

Once m2e is installed, there are several ways to install m2e-wtp. First you need to wipe the m2eclipse-extras update site from your memory (and eclipse), it only contains m2e 0.12.0 compatible plugins :


IMPORTANT UPDATE : m2e-wtp has been temporarily removed from the m2e marketplace (http://dev.eclipse.org/mhonarc/lists/m2e-users/msg00938.html). Please consider option #3 while we're working on fixing the problem.


IMPORTANT UPDATE (02/08/2011) :the m2e marketplace issue is fixed with m2e-wtp 0.13.1 : http://community.jboss.org/en/tools/blog/2011/08/01/m2eclipse-wtp-0131-back-to-the-m2e-marketplace


1) Import existing Java EE projects into the workspace; You'll be proposed to install the m2e-wtp plugin :


m2e-wtp-discovery.jpg

click on Finish and the installation will proceed. Your projects will be imported but the workspace will have to be restarted.


2) Go to Window > Preferences > Maven > Discovery and click on "Open catalog". Select m2e and proceed with the installation.


3) Old school installation : Use this update site : https://repository.sonatype.org/content/sites/forge-sites/m2eclipse-wtp/0.13.0/S/0.13.0.20110623-0455/ 


IMPORTANT UPDATE 2 : m2e-wtp 0.13.1 is available from a new update site url (http://download.jboss.org/jbosstools/updates/m2eclipse-wtp/).


Experimental war overlay support

Finally, after all these years, m2e-wtp offers support for maven war overlays. The idea is to share common resources between several web applications. One use case could be to easily share logos, style sheets etc... in a corporate environment. All you need to do is declare in your web application pom.xml a dependency to another war artifact.


<project xmlns="http://maven.apache.org/POM/4.0.0" xmlns:xsi="http://www.w3.org/2001/XMLSchema-instance"
    xsi:schemaLocation="http://maven.apache.org/POM/4.0.0 http://maven.apache.org/xsd/maven-4.0.0.xsd">
    <modelVersion>4.0.0</modelVersion>
    <groupId>foo.bar</groupId>
    <artifactId>war</artifactId>
    <version>0.0.1-SNAPSHOT</version>
    <packaging>war</packaging>
    <dependencies>
        <dependency>
            <groupId>foo.bar</groupId>
            <artifactId>overlaid</artifactId>
            <version>0.0.1-SNAPSHOT</version>
            <type>war</type>
        </dependency>
    </dependencies>
</project>


By default, all the contents of the overlaid artifact will be copied to the deployment directory of the web application, minus the MANIFEST.MF. The resources of the web application take precedence, in case of duplicate files.

If your project depends on a war archive (from your local repository), that dependency will be unzipped under target/m2e-wtp/overlays/<dependency>/ before being deployed to your server, according to the overlay configuration (you can select what files are included/excluded). For instance :


<plugin>
    <groupId>org.apache.maven.plugins</groupId>
    <artifactId>maven-war-plugin</artifactId>
    <version>2.1.1</version>
        <configuration>
            <overlays>
               <overlay>
                  <groupId>foo.bar</groupId>
                  <artifactId>overlaid</artifactId>
                   <excludes>
                       <exclude>WEB-INF/lib/*</exclude>
                    </excludes>
                 </overlay>
            </overlays>
    </configuration>
</plugin>


... won't deploy the jars from overlaid (project or archive)/WEB-INF/lib


If the dependency is another web project in your workspace, the deployed resources will be dynamically determined from the overlay configuration and any file changed in the overlaid project will be automatically redeployed to the target server.


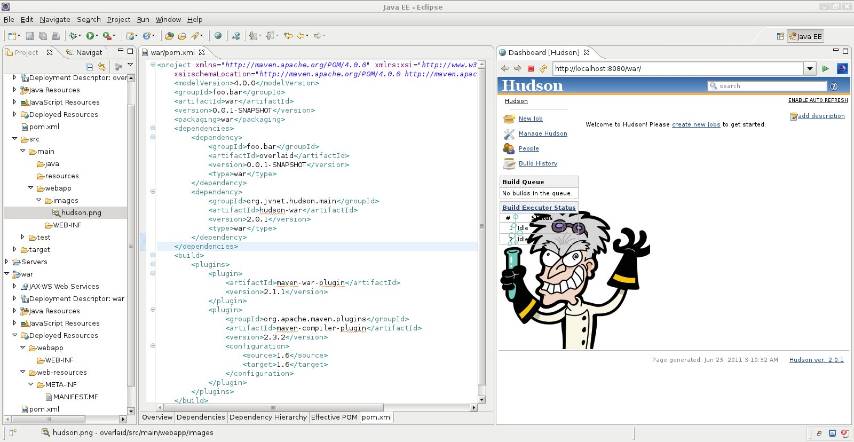
Below is an example where the "war" project depends on an "overlaid" war project and hudson-war-2.0.1.war(before you asked, it's because this one is available in central). The images/hudson.png file is present in both overlay artifacts. The file is picked from "overlaid", since it's declared first in the pom. The deployed "war" project is a fully fledged CI server

war-overlay.jpg

As of now, unsupported features of war overlays are :

- filtering

- exclusions of resources from the main project (defined as <overlay></overlay>)


There's plenty of room for performance optimizations, and it still needs to be tested "on the field" so please, please, do not consider this feature as production ready, it's still experimental.


Also note that the WTP overlay metadata format (in .settings/org.eclipse.wst.common.component) has changed and is incompatible with older development builds of m2e-wtp 0.13.0. So if you used previous nightly builds, you should reimport your projects without their eclipse metadata (.project, .classpath, .settings/)


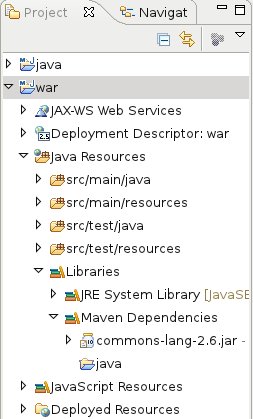
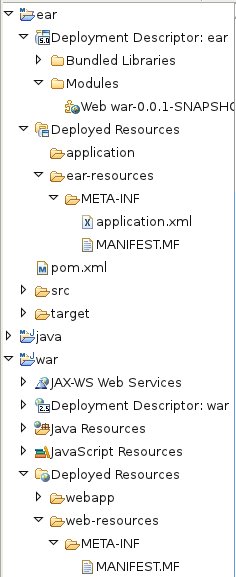
Removal of WTP classpath libraries

classpath-containers.jpg


Since its infancy, m2e-wtp suffered from outstanding classpath resolution issues when unit tests were being run. It turned out some dependencies were being leaked by the WebApp and EAR classpath libraries, installed by default on Java EE projects. Having these libraries also required extra code complexity to move workspace dependencies from one library to the other. In m2e-wtp 0.13.0, a rather radical solution was taken : remove these WTP libraries after they're being automatically added by WTP. Guess what? it solved all the classpath issues occurring during tests and simplified the code. So from now on, you will just see the following libraries in the project explorer


:


'Deployed Resources' node in the Project View

deployed-folders.jpg

Previous m2-wtp versions displayed a Web Resources node, for Web projects, or Application Resources for EARs, in the Project View. These nodes aggregate the content that must be deployed on the server / packaged in the final archive. A Web Resources node is already provided by JBoss Tools for projects having the JSF Facet installed. So, in order to avoid confusion, the nodes contributed by m2e-wtp have been renamed more appropriately to Deployed Resources :


Maven-generated MANIFEST.MF

Up until now, in m2e-wtp, the manifest was generated "manually" using WTP's API, for web projects only. In the process, the man

ifest kinda fixed some maven shortcomings in order to handle skinny wars (didn't add a classpath prefix for EJBs, contrary to maven). Now, for Web, EAR, EJB, Utility and Connector projects, the manifest is generated via a call to the Maven's archiver.

That means no more impedance mismatch between Maven and Eclipse manifests. Manifest customization is reflected on the fly in the generated file.

For jar, ejb and connector projects, it is generated under target/classes. For web projects, it goes under

target/m2e-wtp/web-resources/ and for EARs, goes under target/m2e-wtp/ear-resources/

manifest-support.jpg

Since the EAR library is gone, the manifest is no longer used to reflect compile classpath within Eclipse and is only used for runtime classpath resolution.

Since it now follows the same rules as Maven, how do you handle skinny wars with EJBs and classpath prefix? One solution is to use your own Class-Path entry, which will be appended with the classpath computed by the maven archiver. So, for instance :


<plugin>
    <groupId>org.apache.maven.plugins</groupId>
    <artifactId>maven-war-plugin</artifactId>
    <version>2.1.1</version>
      <configuration>
        <warSourceExcludes>WEB-INF/lib/*.jar</warSourceExcludes>
        <archive>
            <manifest>
                <addClasspath>true</addClasspath>
                <classpathPrefix>lib/</classpathPrefix>
            </manifest>
            <manifestEntries>
                <Class-Path>sample-ejb-${pom.version}.jar</Class-Path>
            </manifestEntries>
        </archive>
    </configuration>
</plugin>

will generate something like :


Manifest-Version: 1.0
Built-By: fbricon
Build-Jdk: 1.6.0_24
Class-Path: sample-ejb-0.0.1-SNAPSHOT.jar lib/sample-util-0.0.1-SNAPSH
OT.jar
Created-By: Maven Integration for Eclipse


Of course, the "Created-By: Maven Integration for Eclipse" entry can be overwritten using your own value :


<manifestEntries>
  <Created-By>My kick-ass IDE</Created-By>
 </manifestEntries>


Finally, we tried to delete all MANIFESTS.MFs automatically generated by WTP. So hopefully, your source control shouldn't be polluted anymore.


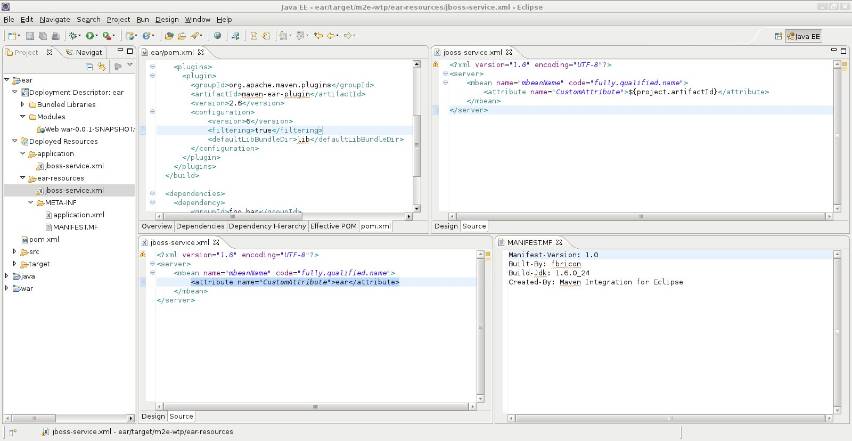
Support for EAR Resource filtering

m2e-wtp now supports EAR resource filtering, pretty much the same way Web projects do. Just add the filtering attribute to your maven-ear-plugin configuration :


<plugins>
  <plugin>
    <groupId>org.apache.maven.plugins</groupId>
    <artifactId>maven-ear-plugin</artifactId>
    <version>2.6</version>
    <configuration>
        <filtering>true</filtering>
        ...
    </configuration>
  </plugin>
</plugins>


Filtered resources are generated under target/m2e-wtp/ear-resources/

ear-filtering.jpg

Dropped support for Eclipse 3.5 and older versions

In order to support war overlays, m2e-wtp 0.13.0 is taking advantage of several APIs that were made available in Eclipse 3.6 ( Helios). The direct consequence is it's not longer compatible with Eclipse 3.5 (Galileo) based platforms and of course older versions. However it's been tested against Eclipse 3.6 and 3.7 on the continuous integration server at JBoss.


Now, what next?

Well, we're gonna see how the overlay support stands in the wild. If necessary, one or more 0.13.x bugfixes can be made available "quickly". One of the problem that delayed this release is a conflict between m2e-wtp and the pom properties configurator. This lead us to remove the latter from m2e marketplace catalog to avoid confusion. I hope we can find a solution quickly in order to restore that plugin in the marketplace.

Next version (0.14.) should include Dali support, Application Client packaging support, bug fixes and more...

As always, if you find any issue or would like to see new useful features in m2e-wtp, please open a ticket at https://issues.sonatype.org/browse/MECLIPSEWTP


Enjoy,


Fred.

https://twitter.com/#!/fbricon


PS: Again, special kudos to Igor Fedorenko who supported me during this not-so-trivial release.

Update: JBoss Tools 3.3 M2 have been released that targets/supports Eclipse 3.7 making this blog out-of-date!

In about 24 hours or so Eclipse Indigo are going to push out their Indigo release train and its many users will bring all the Eclipse mirrors to a halt for the coming days.


The yearly release of Eclipse always generates alot of questions concerning if JBoss Tools will run on the latest and greatest version just released and i'm writing this blog so those that go look will have an answer.


The short answer is that you can use JBoss Tools 3.3.0.M1 release with Eclipse 3.7M6, last minute API changes makes it so you will see errors

if you try run M1 on Eclipse 3.7 final. If you really really want to to use Eclipse 3.7 final you can use our nightly build updatesite on your own risk but I do recommend you wait until we have JBoss Tools 3.3.0.M2.


We were planning on releasing on the same date as Indigo, but we have hit a few speedbumps on the last weeks of release lockdown making it so we will miss the Indigo release train.


The speed bumps is the release of JBoss AS 7 release candidate to be sure our new AS 7 Server adapter integration will work smoothly and we needed to implement a workaround for a hard-to-track regression issue with Eclipse SWT and XulRunner which causes crashes on newer Linux distributions.


We expect to have these fixed this week and expect to release JBoss Tools 3.3.0.M2 shortly there after.


I'll update this blog when release details becomes available.


Have fun!

Eclipse 3.7 is coming out soon and we are happy to deliver the first milestone of JBoss Tools targeting the upcoming Eclipse Indigo release.


http://in.relation.to/service/File/10824

3.3.0.M1 (Forge On!)

[Download] [Update Site]  [What's New] [Movies] [Documentation (not updated yet)]  [Forums]  [JIRA] [Twitter]


This is a development release in its true form which requires Eclipse 3.7 M6 to run.


If you use Eclipse 3.7 M7 things will install, but there have been API changes between M6 and M7 so please follow the installation instructions below very carefully to avoid problems.

Installation

Read this very carefully - if you don't follow this you *will* have problems running this milestone since Eclipse 3.7 M7 is not compatible with Eclipse 3.7 M6.


  1. Download & Install Eclipse 3.7 M6a (Indigo) JEE bundle.
  2. Run and add this URL to Eclipse's list of available update sites:
    http://download.jboss.org/jbosstools/updates/development/indigo
  3. Disable all other URL's except that URL and this
    http://download.jboss.org/jbosstools/updates/indigo/M6/
  4. Now go and install the JBoss Tools components you want from the JBoss Tools updatesite


Step #3 is the important one - this prevents P2 from overriding your M6 installation with M7 updates.


This Jira explains the details for this with screenshots if the above text is causing problems.


New & Noteworthy

The biggest change is for this release is definitely the Eclipse 3.7 compatiblity but besides that and a bunch of bugfixes and minor improvements we have more than a few exciting new features in this release.


JBoss AS 7


This release introduces a server adapter which allows you to start/stop/debug and deploy applications to JBoss AS 7 via the file system.


If you haven't tried out JBoss AS 7 now is the time - it starts a in approximate 3 seconds; it's like night and day compared to previous AS versions.


CDI/Seam Solder

The CDI tools have added additional features and bugfixes, but most importantly we now support components based of Seam Solder allowing us to pickup and identify CDI and Seam 3 components that uses the Seam Solder extensions. i.e. we will now honor the Seam Solder annotation @Veto to ignore otherwise valid CDI components.  The full list of supported annotations from Seam Solder so far is:


  • @Veto
    @Requires
    @Exact
    @MessageLogger
    @MessageBundle
    @DefaultBean
    @Unwraps
    @ServiceHandlerType
    @FullyQualified
    @Resource


In addition to support Seam Solder annotations we also support components defined in Seam Config providng an Seam Config aware XML editor and pickup components defined and configured via XML in additon to annotations.


Forge Tools

Our Forge Tools which are integrating Seam Forge into the Eclipse IDE is now bundled in JBoss Tools and allows you to use Seam Forge out of the box from inside Eclipse.


Seam Forge is core framework for rapid-application development in a standards-based environment; it provides a command line style shell for rapid scaffolding style development. The special thing about Seam Forge is that the motivation behind it is to support standards such as Java EE, CDI and JPA in addition to common defacto technologies such as git and maven.


In its current release it allows you to easily create CDI based applications based on scaffolding principles as known

from tools like seam-gen, ruby-on-rails, grails etc.


This first release of Forge Tools are focusing on bringing the command shell experience directly available in Eclipse as a console so you can

interact directly with Forge meaning you can execute and run Forge commands directly from IDE and as an extra nice bonus it imports and open projects you have created via the shell. It allows you to use the power of command line shell's together with the visual and integrated developer environment.


Koen made a very nice video of all this in play which I've embedded here below. You can see the details of what is shown in the

demo on his blog.


Maven


What you might not notice in this demo is that it is using m2e/wtp and the JBoss Tools specific m2e configurators behind the scenes to

automatically have the related plugins for the project automatically configured based on the Maven metadata instead of you having to manually configure and setup the tools.


In upcoming releases of JBoss Tools you will see even tighter integration with Seam Forge and with Maven to make you even more productive in working with JEE 6 based technologies.

...and more

The new and noteworthy provides a short overview with screenshots of the various improvements made in JBoss Tools extensive plugin set.

Next Steps

This release is mostly to get feedback on any issues found in Eclipse 3.7, and to introduce some of work that we are doing to provide a faster and more developer friendly developer environment than ever before - this includes Forge Tools and AS 7 for now but we will also focus on making tools such as Maven easier and faster to use.


We've already contributed several patches to m2e which makes it up to 5 times faster in importing and updating project configuration - these improvements will be available soon from our nightly build site if you can't wait


JBoss Tools 3.3 will also continue to make it easier to configure and install JBoss and other runtimes and frameworks to allow you as developer to focus on the code instead of the configuration - at least upfront.


We also have a few other ideas, but we'll save that for some future blogs


Do remember though that we really appreciate feedback on wether the functionallity is helping you, if it is going in the right direction and if you have ideas for improvements or even patches.


We are listing and reacting in both forums, jira, twitter and irc.


Enjoy this milestone - remember to read the installation instructions careful! and...


Have Fun!

As I reported earlier I am currently working on the integration of Forge in JBoss Tools. Lincoln's excellent screencast inspired me to write up a tutorial that shows how his work looks in the context of JBoss Tools. For the people that are too busy to read through the entire post and prefer to watch a movie, I have recorded a short version. In true Hollywood style, this is basically a remake of Lincoln's version. We will create, deploy and debug a simple JEE web application on JBoss AS but this time using JBoss Tools.


Now for the brave among you. Let's see the detailed steps on how to do this yourself...

Setting Up

If you want to try out the different steps in this article the first piece of software you will need to install is JBoss AS. I recommend to download AS 6 Final and extract it into your place of choice.


The other item that you need is JBoss Tools. We are going to live on the bleeding edge and use a nightly build of JBoss Tools 3.3 which embeds a snapshot of the Forge runtime. A word of warning is in its place here: as usual when using nightlies and alpha software it is very well possible that things are broken. If this would happen please don't get frustrated and try again some time later. Or even better, report the issue on the JBoss Tools Forum or on the Forge mailing list (forge-users@lists.jboss.org).


I assume, dear reader, that you are hardcore enough not to be scared away by these minor inconveniences and are ready to download the Indigo M6 release of the Eclipse IDE for Java EE Developers. Extract the archive into your place of choice and fire up the Eclipse IDE. The screenshot below shows you what the installation folder looks like on my machine.
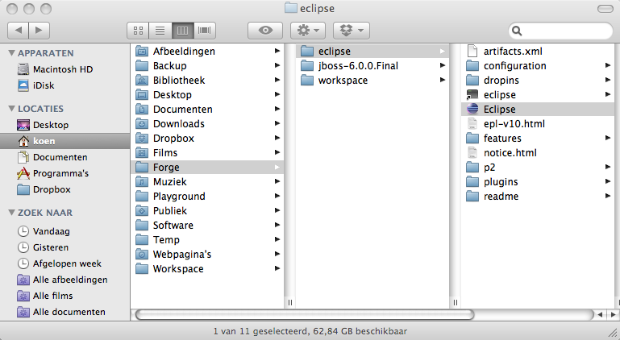
installation_layout.png

When this is done let's go ahead and install the appropriate elements of JBoss Tools. To do this, we select Help->Install New Software. To avoid clashes between the JBoss Tools and Eclipse Indigo update sites we have to disable the latter. Click on the Available Software Sites link and uncheck the Indigo entry.

available_software_sites.png

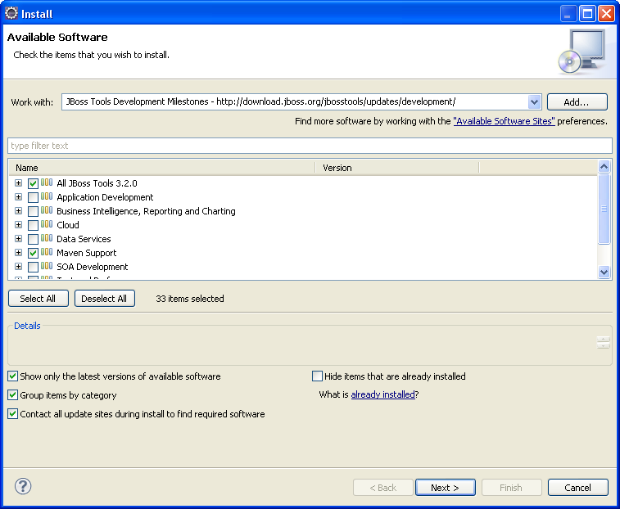
After this, we enter the address of the JBoss Tools nightly update site in the Work with: text field. In the resulting list of available software elements we select Maven Support and Web and Java EE Development. This is illustrated in the screenshot below.
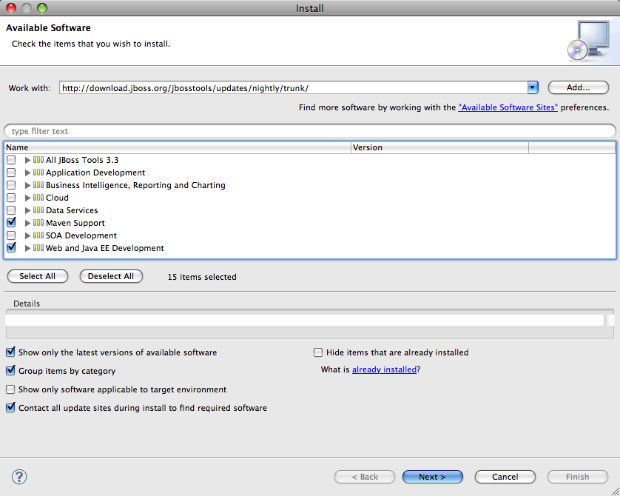
install_jboss_tools.png

The rest of this installation is pretty straightforward. We press Next> and wait until all the needed dependencies have been calculated. Then we press Next> again on the Installation Details page, we accept the license agreements on the Review Licenses page and press Finish to launch the process that will download the required packages. We press OK when the security warning appears and Restart Now when prompted.


Now we are ready for the next step which will be to configure and start the application server.


Configuring the Application Server

In order to debug a webapp in our running server we need to make JBoss Tools aware of the server. The first step to do this is bring up the context menu in the Servers view and select New->Server.

new_server.pngThe New Server wizard opens. On the first page of this wizard we select JBoss Community->JBoss AS 6.0 as the server type and push the Next> button. The only thing we still need to do is specify the folder where we extracted the previously downloaded JBoss AS 6 archive in the Home Directory text field. The situation on my machine is illustrated in the screenshot below.
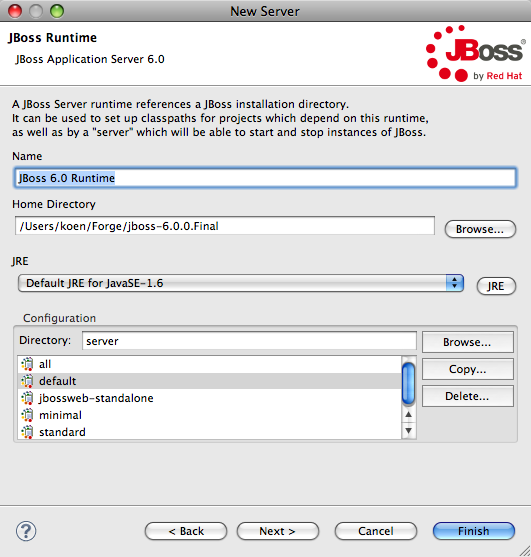
JBoss_Runtime.png

We leave all the default settings and push the Finish button to close the wizard. The newly configured server shows up in the Servers view. The only thing that we still need to do is launch it by selecting this new server, bringing up the context menu. Since we want to debug our application we will select Debug to launch it in debug mode.

debug_server.png

The Console view opens and shows the console messages generated by the starting application server. After some time our server is up and running and we are ready to roll.


First Forge Steps

Until now we haven't seen any sign of our beloved Forge project. Let's change that and open up the Forge console by selecting Window->Show View->Other... and then Forge->Forge Console as illustrated above. The Forge Console view opens. An image of that is shown below.

start_forge.png

As you can see there are two buttons in the top left corner of this view as well as a drop down menu with two entries to start and stop our Forge runtime. Go ahead and select either the green arrow or the 'Start Forge' entry from the menu. After some time the Forge start banner should appear and Forge is prompting for input. Entering the pwd command should indicate the path to your current workspace.

forge_banner.png

It can sometimes be unclear to a beginning user as to what commands you can issue at a particular moment when working with Forge. Luckily there are a number of tools at your disposal that can help at this point. Typing a tab character can help you at any time. When you do this at an empty prompt Forge will give you a list of commands that can be used at that particular scope. Below you see the list that is produced when we type a tab character at this time.

tab_character.png

You can also use the tab character when in the middle of typing a command. When there are multiple choices Forge will list all the possibilities but when there is only one possibility Forge will complete your command. Furthermore, as you can see, there is the list-commands command. This will print the commands applicable in the current scope listed by category. If you use this command with the --all option, it will list all the possible commands disregarding the current scope. The ones that are applicable in the current scope are marked with an asterisk.
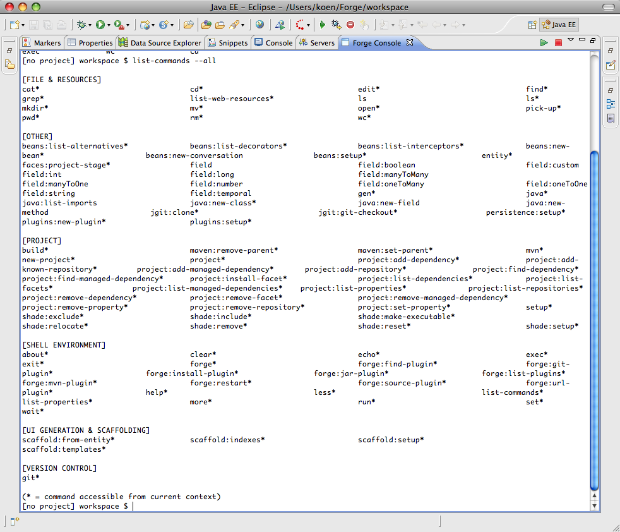
list_commands_all.png

Before we start the interesting work, it is worth mentioning one last thing. The Forge runtime that we are currently working with is embedded in JBoss Tools. Currently this is a snapshot build that removes some of the issues that were present in the 1.0.0.Alpha3 release. Of course it is probable that at one time you will want to change the provided runtime. You can do so by opening the Installed Forge Runtimes preferences page. On this page you can add new runtimes and select the one that you want to use.
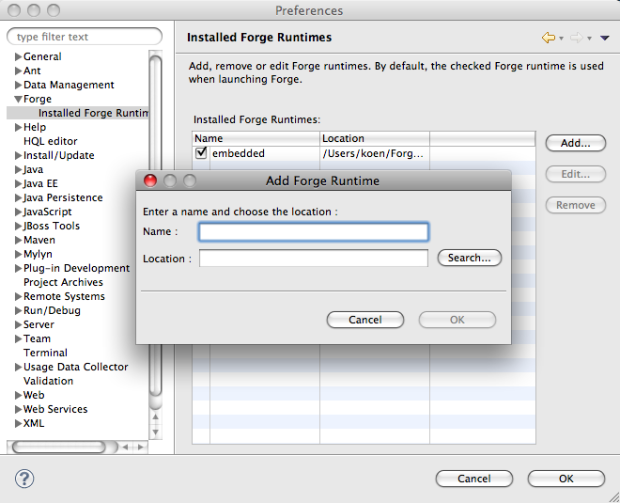
forge_preferences.png

Now that we have covered the basics, it is time for some real work. Let's create an example project.


Creating the Example Project

Surprisingly enough or not, to create a new project, you need to use the new-project command. This command has two important parameters: the name of the project itself and the fully qualified name of the top level package. Using the tab character is really convenient as you will quickly learn when using Forge for a while as it reduces the long command illustrated below to just a few key presses. Of course you will still have to write the respective names.

new_project.png

We accept the default project directory that Forge presents us by pressing enter once again. At this time the Forge runtime starts off creating a project with a typical Maven layout. When this is done JBoss Tools will automatically import this newly created project into the current workspace. The result is shown in the screenshot below.
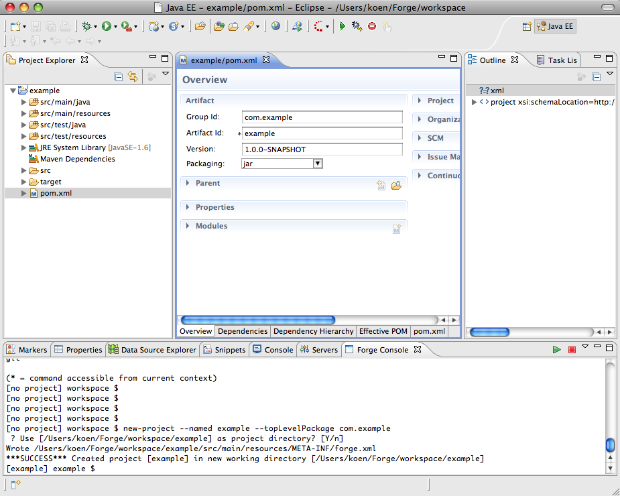
after_project_import.png

As you can see, this went really very smoothly. But let's make it even more interesting by creating an entity.


Adding the Customer Entity

Adding an entity is done using the entity command. At this time, in the current scope, the 'entity' command is not enabled. We first have to setup the persistence. This is done using the persistence setup command. We will need to specify the JPA provider for which we choose Hibernate and the target container which will be JBoss AS 6. The full command to issue is persistence setup --provider HIBERNATE --container JBOSS_AS6.

persistence_setup.pngAs you can see we have the opportunity to accept support for the extended APIs which we will do. When prompted we select version 3.6.4.Final of Hibernate. As shown below, an editor opens and shows the generated persistence.xml file.
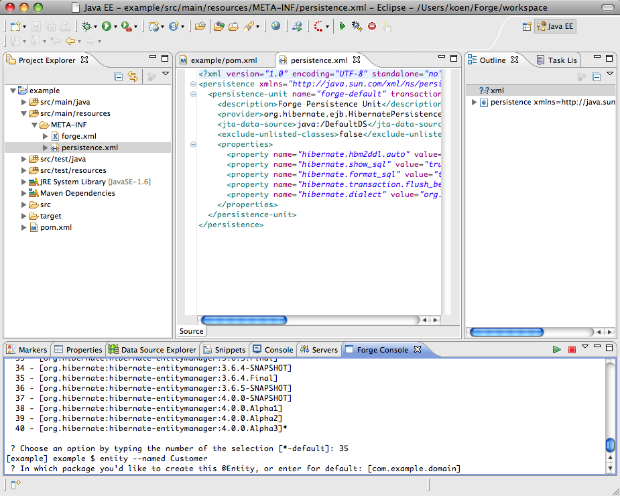
entity_command.png

Now the we can create entities. As shown above we issue the following command entity --named Customer. We will be lazy again and accept the proposed default package. This time the java editor opens on the generated Customer.java file.
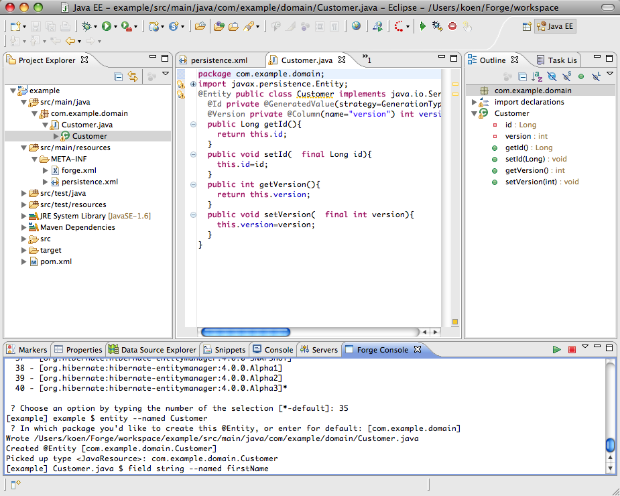
field_command.png

Next we will create two fields in our Customer class. One for the first name and one for the last name of the customer. The two commands to be issued are field string --named firstName and field string --named lastName. Observe how the newly created fields get selected in the editor and the outline view.
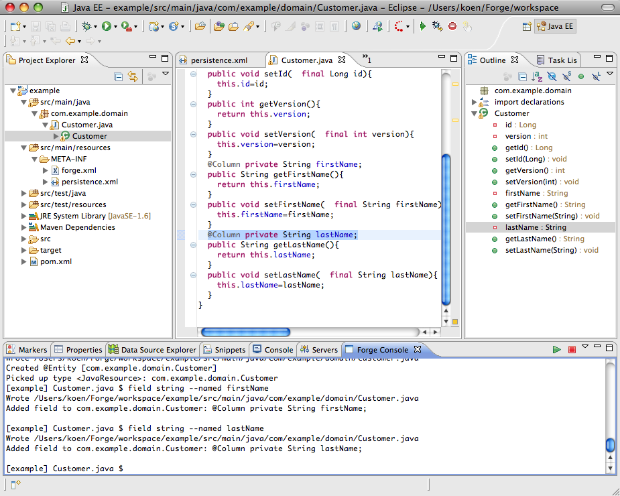
after_adding_fields.png

Now that we have our Customer class, let's develop the user interface. We want to make use of PrettyFaces to provide us with pretty URLs. Fortunately for us, there is a Forge plugin for PrettyFaces that we can use. As a bonus it will enable us to show how to install additional plugins into Forge.


Adding the PrettyFaces Plugin

The commands available in Forge are provided by plugins. The Forge runtime embedded in JBoss Tools comes with a number of standard plugins that provide us with the commands that were shown earlier when we tried the list-commands --all command. The prettyfaces setup command which we need to use if we want to enable PrettyFaces in our example project is not one of those standard commands. Luckily the list of Forge commands is extensible. To do so we can install plugins with the forge command. There are a number of different ways to install those plugins such as providing a jar file or a Maven identifier. We are going to install our PrettyFaces plugin using git. As shown below we issue the forge git-plugin git://github.com/ocpsoft/prettyfaces-forge-plugin.git command.

install_prettyfaces.png

Forge will start by checking out the plugin source code into a temporary folder, launch Maven on the checked out code to build the plugin and then install the plugin in the ~/.forge folder. It will then restart Forge so that the new plugin is available.

prettyfaces_installed.png

Now that our prettyfaces plugin is installed, we can start using it.


PrettyFaces in the Example Project

We start of where we left earlier and setup PrettyFaces for our example project by issuing the command prettyfaces setup. Forge will ask us if it's OK to change the packaging from 'jar' to 'war', which we accept.

prettyfaces_setup.png

After that we need to choose the technology to use for our application. We choose Java EE 6 and Servlet >= 3.0.

prettyfaces_technology.png

The last thing Forge asks from us is to choose the version of PrettyFaces that we want to use. We choose version 3.2.1. The pretty-config.xml file opens in an xml editor. Also notice how the layout of the project changes. This is because setting up PrettyFaces has changed our packaging from 'jar' to 'war'. The Eclipse Maven integration picks this up and the Forge Tools automatically update the project configuration accordingly.
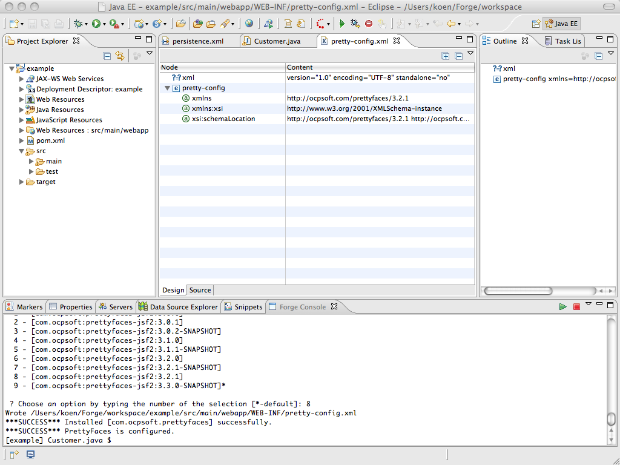
prettyfaces_installed.png

Now we are sure we will be able to create pretty urls and we are ready to scaffold our Customer application.


Scaffolding the Example Application

The first thing to do is setup scaffolding. We issue the scaffold setup command and accept the default for the scaffold type and instruct Forge to install the scaffold provider for our project.

scaffold_setup.png

We install version 1.15 of Metawidget and version 3.0.0.Final of Seam Persistence.

scaffold_versions.png

We accept the index.html file to be overwritten and choose to generate a pretty URL ('/') for the combination of the index.xhtml resource and the /index.jsf URL.
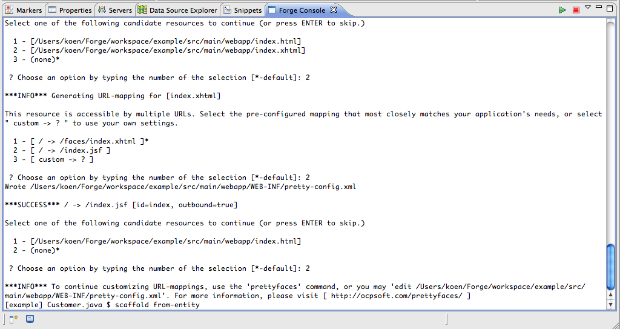
scaffold_index.png

Now we need to scaffold the user interface for the Customer entity. We can do this by issuing the scaffold from-entity command. We again accept the default for the scaffold type and then generate the following URL combinations:

  • /customer/view -> /faces/scaffold/customer/view.xhtml for the view.xhtml resource.
  • /customer/create -> /faces/scaffold/customer/create.xhtml for the create.xhtml resource
  • /customer/list -> /faces/scaffold/customer/list.xhtml for the list.xhtml resource

The process is illustrated below for the first one of these.
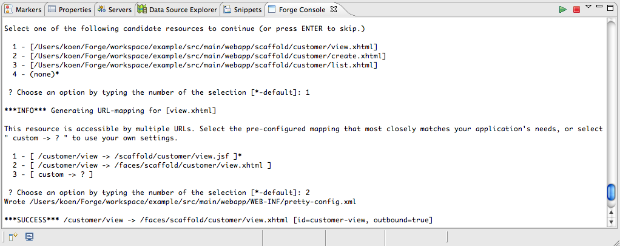
scaffold_from_entity.png

After this, we can proceed by building and deploying our application.


Building and Deploying

Building the application is only a matter of entering the build command. This will invoke Maven and build the project.
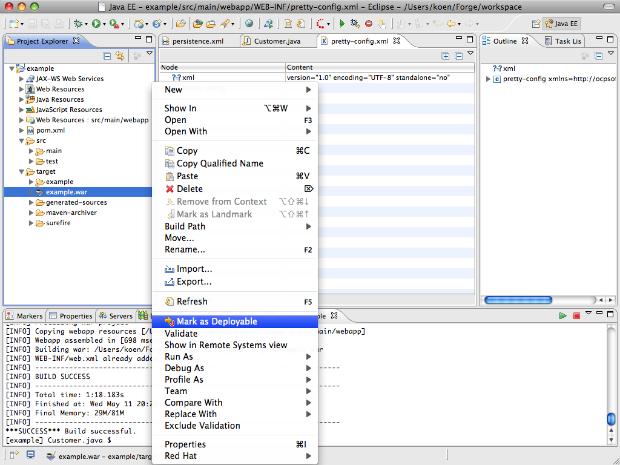
mark_as_deployable.png

When the build is finished, we navigate to the created example.war artefact in the target folder, bring up the context menu on this file and select Mark as Deployable. After that, we bring up the context menu a second time on this file and select Debug As->Debug on Server.

debug_on_server.png

The Debug on Server wizard pops up. We select our JBoss AS 6 Runtime Server that we configured in the beginning and push the Finish button. The Eclipse console view should appear, showing the activity of the server while it is deploying our application.

When deployment is finished, we are ready to see how debugging works.


Debugging the Application

Let's put a breakpoint setLastName method of our Customer class.

breakpoint.png

Next we open the Eclipse browser window by clicking the globe icon in the toolbar and enter the URL of our application: http://localhost:8080/example/customer/list.
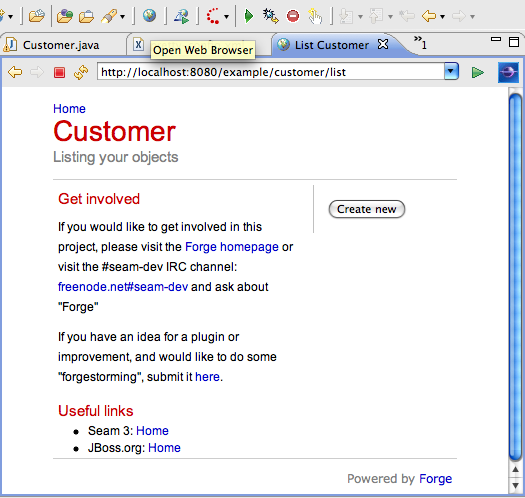
webbrowser.png

As expected there are no customers in our database. Let's change this by pushing the Create new button. On the next screen we enter the first and last names of our first customer and press Create.
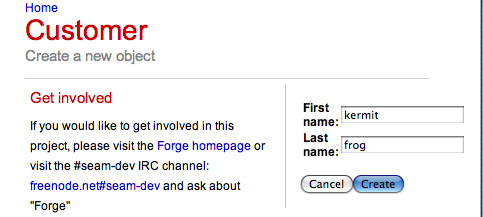
kermit_frog.png

We are prompted by Eclipse to change to the Debug perspective and as expected, our application is halted on the breakpoint tht we set a moment ago.

debug.png

Now we can do all the things developers do while debugging applications. I encourage you to remove the breakpoint and push the Resume button (or F8) to continue the application, play around and see how Forge created a basic CRUD user interface for our Customer entity. For me the time has come to finish this long article and come to a conclusion.


Conclusion

In this article I have tried to illustrate how easy it is to get started with Forge to create, deploy and debug a JEE application. Also, I have tried to show you how developers can benefit greatly of the combined power of a command line oriented interface that is integrated in a full featured IDE. As you have seen, the IDE can provide immediate feedback of what happened by issuing the commands at the command line in the Forge Console view.

Finally, I would encourage you to test drive Forge and its JBoss Tools integration and provide us with all you feedback. For that you can use the Forge mailing list (forge-users@lists.jboss.org) as well as the JBoss Tools discussion forum. Bugs and feature requests can be filed against the Forge or the JBoss Tools issue trackers.


Happy Forging!

Koen

So, thanks to Igor Fedorenko's last efforts, m2eclipse-wtp 0.12.0 is finally out, (update site available at http://m2eclipse.sonatype.org/sites/m2e-extras), bringing the WTP integration with Maven to a whole new level. The complete release notes are available here. However, I wanted to highlight some of the most notable features in this new version, so let’s take a quick tour :

On-the-fly web resource filtering

Maven has this interesting concept of web resource filtering : basically you can add resources existing in non standard directories, into your final web application. Moreover, you can filter these resources to apply, for instance, specific application configuration depending on a maven profile : you can activate some debug options in your web.xml, define development specific parameters in your spring configuration files, use a different css color scheme when you work locally and so forth.
Supported maven web resource filtering features are :

  • inclusion/exclusion of resources
  • filtering (not activated by default)
  • target path (root of the web application by default)
  • possibility to use specific properties file filters


Here is a sample of maven-war-plugin configuration filtering any xml files under src/main/webapp, using an external filter file :


<plugin>
    <groupId>org.apache.maven.plugins</groupId>
    <artifactId>maven-war-plugin</artifactId>
    <version>2.1.1</version>
        <configuration>
            <webResources>
                <filters>
                    <filter>src/main/filters/dev.properties</filter>
                </filters>
                <resource>
                    <directory>src/main/webapp</directory>
                    <filtering>true</filtering>
                    <includes>
                        <include>**/*.xml</include>
                    </includes>
                </resource>
            </webResources>
    </configuration>
</plugin>


Note that after adding the webResource configuration to your pom.xml, you need to update the Maven project configuration.


m2eclipse-wtp 0.12.0 not only supports these features from maven, but goes one step further and brings you on-the-fly filtering : as soon as you save a file included in the <webResources> configuration from the maven-war-plugin, filtering is triggered automatically. Couple that with WTP’s hot redeployment capabilities, and you can see your changes by just reloading the affected pages in your browser.


OK, to be fair, that depends on the changed files, actually. If you change the content of your web.xml, or some spring config files, chances are you’ll have to restart your application or the server for the changes to be taken in consideration.
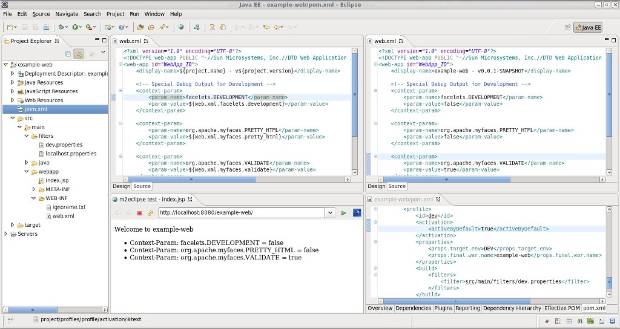
The filtered resources are  copied to the project build directory, under m2e-wtp/web-resources. You can view the content of this folder directly from the Project Explorer view in eclipse, under the Web Resources Node. You can open and compare side by side a raw file and its filtered version, as shown in the following screenshot.


web-resource-filtering-profile1.jpg

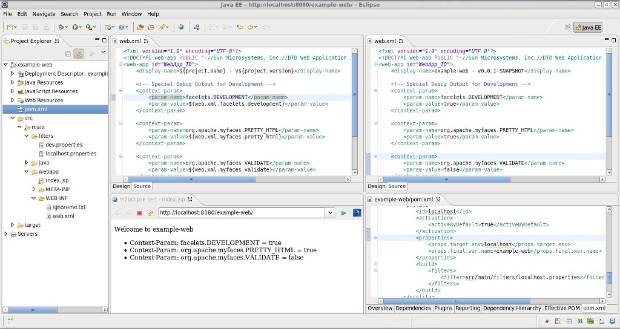
In the previous example, the dev profile, activated by default (see lower right panel) determines which filter file must be used during filtering. In this case, we want to active some debugging options. The index.jsp page, shown in the browser in the lower left panel, displays the computed values of the different context-params from web.xml.


Now after changing the active profile (due to a bug in m2e-core 0.12.0, the pom.xml needs to be saved twice for the change to be detected, but this has been fixed in m2e-core 0.13.0) and after restarting tomcat (it doesn't restart the application upon web.xml changes), you'll notice the web.xml values are updated, values are taken from another properties file.

web-resource-filtering-profile2.jpg


Context root customization

By default, the web project's context root is resolved from the <finalName> value resolved from the pom.xml. In the following example, the example-web project will be accessible at http://localhost:8080/example/, according to the finalName value  :

m2e-wtp-context-root-finalname.jpg

However, you can customize the context root used in WTP by setting a custom property in your pom.xml, for instance, if you need to use "/" as your context root, just add <m2eclipse.wtp.contextRoot> in your properties and update your maven project configuration :


<properties>
    ...
    <m2eclipse.wtp.contextRoot>/<m2eclipse.wtp.contextRoot>
    ... 
</properties>


When restarting tomcat, the context root change will be detected and tomcat will ask to update its configuration. Now the same application is accessible at http://localhost:8080/


m2e-wtp-context-root-property.jpg


Java nature no longer added to EAR projects

The java nature was wrongly added to EAR projects. This is no longer the case. Moreover, existing Java nature will be automatically removed from existing EAR projects upon update project configuration.


Generation of application.xml outside the source folders

Since m2eclipse added support for EAR projects in 0.9.8, many users complained the deployment descriptor was generated under the source folder, under version control. Since application.xml (and jboss-app.xml) can be generated by maven automatically, there is no need to pollute the source folder right? Starting from m2eclipse-wtp 0.12.0, the deployment descriptors are now generated under <build directory>/m2e-wtp/ear-resources. Similarly to the web projects, a new Application Resources node is now displayed in the Project Explorer view, showing you which EAR resources will be deployed/exported.

ear-application-resources.jpg

If, for some reason, one would still want to generate the deployment descriptors under the source folder (src/main/application by default), then you could right click on the project, open the project Properties and go to the Maven > WTP integration page. There, after enabling specific project configuration, you can choose to NOT use the build folder to generate application.xml.


m2e-wtp-project-properties.jpg


The same setting can be enabled globally for all EAR projects in the workspace by opening the Preferences > Maven > WTP Integration

m2e-wtp-preferences.jpg

After validating your choice, all EAR projects in the workspace will update their configuration, if you choose so.


Support for the no-version file name mapping in maven-ear-plugin

maven-ear-plugin 2.5 introduced a new file name mapping strategy, namely no-version, that remove the version suffix from all EAR deployed dependencies. All you need to do is add the following configuration to your  maven-ear-plugin configuration :


  <plugin>
    <groupId>org.apache.maven.plugins</groupId>
    <artifactId>maven-ear-plugin</artifactId>
    <version>2.5</version>
    <configuration>
       ...
       <fileNameMapping>no-version</fileNameMapping>
       ...
    </configuration>
  </plugin>


Then you can check in the Project Explorer view, under the Deployment Descriptor node, all dependencies' names under the Bundle Libraries and Modules are updated :

ear-noversion-filenamemapping.jpg

Increased stability

Many users, over the years, experienced random crashes during project import or configuration update, or saw test resources being deployed with their applications. All these issues could be linked to one root cause : some WTP projects were missing a crucial element : the org.eclipse.wst.common.modulecore.ModuleCoreNature nature in their .project. The root cause of this "corruption" is still unclear, this is probably caused by some race condition, but unfortunately, this has proved impossible to reproduce with test projects.

m2eclipse-wtp 0.12.0 actually workarounds this issue : if the ModuleCoreNature is missing from WTP projects, it's automagically added to fix the projects, under the hood. Hopefully, this should fix most of the crashes users occasionally experience.


Now, what next?

m2eclipse-wtp 0.12.0 is the last version supporting Eclipse 3.5 (Galileo) based platforms. Next 0.13.0 version will be aligned with the new, revamped m2e-core 0.13.0 (= future 1.0) and will be released at about the same time frame as Eclipse 3.7 Indigo (late june). The next big thing is the added support for war overlays, the single most requested feature in m2eclipse-wtp. If you like to live on the bleeding edge, you can already try the latest development builds, available under https://repository.sonatype.org//content/sites/forge-sites/m2eclipse-wtp/0.13.0/N/ (use the latest directory as your update site).


One last thing : all this sweetness would not have been possible if I wasn't working full time on m2eclipse-wtp. Fortunately, Max R. Andersen got me a job in his JBoss Tools and Developer Studio team, and allows me to spend a considerable amount of time playing with my favorite toy of the moment :-) Thanks a bunch Max!!! Also big thanks to Eugene Kuleshov, Igor Fedorenko and Jason Van Zyl who gave me the chance to get involved in m2e(clipse).


Enjoy,


Fred.

JBoss AS 7 is still being developed on but lately file based deployment is now in place and I thought it would be a good thing to tell you how you can use JBoss AS 7 from our tools even before there is an optimized and fully supported server adapter for it.


It's not optimal, but at least it lets you get started.


For this blog I used JBoss AS 7 Beta 2 and JBoss Developer Studio 4; you can use a newer version of AS 7 (beta 3 is coming out soon) or if you have JBoss Tools 3.2.0 installed all this works fine too from there.


Read more below.

Start/Stop of AS 7

For now the best way to start/stop AS 7 when working from Eclipse is to simply start and stop it from a command line.


Start:

$JBOSS_HOME/bin/standalone


Stop:

Press Ctrl+C in your terminal/command prompt


You can start AS 7 via Eclipse External Tools support but Stopping won't work since it will only stop the shell script not the actual running AS 7 instance. Thus for now - use the command line.

Deployment to AS 7

If you have a standard Eclipse Web Tools Project style project then the simplest is to use the Deploy Only server, if you have a free-form project you can also use Deploy Only server but maybe Project Archives gives you a better workflow. I'll outline the "Web Tools" and Project Archives approach below:


Create a Deploy Only Server

The "Deploy Only" server is available in JBoss Tools & Developer Studio and provides a server adapter that has no special knowledge about the server it is deploying to beyond a directory location. Thus this is perfect for using with servers that does not yet have direct support from within Eclipse.


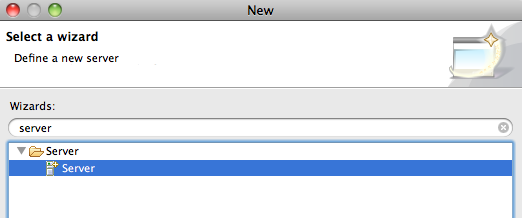
To create one you simply hit Ctrl+N or use File > New > Other from the menu and find the Server wizard.


define_new_server.png

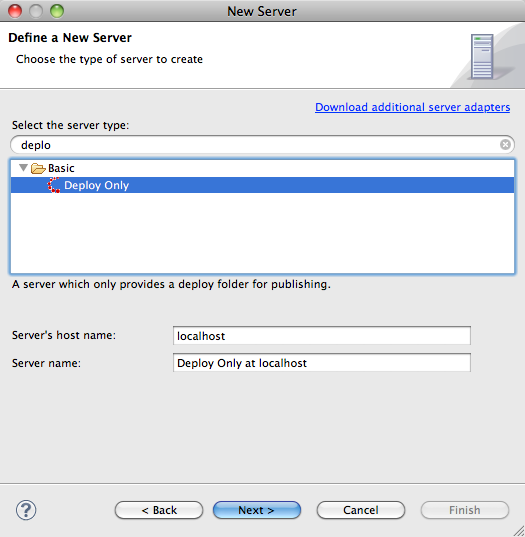
Within the Server wizard you need to find and select the "Deploy Only" server:

newserver_deployonly.png

Press "Next", and then give your server a name and specify the directory location for deployments.


deployonly_deploydirectory.png

For AS 7 standalone deployments goes to $JBOSS_HOME/standalone/deployments.


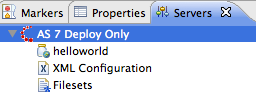
Press "Finish" and you should now have your "AS 7" server available in the servers view:


as7_serverview.png

Now you have a "Server" which you can deploy standard Web tools projects to; you simply drag'n'drop deployable resources to the server or use the "Add and Remove" available in the context menu.


Enable Compressed Archives

There is one "gotcha" with this setup and that is that with AS 7 for exploded deployments it now requires a .dodeploy marker to explicitly trigger a (re)deployment of an exploded directory.


The simplest way to avoid having to set this up is to enable "Compressed Archives" from within the tools since AS 7 will automatically deploy such archives once they are complete.


To enable this, double click the Server and it's server editor should show up.


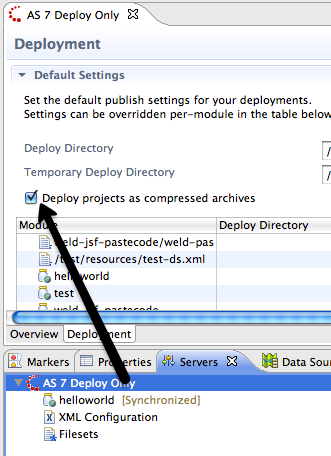
enable_compressed_archives.png

In this editor, switch to the Deployment tab and make sure there is a checkmark for "Deploy projects as compressed archives".


With this done you can now easily add any war/jar/ear project to the server and deploy it.

as7_helloworld.png

Above I've added a project called "helloworld".


To deploy or redeploy this simply right click the server and choose "Publish" (you can also use the keyboard shortcut shown in the menu for easier access).


publish.png


Exploded and Explicit Deployments

If you really want to use exploded deployments then there is a trick you can do to simulate the .dodeploy marker with JBoss Tools.


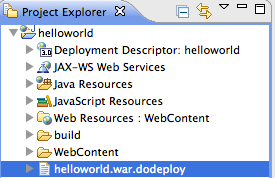
Simply create a text file in your project called "foo.war.dodeploy" where foo.war should the name of your deployment. In my case that is "helloworld.war.dodeploy".

dodeploy_file.png

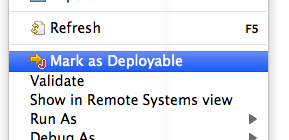
Then right click this file and choose "Mark as Deployable"


markasdeployable.png

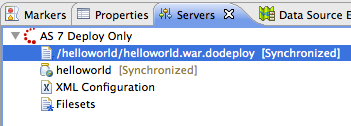
This should then automatically get deployed to your sever (if you have multiple there will be a dialog asking you which server to deploy to)

dodeploy_in_serverview.png

If you don't know what a "dodeploy marker" is look in the README.txt in $JBOSS_HOME/standalone/deployments for an explanation.


Please note that Deploy Only server currently does not support automatic publishing thus you have explicit invoke Publish when you are ready.


This will be fixed in upcoming release of JBoss Tools 3.2.

Deploy using Project Archives

Project Archives is mostly relevant for those not using Web Tools style projects, but is also usable for deploying to AS 7 - the feature is already documented and even with a screencast in a previous blog


Please, Make this easier!

We are working on it and the first steps of an AS 7 adapter is already in JBoss Tools trunk which will be JBoss Tools 3.3 and target Eclipse 3.7.

If you are interested in that work ask on the forums where we will keep you updated with the progress, i.e. when there will be an updatesite to install and use from

While at EclipseCon a few weeks ago, I heard about a new framework at Eclipse for quickly developing Eclipse editors for XML files, especially XML configuration files. As Konstantin Komissarchik, one of the lead developers on Sapphire, pointed out in the summary for his EclipseCon talk - "[Sapphire] is a UI building framework that allows developers to specify UI in terms of higher level constructs like property editors instead of widgets and layouts. This paradigm results in several orders of magnitude improvement in developer productivity while simultaneously delivering better quality UI that is easier to maintain."


Though I missed his talk, I had a chance to sit down with Konstantin afterwards and he showed off what his framework can do. To say the least, I was excited. One of the things we do a lot of in JBoss tools is editing XML configuration files. We have them everywhere. And we don't really have a consistent look and feel to any of them. The other thing I was excited to see was the potential integration with Graphiti, a framework for graphical editors. Perhaps they've hit upon the "Holy Grail" of UI development?


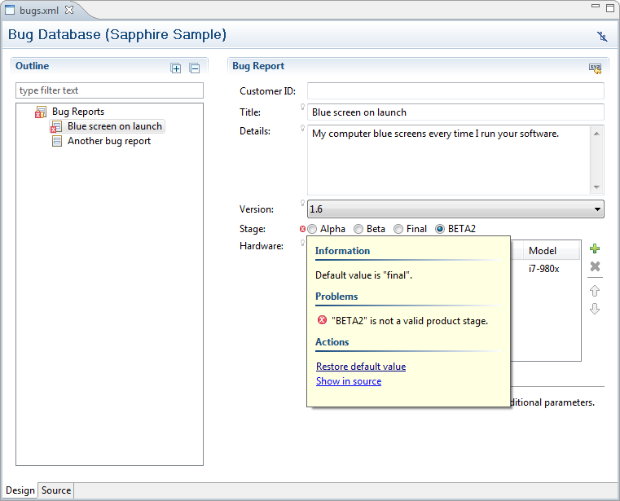
Here's an example from one of the samples that comes with the Sapphire framework:

sapphire-screenshot-1.png


I wanted to find out. So when I got back from my trip, I started playing with Sapphire locally. You have to keep in mind that this is very early in the process for Sapphire. The version I'm working with is 0.3 and they're providing bug fixes nearly every day, which means things may break or change between updates. Honestly that's fine - Konstantin said they're using the framework at Oracle and have commercial editors out in the wild based on this technology, so it has to be pretty good, right?


We have a runtime project at JBoss that's rolling along at a pretty good clip now. It's the next generation of our ESB called SwitchYard. You can check out the SwitchYard Community Page for more details. But they've been working on the format of an XML configuration file that we'll need to develop an editor for. It seemed like the perfect opportunity to put Sapphire to the test

.

Over the course of the last 5 or 6 business days, I've probably put in 20-30 hours on this editor. I've run into a few issues here and there, most because I didn't grok the framework fully at the start. But I've ended up with a good first cut that is able to edit the initial sample of the configuration file. And that's amazing to have something that even sort of works in that short a timeframe.


Ultimately developing an editor in Sapphire boils down to two main things:


  • A set of Java interface files that map to different parts of your XML configuration.
  • And a Sapphire Definition (sdef) file, which defines how different parts of the UI are rendered.


Think of the Java interface files as a quick and easy Java bean representation of your XML. So various element structures and properties are reduced to getters and setters in the interfaces. All you do from there is take the Switchyard annotations and indicate how to tie those properties back to the XML you're editing. The Sapphire framework then takes those annotations to define a model (using EMF of course see the correction below) on the fly representing your XML. This is the "Model" part of your typical Model-Viewer-Controller approach.


[Correction: Konstantin pointed out that "Sapphire does not use EMF for any part of modeling or data binding. The developer specifies semantics in interfaces and annotations. The annotation processor generates implementation classes. The XML binding code directly reads and writes on the live DOM API exposed by the XML editor."]


Then the SDEF file describes how to present that generated model to the user in UI form. Want to generate a view? Cool. Wizard or dialog? Cool. Editor? Cool. And you can define reusable components of the UI so you don't have to redefine everything if you decide to go, for example, from a dialog to an editor later on. It's nice because there's instant integration between the Outline view and the Editor for example, so you don't have to worry about the niggly little bits that can sometimes consume days at a time to get right.


What's awesome is that the Sapphire UI Definition Editor is itself written in Sapphire. Talk about eating your own dog food.


Here's a screen shot of what I have working so far:

switchyard_0_1.jpg


There are some gotchas:


  • Annotation processing is not turned on by default for projects. To do that, go to Project Properties -> Java Compiler -> Annotation Processing -> Enable annotation processing.
  • To see the classes generated by the Sapphire framework for your interfaces, you have to turn off the filter that hides files & folders starting with "." Those generated classes appear in the ".apt_generated" folder.
  • It's taken me several days to grok how to get XML namespace declarations just right with the XmlNamespace and XmlNamespaces and XmlRootBinding annotations. But it boils down to declaring them when you use them. Easier said than done, but it makes sense once you've played with it a bit.
  • You have to make sure that you name things consistently. This is one of the areas I have run into again and again. The name of the property field, property name, getter and setter must be consistent or the framework complains loudly at runtime. So if you have a property named "SOAPBindings", you need to make sure the property is PROP_SOAPBINDINGS, the property name is "SOAPBindings" and the getter is "getSoapbindings()".

    Why? Seems to be something with how the processor is looking at the capitalization of various bits in the model and if one is out of whack, they're all out of whack. You can make it a bit more consistent by adding underscores to the PROP_ declaration - such as PROP_SOAP_BINDINGS would need the property name "SoapBindings" and the getter would be "getSoapBindings()" - the underscore hints that there's a uppercase letter coming up.


That's about it at this point. Now that I have the structure working and can define/modify/delete things via the editor, I want to go in and add some polish. Things like boolean options - true/false, combo boxes, validation, etc.  After that's done, I'll start playing some with the Graphiti integration - but I'm not quite ready to tackle that yet.


Interested in playing with Sapphire yourself? Here are a few links to get you started:


A big thanks to Konstantin for helping me out on the Sapphire mailing list and forum. He's been very patient dealing with me over the last week!

As per usual, EclipseCon was full of interesting new technologies, people using older technology in new ways, and a lot of social (mostly because of the Free Beer) engineers. I thought I'd offer an overview of the areas I was the most intrigued by this year.


Q7


On the first day, I went to a talk (that was actually more of a tutorial) to learn about a new test framework from Xored called Q7. Q7 will be a commercial product (sometime in the next 6 months most likely), but also have a community version. The tooling allows you to script tests in a similar way to how Rational Tester used to do it, but has hooks directly into the Eclipse platform UI bits so it doesn't need to rely (except in certain cases) on screen locations. They've even gone so far as to integrate it with Maven & Tycho for automatically triggering tests as part of the build.


They offer a free evaluation version that was released for EclipseCon here: http://docs.xored.com/display/Q7E/Home


The differences between Q7 and SWTBot are quite large. The biggest of those differences being the ability to explicitly test pre-conditions (i.e. clean workspace with two projects, a few preferences changed, etc.) between tests. That alone makes this a compelling new product in the Eclipse test space and something we should seriously look into as opposed to continuing with SWTBot. They just released tentative pricing details here (http://docs.xored.com/display/Q7E/Pricing+%28Tentative%29) and I'd encourage Jiri and his team to check it out.


MoDisco

On the second day was the "Spy on your Models" talk that discussed the MoDisco EMF Model Browser. The MoDisco project (http://wiki.eclipse.org/MoDisco/Components/v0.9) offers a variety of tools to help navigate the EMF model hierarchy within the Eclipse tooling. Once you have that, you can execute queries and other interesting things in a SQL-like language that also has possibilities. I plan on downloading and playing with it in their Indigo release (http://download.eclipse.org/modeling/mdt/modisco/updates/release/).


EMF and GWT

After that I saw a talk by Ed Merks on "Building Web Applications with EMF and GWT," which showed on the fly how EMF can build a quick GWT app that runs on the Google App Server merely by tweaking a few genmodel settings. It might not have been a great editor, but as something quick and easy to develop for the web it offers some interesting possibilities.


What not to do with p2

One of the more entertaining talks was "p2, your savior or your achilles heel? Everything an Eclipse team needs to know about p2." The pair giving the talk offered 10 things NOT to do when using P2. Hopefully they will release the slides at some point, but here are the top 10:


  1. Don't move or remove files on disk. Let p2 and the p2 garbage collector manage your install. Otherwise your metadata gets out of whack.
  2. Don't unzip your plug-in files over Eclipse. Instead, use a p2 repository (downloadable or online).
  3. Don't replace published content. The version/ID pair is immutable, so bad things occur when you overwrite plug-ins directly by name.
  4. Don't alter a released repository. People depend on those. Instead, specify a retention policy and create additional repositories.
  5. Don't NOT categorize features.
  6. Don't ignore version ranges.
  7. Use APIs, NOT internals.
  8. Don't use the metadata generator, use the publisher instead.
  9. Don't use legacy update sites or expect a long lag time when installing.
  10. Don't spell it P2 - it's a lower case p2.


Sapphire

I missed the Sapphire talk by Konstantin from Oracle, but caught him later that day and he showed me the wonders of the Sapphire framework. I'm still playing with Sapphire a bit, but you can read more here: http://www.eclipse.org/sapphire/


As I get the hang of it, I'll write up a blog post or two about how it works. Ultimately it's about providing an abstraction layer on top of the Eclipse UI to simplify tool development. It has a lot of potential to standardize the look & feel for new tools and simplify their development dramatically, but it's a technology in its formative days. That said, they're doing some amazing things with it and using it in commercial Oracle Eclipse applications, so I suspect it will mature quickly.


...


And that's about it for this year. There were many other great talks and the keynote featuring Watson the Jeapordy champion was quite entertaining and informative.


For other details about the conference, be sure to look at the EclipseCon 2011 site.

Note: JBoss Developer Studio 5 is now available, see https://community.jboss.org/en/tools/blog/2012/06/21/jboss-tools-33-and-developer-studio-50-final-release


JBoss Developer Studio 4 is now avaliable for free (registration required) from http://devstudio.jboss.com/download/


If you are an existing Red Hat Support Portal user/customer then you already should have access to JBoss Developer Studio via the Downloads section, but if you are a new user the only thing you need to do is to signup and you will be granted access to the free download of JBoss Developer Studio.


The direct link to the download no matter if you are existing or new user of Red Hat Support Portal is: https://www.redhat.com/wapps/eval/index.html?evaluation_id=1015

What is JBoss Developer Studio 4 ?

JBoss Developer Studio 4 comes as a full easy to install Eclipse installation that bundles Eclipse WTP, TestNG, Spring IDE and the latest updated release of the supported plugins from JBoss Tools 3.2.


This latest release highlights are that it is now based on Eclipse 3.6 (Helios), updates the JSF 2 tooling, adds remote deployment for JBoss server adapters, easier setup of existing runtimes, provides tech preview of improved CDI functionallity and it includes updates for the SOA-P related features such as Guvnor, Drools, jBPM 3, Teiid Designer and Modeshape plugins.


Free vs For Pay ?

The free version of JBoss Developer Studio is the standalone version which can be used with both community and productized versions of JBoss Application Server and related frameworks such as Hibernate, Seam, Drools, jbpm, etc. The difference between this distribution and JBoss Tools boils down to ease-of-installation and future updates.


The product called JBoss Developer Studio Portfolio Edition is also available from http://devstudio.jboss.com/download/ for 99$ and in addition to the standalone version of JBoss Developer Studio it gives access to a bundle with JBoss Enterprise Application Platform 5 and additional downloads for development purposes of JBoss and Red Hat runtime distributions - including but not limited to JBoss Enterprise SOA Platform and Red Hat Enterprise Linux. You can read more about this offering at http://www.jboss.com/products/devstudio/


Thus if you already have access to the runtimes you would like to target for development the free version of JBoss Developer Studio is for you, but if you want access to the full range of JBoss and Red Hat runtime products (+ updates) for developement then the Portfolio Edition is what you are looking for.


Have fun!

JBoss Tools introduced JSF 2 Composite Component support in version 3.2.0.M1, it matured through several development versions and got a lot of useful features:

  1. Content assist for component developers
  2. Content assist for component users
  3. Validation and quick fixes
  4. Refactoring
  5. Rendering in XHTML Visual Editor
  6. Resource Navigation in source and visual part of XHTML Visual Editor


Read full article about JBoss Tools JSF 2 Composite Component Support.

"The Cloud" is many things to many people, but in the example Andre Dietisheim blogs he is showing off how to use JBoss Tools server adapter together with the new Delta Cloud tooling to deploy to a server running on Amazon EC2.


I've embedded the video he did into this blog posting, but Andre's blog contains more details on how you can do this your self - such as configuring the right ports on Amazon EC2 and example image names/id's to try this out with.


Next steps

This screencast primarily shows off the current integration between Delta Cloud + JBoss Tools Server adapter + EC2 Images made by Marek Goldmann; images which anyone can use or create on their own as outlined in the screencast - and when they are done its like deploying against your own local server in the cloud.


We will be posting a demo showing off some of the other improvements that have been made in the latest JBoss Tools 3.2 release allowing for even more flexible deployments to a server (JBoss and others).


Have fun!

Next month at EclipseCon I'll be continuing the saga of the Graph Editor. This story actually starts back in 2005, when I was working on the very first graphical editor for jBPM 3. I was using the Eclipse Graphical Editing Framework (GEF) and became very frustrated with the lack of good documentation. So for my own records, I kept notes as to how the application was put together. The result served as the base for a number of talks and tutorials on GEF at the EclipseWorld (2005, 2006 and 2007) and EclipseCon (2006, 2007 and 2008) conferences. Should you be interested, I have attached the last version of this tutorial that I presented at EclipseCon 2008.

In the meantime, two other frameworks have emerged in the Eclipse realm that can be used to create such rich graphical editors. The Graphical Modeling Framework (GMF) has been around for a very long time even and is well matured. It builds on top of GEF and the Eclipse Modeling Framework (EMF). It also has a powerful tools suite that can be used to quickly model and generate your application. Graphiti is a bit more recent and is currently in incubation at Eclipse. Graphiti also builds on top of GEF and uses EMF to store its graphical details. EMF is also the preferred way to serialize the semantic model.

During the previous year, I have been using GMF intensively while forging a prototype BPMN2 editor for jBPM 5. Later that same year I was asked to investigate Graphiti as a candidate technology for a BPMN2 editor. Just like 6 years ago, I have kept notes on the use of both of these technologies. It was only a small step to turn these notes into a presentation comparing both technologies. So I am happy to have been accepted to share this experience at the upcoming EclipseCon conference.

If you expected to see the results of the comparison in this post, I'll have to disappoint you. I will probably write up an article later on but in the meantime I'll leave the scoop to the EclipseCon attendees. The advice is to register for EclipseCon and attend my session on Tuesday March 22nd at 2:30 pm. I hope I will see a lot of you!


Cheers,

Koen


http://in.relation.to/service/File/10824

3.2.0

[Download] [Update Site] [Market Place] [What's New] [Documentation] [Forums] [JIRA] [Twitter]


I'm very happy to be able to announce that we pushed out JBoss Tools 3.2 to the servers shortly before the weekend.

Installation/Upgrade


Existing Eclipse Workspaces used with JBoss Tools 3.1 will work with JBoss Tools 3.2, but do take a backup of your workspace to be on the safe side.


As per tradition the updatesite is now moved over to a stable location

http://download.jboss.org/jbosstools/updates/stable/helios/


To "upgrade" from JBoss Tools 3.1 to JBoss Tools 3.2 you need to install Eclipse 3.6 and add the updatesite. Updating Eclipse major versions via updatesite does sometime work, but we do recommend a clean install to make it all a bit cleaner.


If you don't like messing with updatesites you can also install JBoss Tools 3.2 via Eclipse Marketplace - simply use Help > Eclipse Marketplace directly from Eclipse and find JBoss Tools 3.2 (Helios) via the Search facility.


New Features

The following paragraphs outlines the highlights from the JBoss Tools 3.2 release, but I recommend reading the complete

What's New lists if you want to see all the noticable changes and improvements that have been made since JBoss Tools 3.1.


JSF 2

The Visual Page Editor and our XHTML structured editors now supports JSF 2; especially the notion of composite components which is a new feature of JSF 2 allowing users to much easier define reusable components for their application or framework.


JSF 2 also provides a new standardized approach to load up resources via the classpath and web archives; these are all supported by JBoss Tools making the visual page editor render even more realistically the layout of the page but also code completion, navigation and even quickfixes now benefit from this additional information to make it easy to fix issues and navigate to the linked resources instantly.

Context & Dependency Injection (CDI)

The CDI tooling have received a lot of updates, especially in context of providing validations of all the error handling cases covered by the CDI TCK test suite and a few other hints provided by the Weld CDI Team.


There is also a good set of wizards, code navigations and quickfixes added in this release and I recommend you go read Alexey Kazakov's blog about this feature set.


Visual Page Editor

Besides supporting JSF 2 better in this release various other improvements were done to the Visual Page Editor.


  • Templates for jBPM, Spring and Richfaces 4 were added/improved
  • DocBook support were made more complete and is now a separately named editor
  • A generic "Split-Editor" functionallity were added (can be used with any Eclipse editor)
  • The UI were cleaned up to fit better into the Eclipse IDE

Servers, Packaging & Remote Deployment

The biggest new feature for the Application Server integration in JBoss Tools 3.2 is the introduction of Remote Deployment.


Remote Deployment works (more or less) just like the Local deployment except instead of using local file copies we now relay the file transfer to the Eclipse Remote System Explorer API; this then allows you to deploy to systems via SSH, FTP, etc.


This Remote Deployment not only works for the JBoss Application Server adapters but is also provided via the "Deploy Only" server meaning you can use it to deploy any project to any application server or system which supports hotdeployment by scanning their local file system for changes.


We've also improved support for "non-WTP" style projects by enabling you to right click Folders and mark them as Deployable. These deployable folders can then be deployed to any of the Server adapters provided by JBoss Tools, including the Deploy Only server.


The JBoss Server Adapter now also supports the new JBoss 6 and updated versions of JBoss Enterprise Application Platform based servers.


Automatic Runtime Detection

One of the big hassles of any IDE configuration is to identify and configure your various runtimes, such as JBoss Application Server, Seam, jbpm, ESB, Drools, JDK's etc.


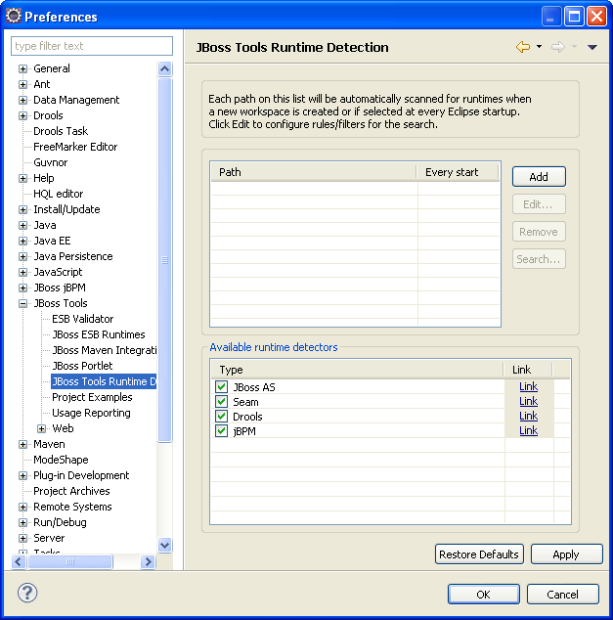
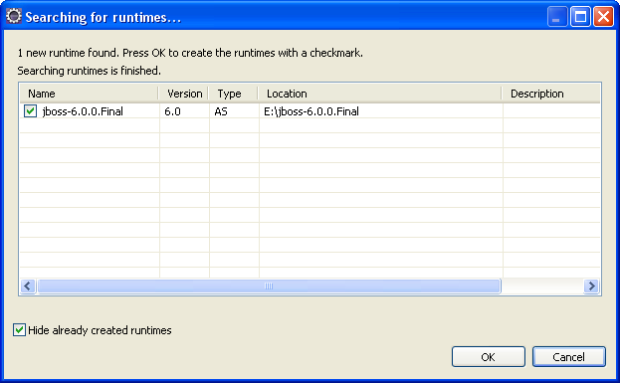
We've contributed the installer logic from our JBoss Developer Studio 4 product into the actual JBoss Tools plugins and enhanced it so it can be configured to scan one or more directories at startup for new runtimes; if it detects a new runtime it will ask if it should add it and JBoss Tools will do a default installation of the runtime - freeing you from having to go through the various runtime user interfaces.


This feature is available under Eclipse Preferences in JBoss Tools > JBoss Tools Runtime Detection


In the future we plan to add more runtime detections, not just JBoss based ones.


Google GWT (Experimental)


Google's Eclipse plugin for GWT does not provide seamless integration with Eclipse WTP based projects; thus we made an Eclipse Facet that allows you to easily enable Google GWT on your WTP project and not having to use custom wizards and special projects to get started with the Eclipse GWT tooling.


Please note that since Google are not providing stable named features from their updatesite to have Eclipse updatesites work together, it is necessary to install Google GWT plugin manually before trying to use our Google GWT facet.


See Andre's article on how to use this Google GWT feature.


DeltaCloud (Experimental)

The tooling for Delta Cloud provides a perspective and a few views to easily interact with systems such as SteamCannon that provide a DeltaCloud API.


This gives you the ability to browse, start & stop virtual machines hosted by cloud service providers such as EC2 and Rackspace.


You can try it out by using https://try.steamcannon.org/deltacloud/api as the URL for a Delta Cloud connection.


Note, DeltaCloud tooling is marked experimental while the DeltaCloud API and implementations are stabilizing. If needed we will provide an update to support the latest/stable DeltaCoud servers.


Maven

We've continued to expand the support for Maven projects by extending m2eclipse tooling to automatically configure projects based on the dependencies of your project.


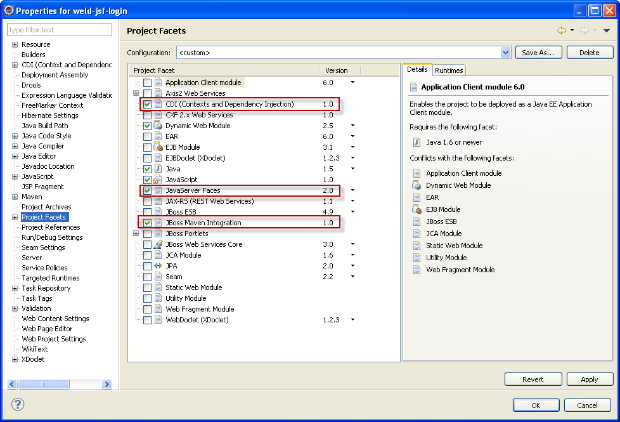
Thus now if you import or configure a Maven based project and it uses a standard dependency for either Seam, CDI, JSF, Hibernate or GateIn/Portal the features for these frameworks will now be enabled and configured automagically.


You can control this per framework under Eclipse Preferences via JBoss Tools > JBoss Maven Integration


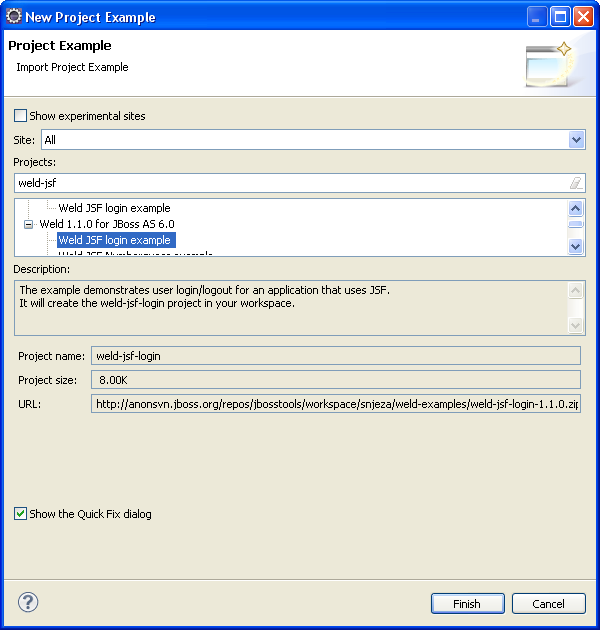
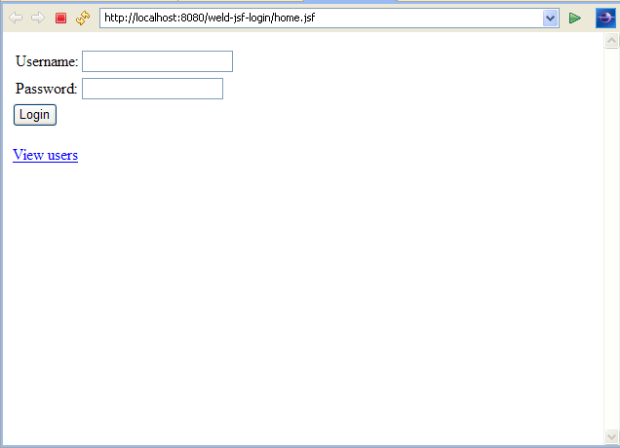
To see an example of this applied, look at Snjezana's blog where she illustrate how via Project Examples you can easily get started with the CDI and JSF tooling. This blog works because of the Maven Integration provided here.


Modeshape

Modeshape provides a JCR based view on many different datasources such as file systems, databases, other JCR repositories and even your own services and applications.


The Modeshape tooling provided in JBoss Tools 3.2 gives you a way to easily connect to a Modeshape server, browse it content and checkin/checkout content from and to the Eclipse workspace.


Teiid Designer

The Teiid Designer that is used to visualize model your datamodel and transformations as supported by the Teiid runtime is now included into JBoss Tools.


The Teiid Designer plugins also provides a testbed for testing and exploring your Teiid configured dataservices.


You can read more about Teiid Designer on its community page.


BPEL

The BPEL tooling is based on the Eclipse BPEL project but provides a set of bugfixes and features that have not yet made it back to the Eclipse BPEL project, especially in context of supporting deployment to other systems than Tomcat based systems such as Apache ODE. We support the Riftsaw JBoss based BPEL system.


If you want to read about the BPEL feature set and its future (its fixes are being contributed back to Eclipse.org) you can read Bob Brodt's blog about this.

WebServices

We've added some much simpler wizards for creating JAX-RS or even JAX-WS webservices to the tooling; but even more interesting is the new Webservice Tester UI which gives you a view to easily query a SOAP or REST based webservice and introspect its result.


Brian Fitzpatrick wrote a couple of blogs about it, giving you an overview of the new improvements for the WebServices support.


Usage Reporting

When you install a JBoss Tools plugin, on the first startup of Eclipse a dialog will ask if you wish to send anonymous usage data to us. We use that information to see which OS's, system configurations and plugins you are running plus we get to see how fast (or slow) new versions of spreads over the world.


...and much more...

The above highlights are just a subset of the over 1600 issues fixed and implemented over the last many months thus the best way to get to know it all is to try it out


Let us know how it goes and above all,


Have fun!

JBoss Tools includes the JBoss Maven Integration and Weld feature that enable you to quickly and easily start developing Weld applications.

Installing JBoss Tools 3.2.0


The best way to install JBoss Tools including the JBoss Maven integration is to start with Eclipse Java EE IDE for Web Developers.
What you then need to do is download appropriate archive for your OS, unpack it and start Eclipse.
Call Help>Install New Software..., click the Add button and enter the following update site:

http://download.jboss.org/jbosstools/updates/development/

Choose All JBoss Tools 3.2.0 and Maven Support

JBossToolsInstall.png

Click the Next button, accept the license terms and click the Finish button.

Click the OK button on the Security Warning dialog.

JBossToolsSecurityWarning.png

and the Restart Now button on the Software Updates dialog.

JBossToolsRestart.png

You have installed JBoss Tools, the JBoss Maven Integration and all required dependencies.


Installing JBoss AS 6.0 Server


You can perform the following steps to install the JBoss AS 6.0 Server:

Download JBoss AS 6.0.0.Final and unpack the archive to some directory.


Call Window>Preferences>JBoss Tools>JBoss Tools Runtime Detection

JBRuntimeDetection.png

Click the Add button and point to the directory where you unpacked the JBoss AS 6.0.0.Final.

JBRTSearchDialog.png

Click the OK button.


The JBoss AS 6.0 Server is created.


Creating weld-jsf-login example


In order to install this example you need to call Help>Project Examples

JBTProjectExamples.png

Select Weld JSF login example and click the Finish button.


You will then get the weld-jsf-login application in your workspace.

If you are interested in more info on this example, see Weld 1.1.0 Reference - Chapter 3. JSF web application example


Deploying and starting weld-jsf-login application


The following procedure demonstrates how to deploy and start this application:


  • Open the Servers view (Window>Show View>Other...>Server>Servers)
  • Right click the jboss-6.0.0.Final server and select Add and Remove...
  • Select the weld-jsf-login application and click the Add button
  • Click the Finish button
  • Right click the weld-jsf-login project in the Package Explorer view and select Run As>Run On Server
  • Select the jboss-6.0.0.Final server and click the Finish button


As a result, the weld-jsf-login application will be deployed and executed on the JBoss AS 6.0 server.

weldjsflogin.png

The application includes the JBoss CDI and WTP JSF feature.

facets.png


The following examples can be created in a similar way:

  • numberguess
  • permalink
  • pastecode
  • translator


References


Weld - JSR-299 Reference Implementation
JBoss Tools Guides - Latest Version
m2eclipse - Maven integration for Eclipse

Filter Blog

By date:
By tag: