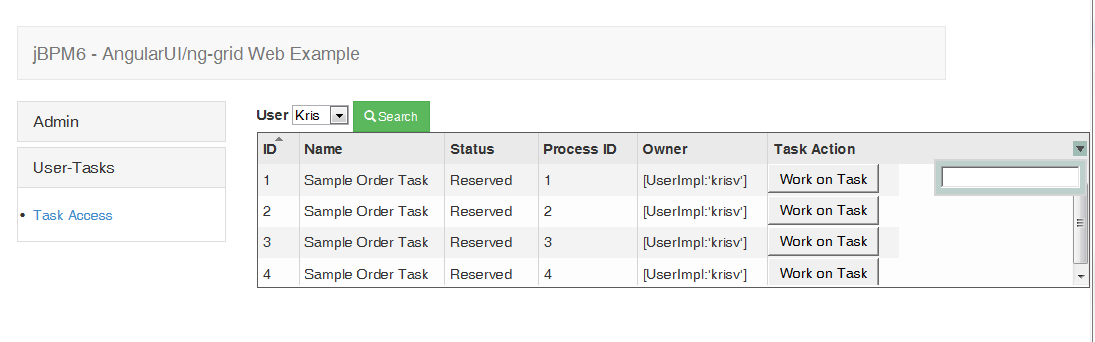

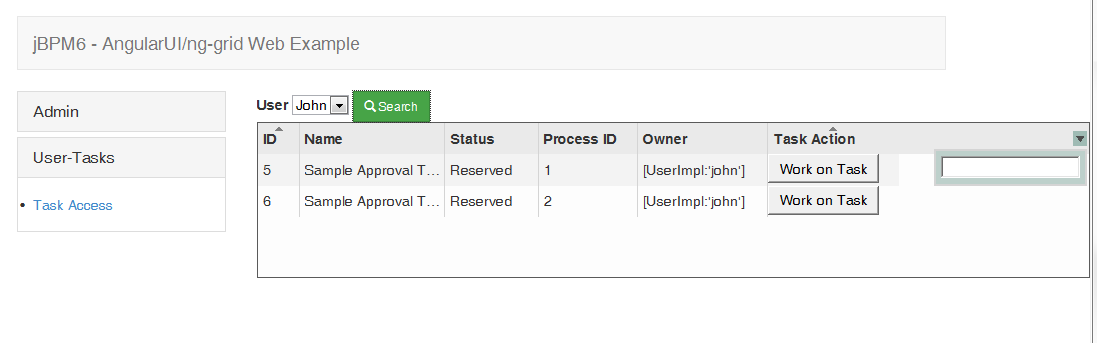
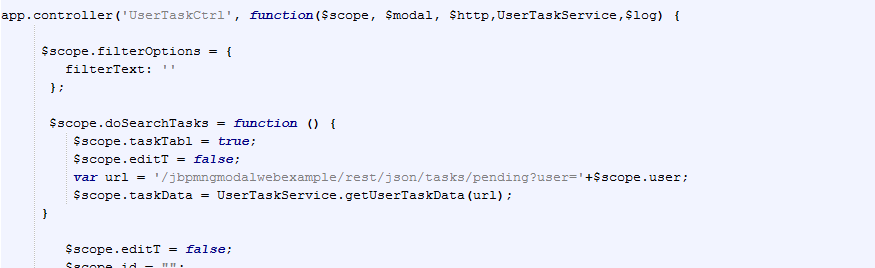
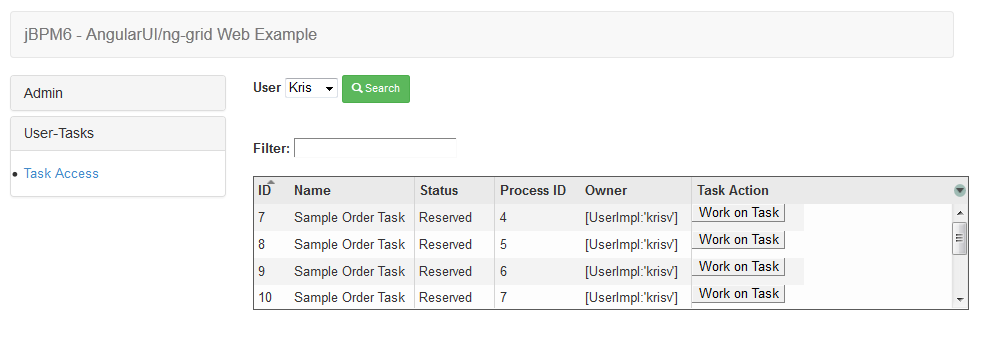
A simple JBPM6 web example using ng-grid component of Angular UI is shown in JBPM6 - AngularUI/ng-grid Web Example. This blog shows another Angular UI component, ui.bootstrap.modal, for creating modal windows.
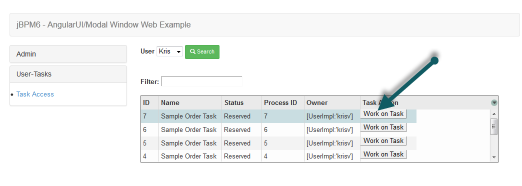
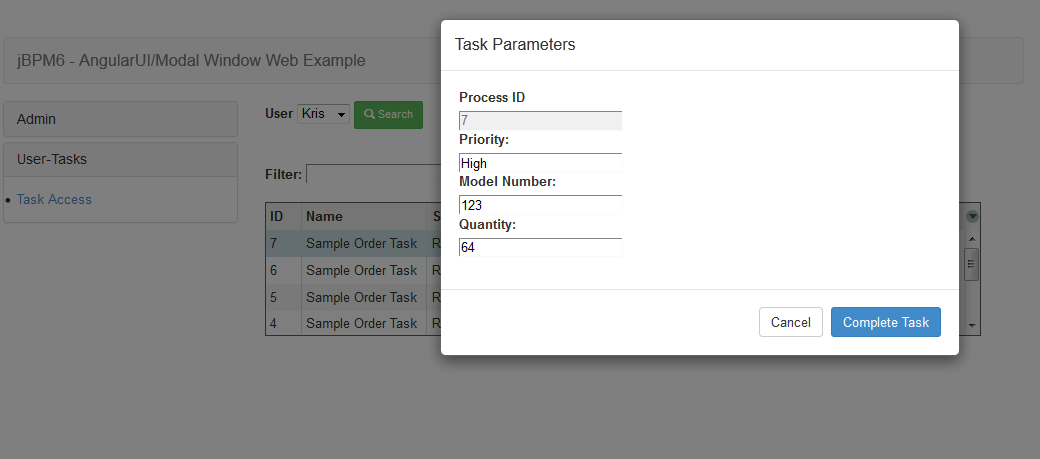
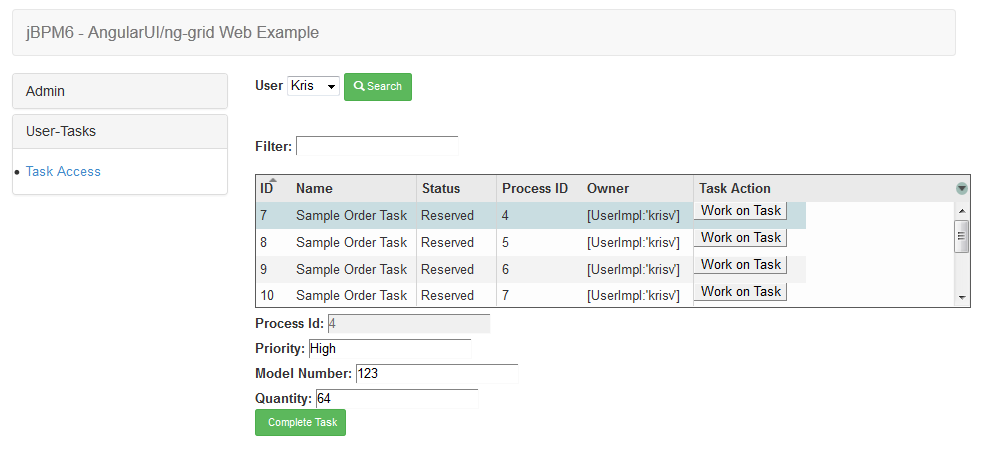
Modal window requires users to interact with it before returning to the parent window. In this example, when user clicks on 'Work on Task' button, the task details are presented in a modal window.
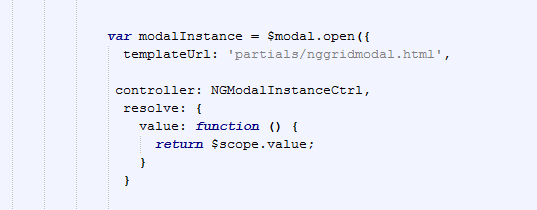
$modal service has only one method open.
In open method provide templateUrl, the path to the template that represents modal's, i.e., task data, content. Provide the controller for the modal instance to initialize the scope used by modal. It also needs a resolve method to resolve and pass the members to controller as locals.
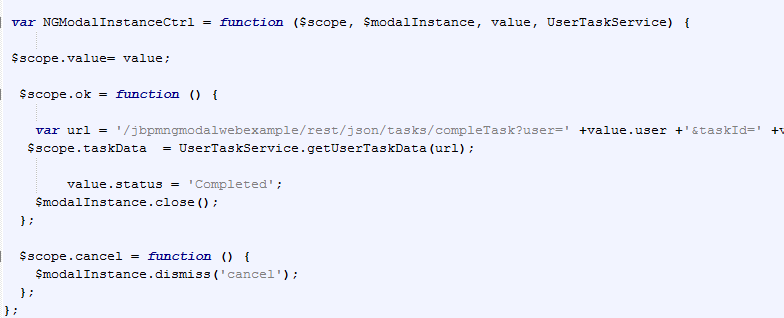
In the NGModalInstanceCtrl method invoke the RESTFul service call to complete the task using the retrieved parameters.
A simple web example using Angular JS example is shown in JBPM6 - Angular JS Web Example. Angular JS provides model-view-controller capability and one can use various UI components.
A simple AngularJS directive (e.g., ng-repeat) in HTML is used in JBPM6 - Angular JS Web Example to show the task table. One can also use other UI componets such as AngularUI (http://angular-ui.github.io/). This example shows a more feature rich grid using ng-grid component of AngularJS. It provides various features such as filtering, scrolling, sorting etc.
Here are the main steps to plug-in the ng-grid component to display jBPM tasks and refer to http://angular-ui.github.io/ for more details about ng-grid.
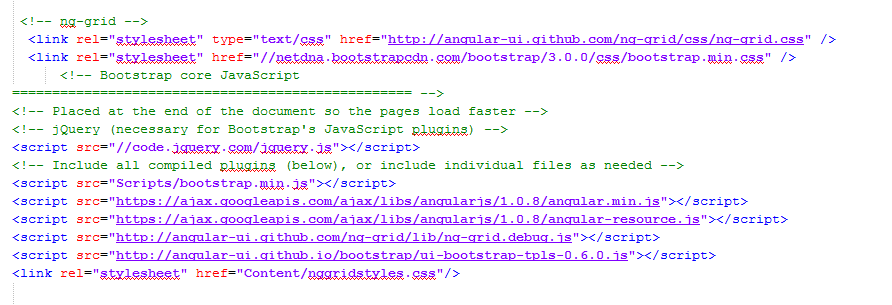
1.) Add refereneces to jQuery, AngularJS and ng-grid javascript and css files.
2.) Add 'ngModule' in the module list in app.js
![]()
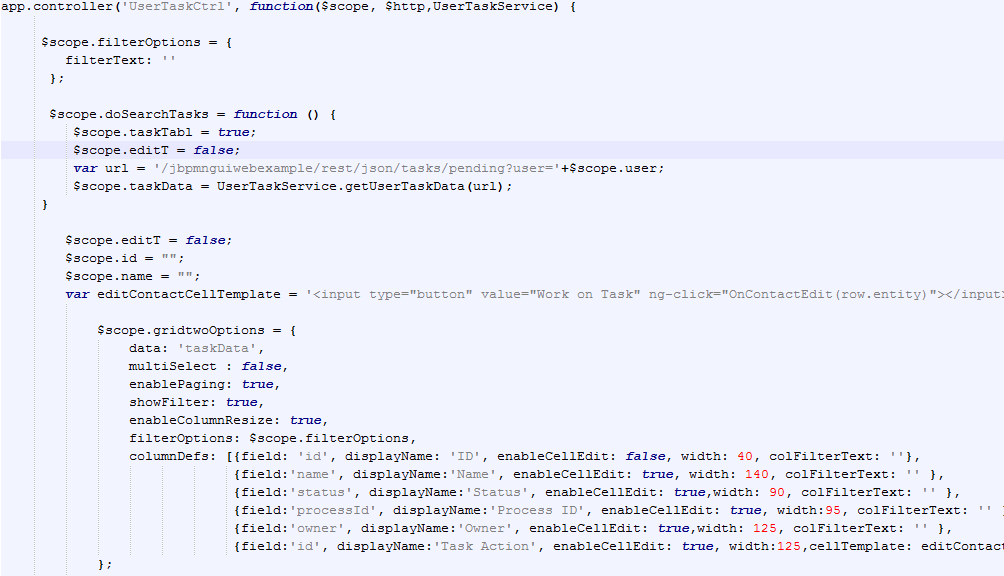
3.) In the task html file (usertasks.html), add grid options variable, e.g., 'gridtwoOptions', and it needs to be bound to the task data in controller.js.
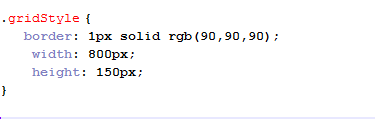
Also add a style class, e.g., gridStyle, that needs to be defined in the style file (e.g., nggridstyles.css).
![]()
4.) Task data ($scope.taskData) is obtained using RESTFul call and it is bound to grid option.
JBPM 6 provides new improved user interface using UberFire. It can also be used as a an embedded workflow engine in application and one can have UI based on various technologies (e.g.,GWT, JSF, HTML5, .Net etc) where the UI can communicate with workflow engine using jBPM API. A simple jBPM web example is shown jBPM6 - Tomcat 7 - Web Example using jsp/servlets.
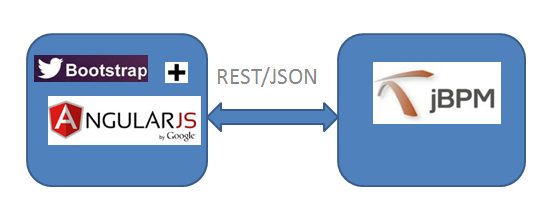
This blog provides a different UI (Angular JS and Bootstrap) approach considering the same example shown in jBPM6 - Tomcat 7 - Web Example. Angular JS augments browser based applications with model-view-controller (MVC) capability and Bootstrap, a popular responsive design framework, provides various HTML and CSS based design templates for forms, buttons and various navigation components. Please refer to http://getbootstrap.com/ and http://angularjs.org/ for documentation and examples.
Model: The data that comes from the REST API in JSON format.
View: HTML that has various Angular directives and Bootstrap templates.
Controller and custom services: Perform the necessary REST API queries against the JBPM engine deployed on a server and put the required data into $scope for View.
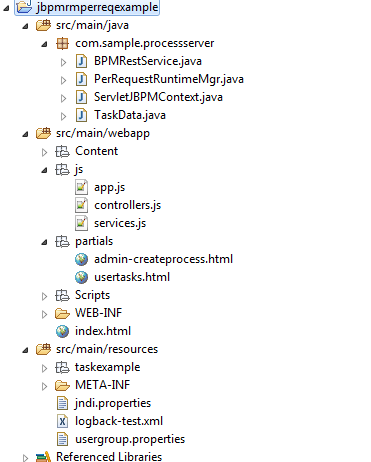
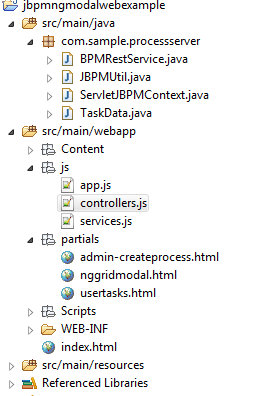
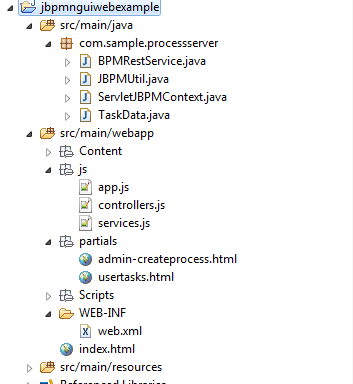
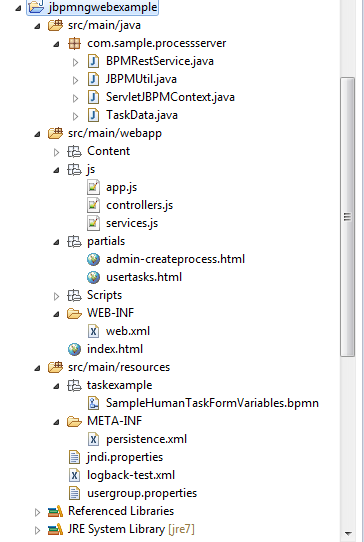
Following directory shows various files in the sample project.
- BPMRestService.java provides the necessary REST API that can be used from Angular JS controller or service.
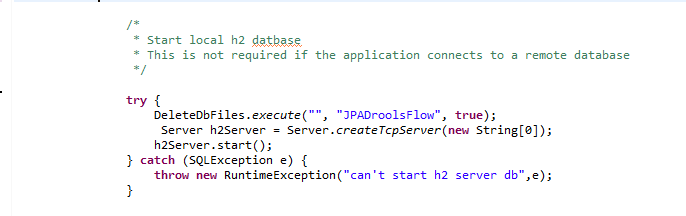
- ServletBPMNContext.java is Servlet listener class to start H2 database and create the Runtime Manager using Singleton strategy.
- Partials folder has html files for views and js folder has router, controller and service Java script files.
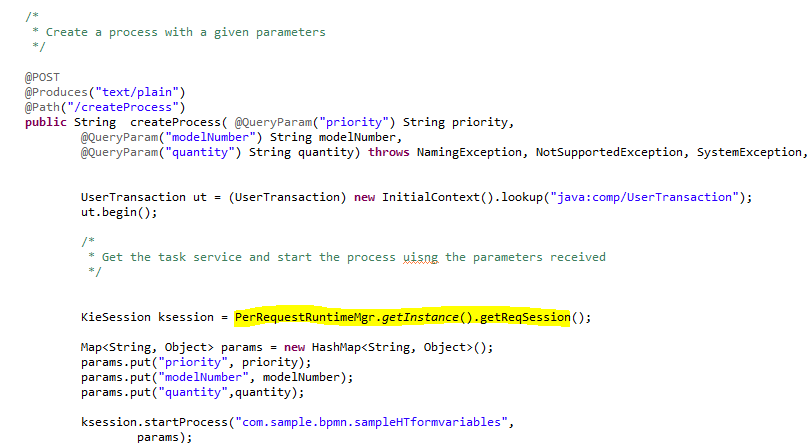
The first step in making this example run using Angular JS framework is to create RESTful API for the jBPM tasks, e.g., process create, request tasks etc. This example uses Jersey framework to provide REST API for all the necessary logic provided the jsp/servlets. For example, following method ( in BPMRestService.java) exposes RESTful webservice for the tasks for a given user and the data is transferred in JSON format.

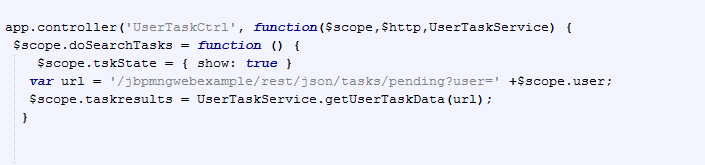
Following method in Angular JS controller (controller.js) retrieves the data and binds the data to $scope variable taskresults.
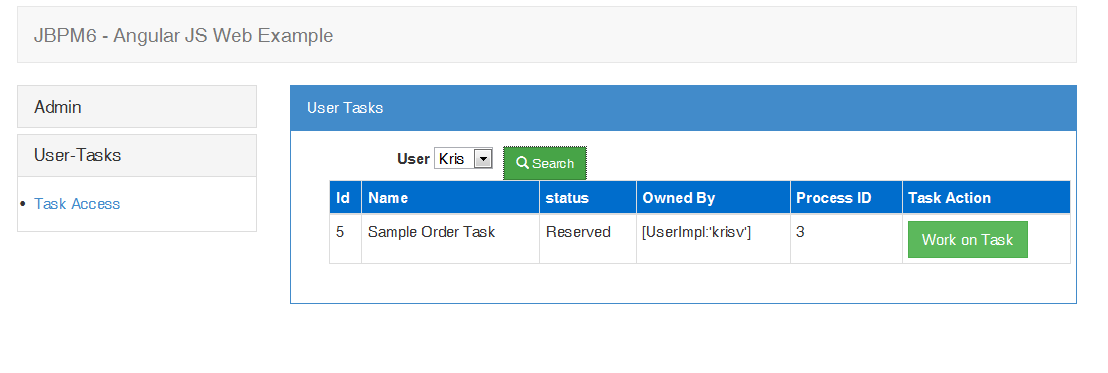
Then the task data is rendered in the view (usertasks.html) using the following Angular directive ng-repeat and Bootstrap.


How to deploy the application?
Create the war file (e.g., mvn install or mvn pacakage) and deploy in Tomcat. Follow the instructions provided in (jBPM6 - Tomcat 7 - Web Example) to configure JNDI. It should be noted that though the UI and REST API code is packaged using a single war file for the simplicity, UI component can be deployed on a different server.
JBPM6 provides the flexibility to extend the default process constructs with domain-specific extensions.
The domain-specific work items (also called service nodes) specify the work that should be executed in the context of a process in a declarative approach.
Here is a simple example that shows the usage of a custom workitem that has a few parameters.
This custom extension feature provides the ability to create a service task, a generic way to interact with external services (e.g., REST, JMS, Web service etc).
Start with the setup as shown in https://community.jboss.org/people/bpmn2user/blog/2013/12/17/jbpm6--eclipse-plugin-installation.
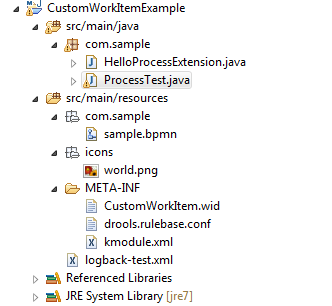
This example has a bpmn file that has the custom WorkItem(sample.bpmn), two WorkItem configurations files (CustomWorkItem.wid and drools.rulebase.conf), WorkItem implementation class (HelloProcessExtension.java) and test class (ProcessTest.java).
Here is the configuration file CustomWorkItem.wid that provides information about the display name, parameter types etc and it should be placed in the project classpath (in PROJECT/src/main/resources/META-INF/CustomWorkItem.wid). Any custom icons for the workitems are places in PROJECT/src/main/resources/icons.

The definition of the workitem (CustomWorkItem.wid) needs to be registered in a project. It can be done by including the definition using the drools.WorkDefinitions property in a file drools.rulebase.conf in META-INF dircectory.
![]()
After creating a definition and registering the workitem, it will show up in designer. The Eclipse might need to be restarted after creating the configuration files(i.e, CustomWorkItem.wid and drools.rulebase.conf files in META-INF directory of the project)
The new workitem 'HelloProcessExtension' can be seen in 'Service Tasks' as shown below.
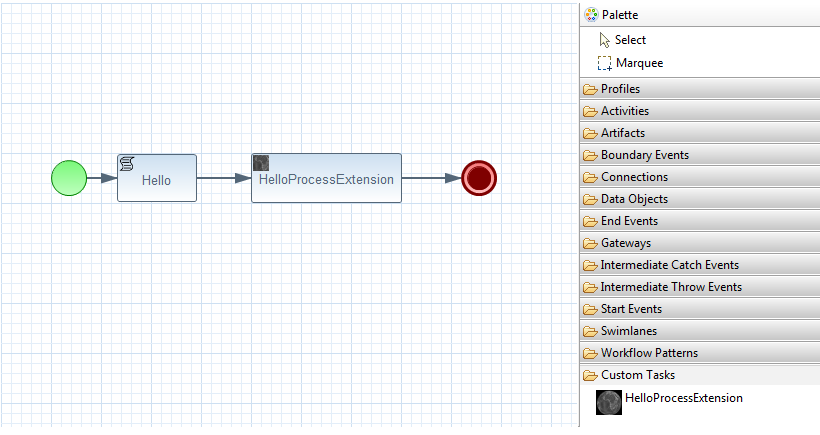
'HelloProcesExtension' node can be created inside the process using drag and drop.
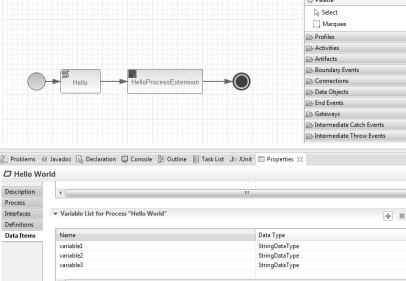
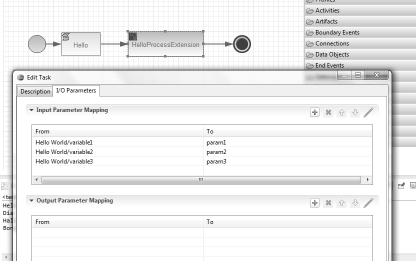
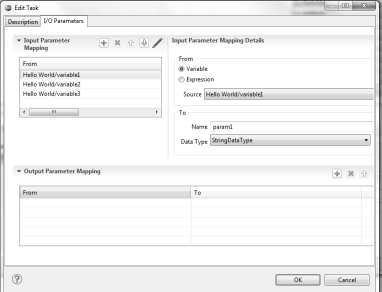
A WorkItemHandler implementation class needs to be created for the 'HelloProcessExtension' node.
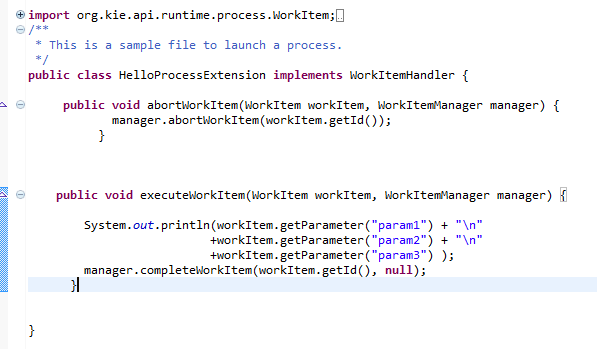
The WorkItemHandler should be registered at the WorkItemManager, using API as shown below (in ProcessTest.java)
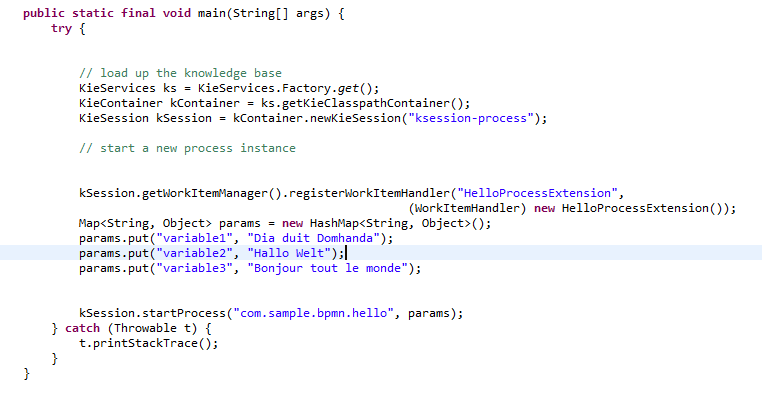
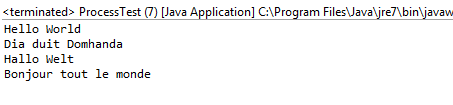
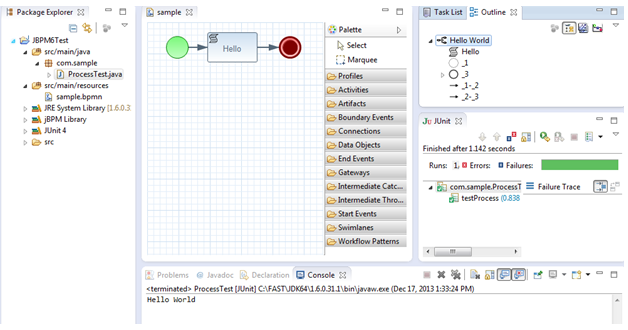
After running the test class 'ProcessTest.java', following results can be seen.
Here is a simple web example that shows how to use jBPM6 API to process human tasks. This blog uses the same example show in JBPM5 Web Example - Local Human Task.
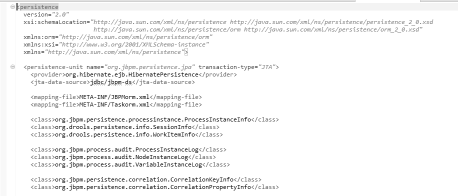
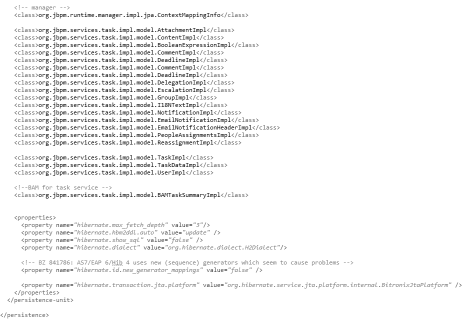
This example uses H2 database and it can so be seen that Hibernate persistence dialect is set to H2Dialect in the META-INF/persistence.xml.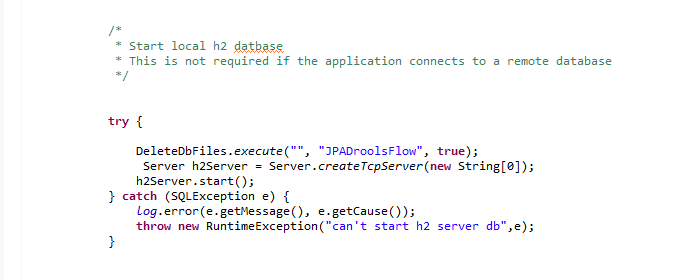
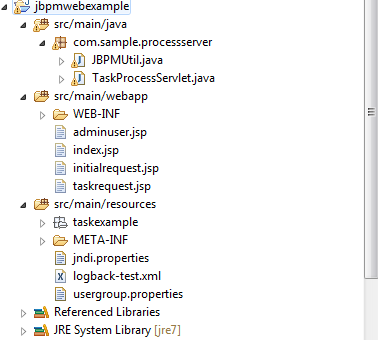
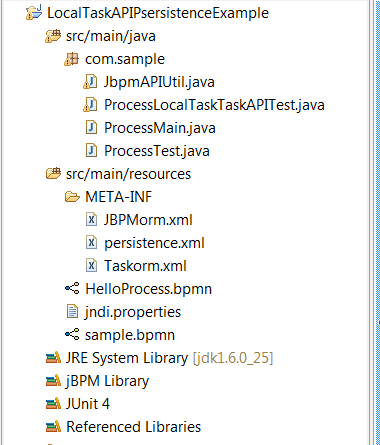
This example has the following files as shown below.
TaskProcessServlet performs various actions (such as retrieving and completing the tasks etc) using the JBPM API (JbpmAPIUtil).
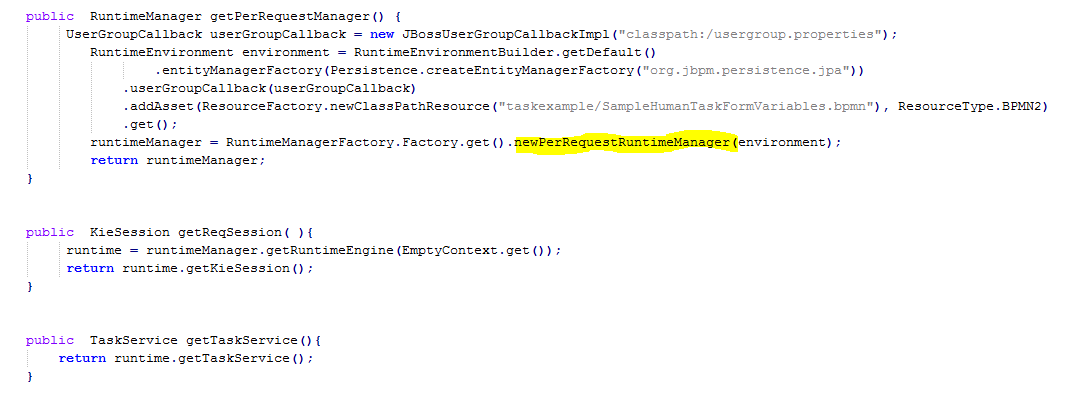
jBPM6 introduces a new module called RuntimeManager which simplies the access to KnowledgeSession (KieSession) and taskservice etc.
There are various pre-defined startegies for creating RuntimeManager, such as singleton (one session for all the requests), session per request (a new session for each request) and session per process instance (each process has its own context and all the commands get executed in that context
This example uses singleton strategy.
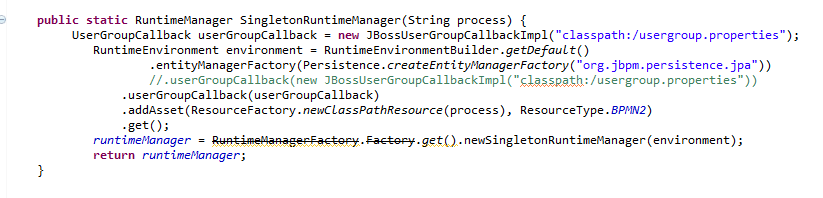
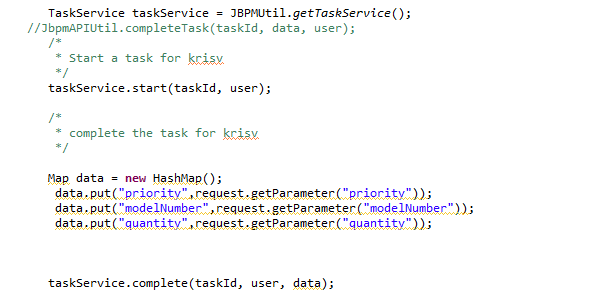
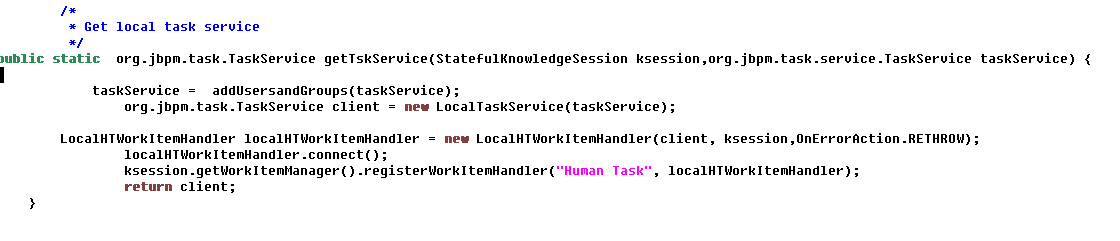
Here is the sample code that shows how to create a task service and complete the task.
How to run and deploy in web container, e.g., Tomcat?
Use maven to create a war file (e.g., mvn package) and copy the war file to TOMCAT_HOME/webapps
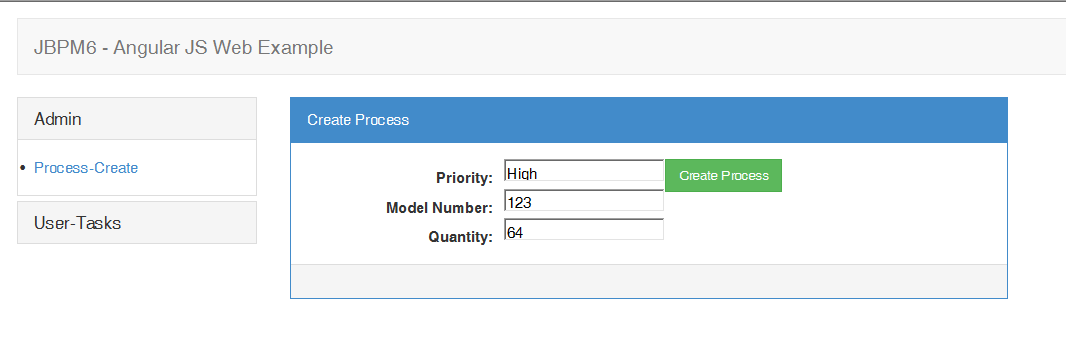
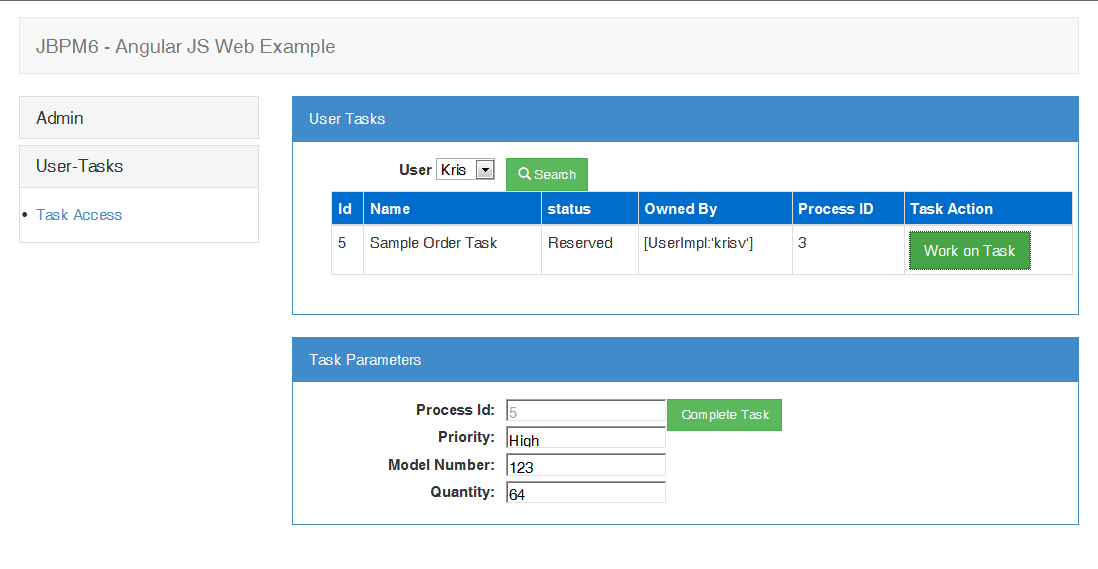
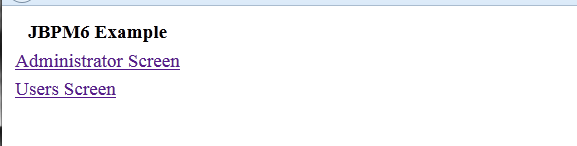
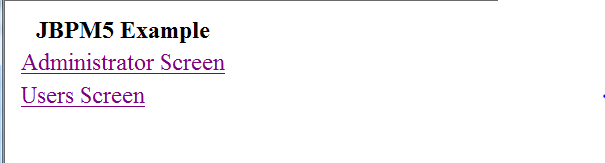
A successful deployment shows the following page (e.g., http://localhost:8080/jbpmwebexample/)
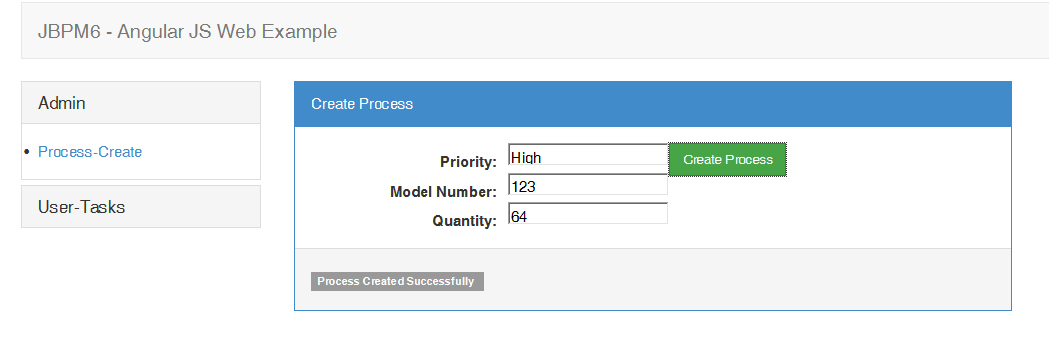
A process instance can be created selecting 'CreateProcess' button.
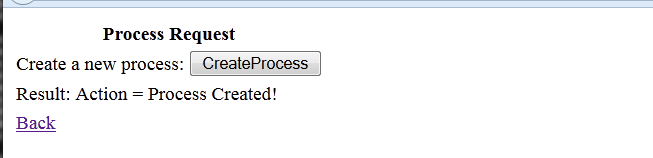
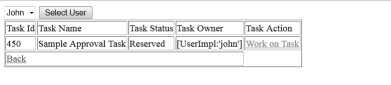
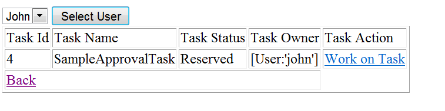
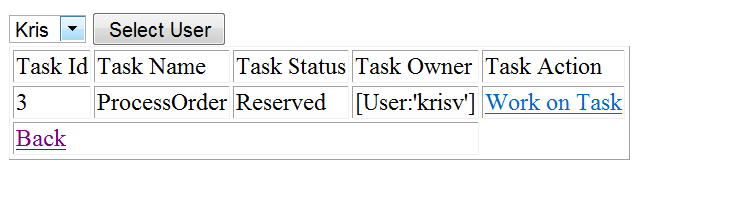
The tasks for the first user can retrieved by selecting the button 'Select User'.

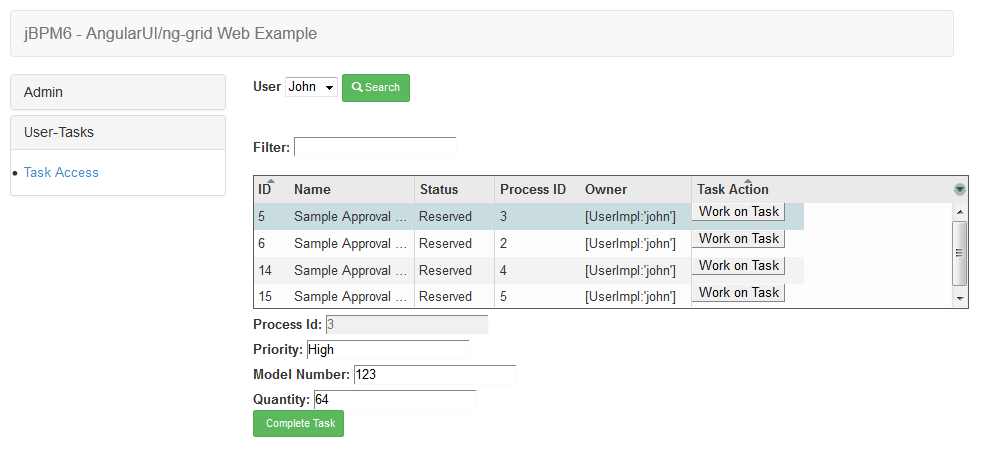
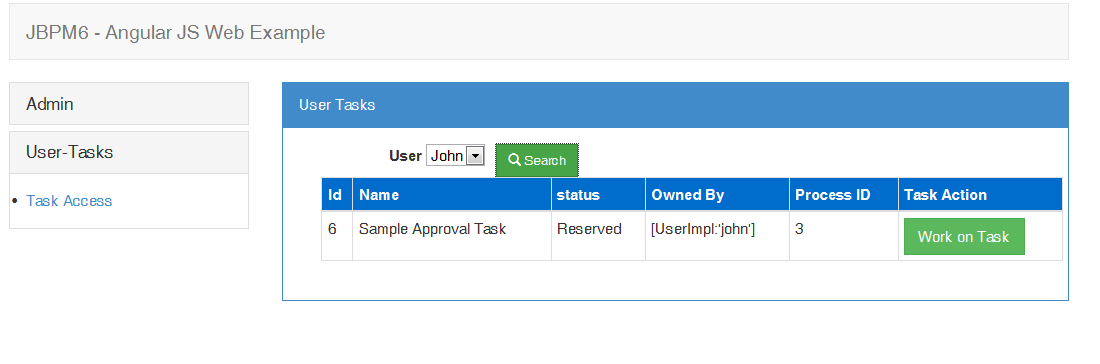
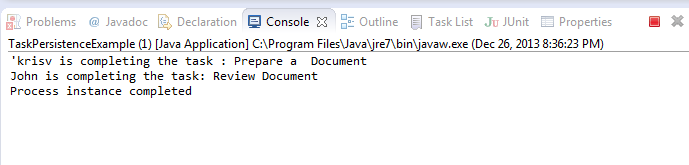
After completing the task as the first user, i.e., krisv, it would wait at the second task that needs to be approved by 'john'.

This example requires a JNDI datasource.
Here are the main steps and refer to http://docs.codehaus.org/display/BTM/Tomcat for more details.
1.) Copy the following libraries to TOMCAT_HOME/lib
btm-2.14.jar
btm-tomcat55-lifecycle-2.1.4.jar
slf4j-api-1.6.4.jar
slf4j-jdk14-1.6.4.jar
geronimo-jta_1.1_spec-1.1.1.jar
h2-1.3.161.jar
a.) Create the following btm-config.properties in TOMCAT_HOME/conf
bitronix.tm.serverId=tomcat-btm-node0
bitronix.tm.journal.disk.logPart1Filename=${btm.root}/work/btm1.tlog
bitronix.tm.journal.disk.logPart2Filename=${btm.root}/work/btm2.tlog
bitronix.tm.resource.configuration=${btm.root}/conf/resources.properties
b.) Add transaction and Resource information after 'WatchedResource' line in TOMCAT_HOME/conf/context.xml as shown below.
.........
..........
<WatchedResource>WEB-INF/web.xml</WatchedResource>
<Transaction factory="bitronix.tm.BitronixUserTransactionObjectFactory" />
<Resource name="jdbc/jbpm-ds" auth="Container" type="javax.sql.DataSource"
maxActive="15" maxIdle="2" maxWait="10000"
logAbandoned="true"
username="sa" password=""
driverClassName="org.h2.jdbcx.JdbcDataSource"
url="jdbc:h2:tcp://localhost/~/test"/>
..........
.........
c.) Create 'resource.properties' in TOMCAT_HOME/conf as shown below.
resource.ds1.className=bitronix.tm.resource.jdbc.lrc.LrcXADataSource
resource.ds1.uniqueName=jdbc/jbpm-ds
resource.ds1.minPoolSize=0
resource.ds1.maxPoolSize=5
resource.ds1.driverProperties.driverClassName=org.h2.jdbcx.JdbcDataSource
d.) Modify TOMCAT_HOME/conf/server.xml to include BTMLifecycleListener after the line that has GlobalResourcesLifecycleListener as shown below.
.........
<Listener className="org.apache.catalina.mbeans.GlobalResourcesLifecycleListener" />
<Listener className="bitronix.tm.integration.tomcat55.BTMLifecycleListener" />
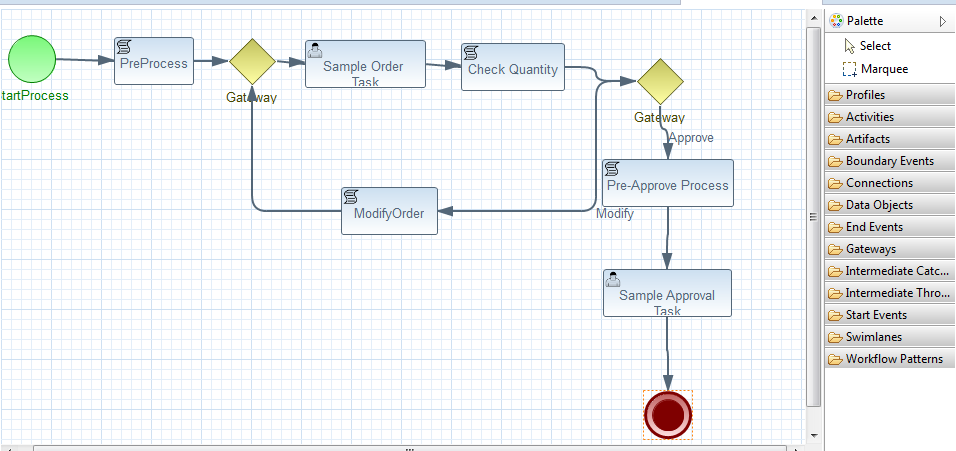
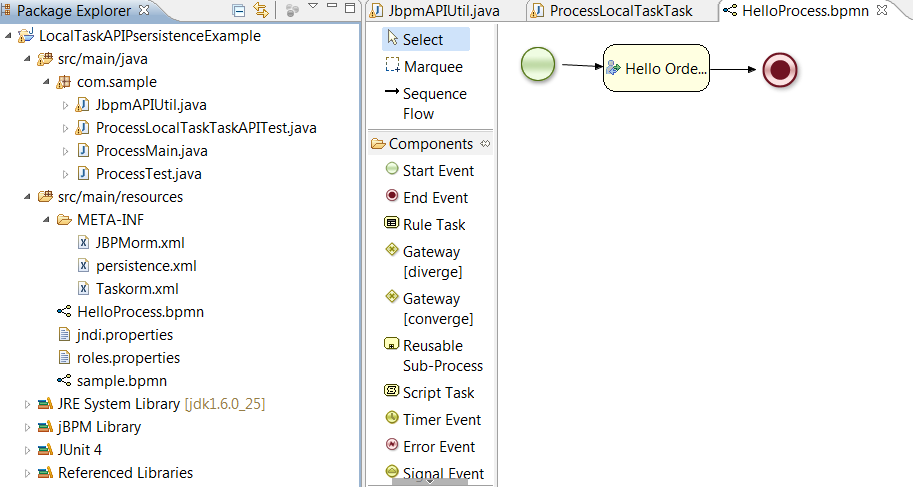
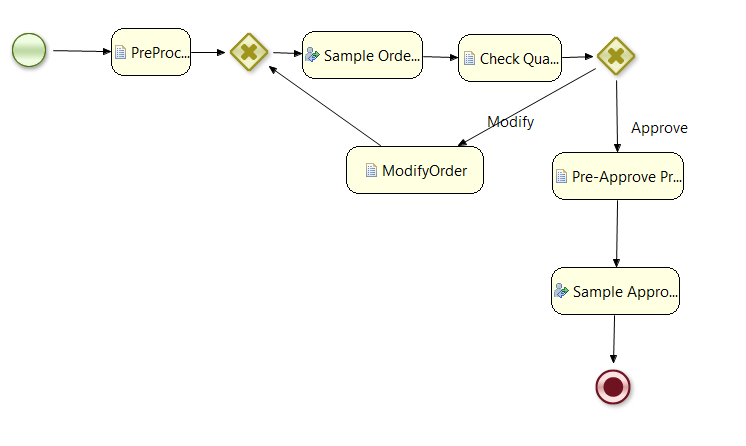
Here is an example that shows task persistence using H2 database. A simple process that has a couple of human tasks as shown below is considered for this example.
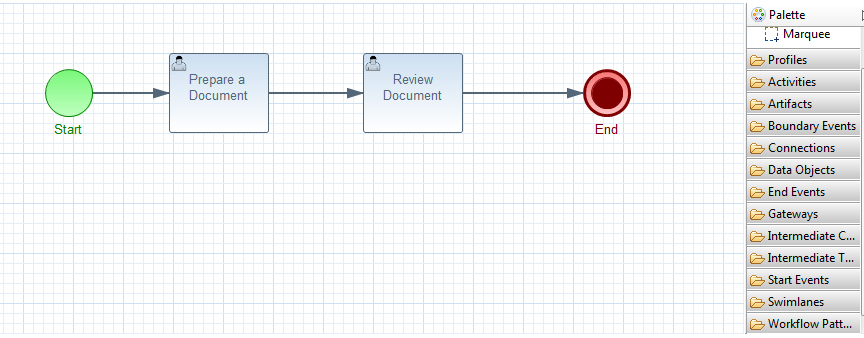
This example uses the jBPM plugin for Eclipse (jBPM6 - Eclipse BPMN Modeler Installation).
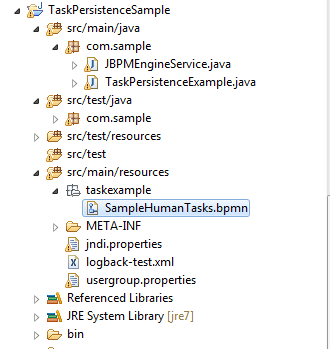
This examples has a bpmn file (SampleHumanTasks.bpmn), a process test program that starts the process(TaskPersistnecTest.java or TaskPersistenceExample.java), a persistence configuration files (persistence.xml ) and a Bitronix JNDI file ( jndi.properties) .
The persistence configuration file needs to be included in META-INF folder as shown below. Please refer to JPA/Hibernate documents to know more about persistence configuration details.
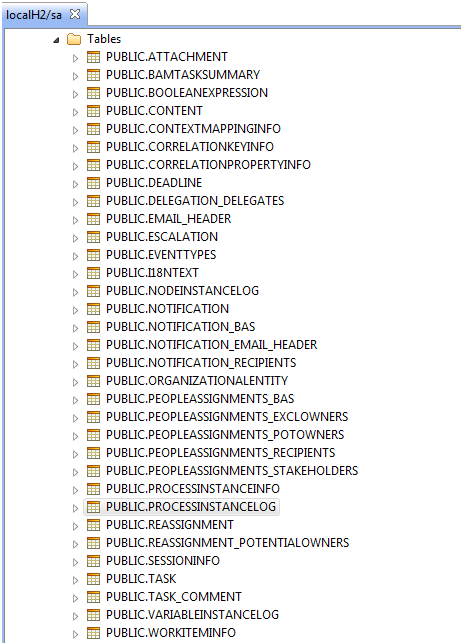
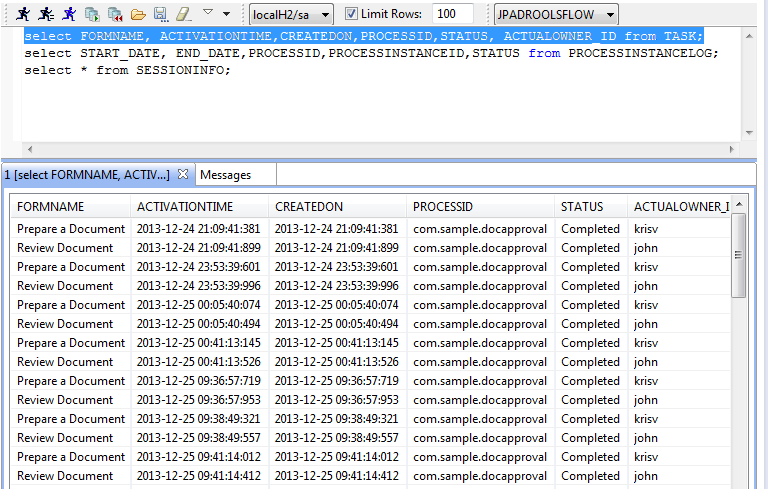
This example uses H2 database to show the persistence of process state into various tables.
JBPM6 database persistence involves following categories:
1.) Process persistence: This involves persisting runtime state that represents current execution state in a specific context. The runtime state contains the minimal runtime state that is required to continue execution at a later time. This allows restoring the state of execution of all the running processes (e.g., ProcessInstanceInfo) in the event of a failure.
2.) Human task persistence: Task management component, which is treated as a separate component, can persist all the task information (e.g, user, assignment etc) into database.
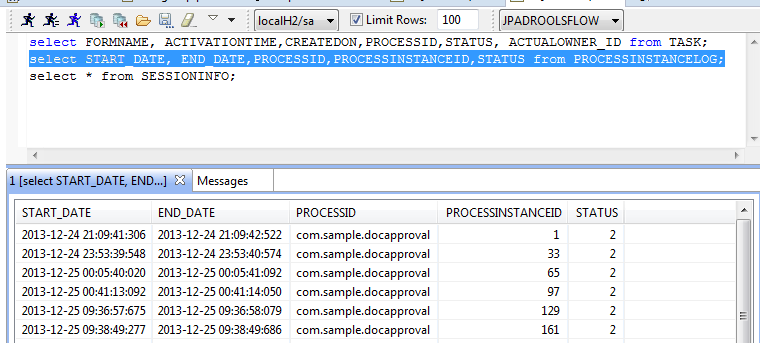
3.) History or Auditlog persistence: All the audit log information(e.g., ProcessInstanceLog, NodeInstanceLog etc)can stored in database for reporting purposes.
The database tables can be viewed in Eclipse using one of database plugins such as SQLExplorer, QuantumDB etc.
The database mapping of various tables can be seen in the JPA persistence xml file included in META-INF.
jBPM6 introduces a new module called RuntimeManager which simplies the access to KnowledgeSession (KieSession) and taskservice etc.
There are various pre-defined startegies for creating RuntimeManager, such as singleton (one session for all the requests), session per request (a new session for each request) and session per process instance (each process has its own context and all the commands get executed in that context).
This example uses singleton strategy.

Here is a code snippet that shows how to use the taskservice to start and complete a task.
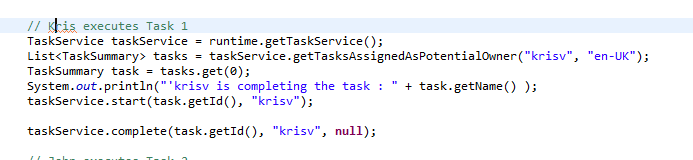
After running the example successfully following results can be seen,
A SQL client can be used to examine the contents of various process, task and audit tables.
This example shows how to use an Excel decision table rules inside a jBPM6 process using the example (JBPM5 - RuleTask Example Using an Excel Decision Table). As this example uses Eclispe plugin, install Drools/JBPM 6 plugin (Drools 6 - Eclipse Plugin Installation and Hello World Example).
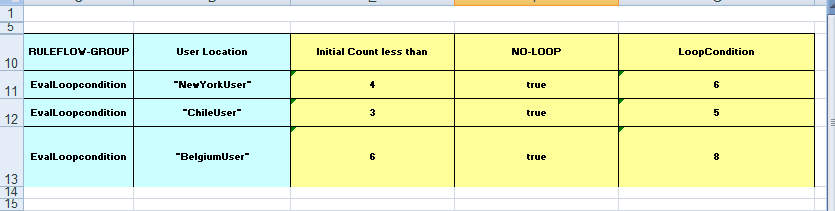
Here are rules represented in Excel decision table.
There are three rules in the following decision table. For example, Rule1 (Row 11) means that if the 'userlocation' is set to ‘NewYorkUser’ and the initial count is less 4, then the ‘loopcondition’ is set to 6.
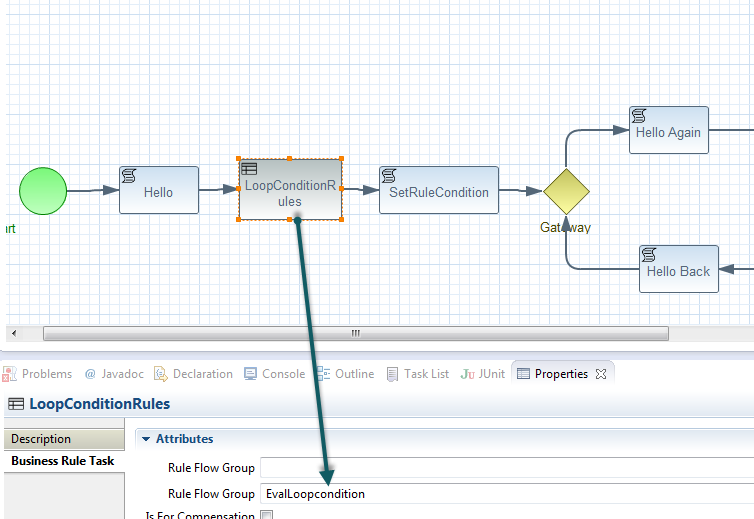
Following is the main process flow diagram. This example has a loop condition which is determined using the rules shown in the above decision table in the RuleTask 'LoopConditionRules'.

'LoopConditionRules' is a 'Rule Task' component and it needs to have a valid RuleFlowGroup name (e.g., EvalLoopcondistion as shown below) and it should match with the 'RULEFLOW-GROUP' name (Column C) of the decision table.
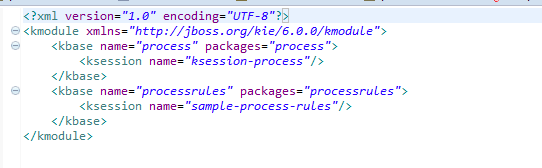
kmodule.xml file provides the name of the package and the ksession's name.
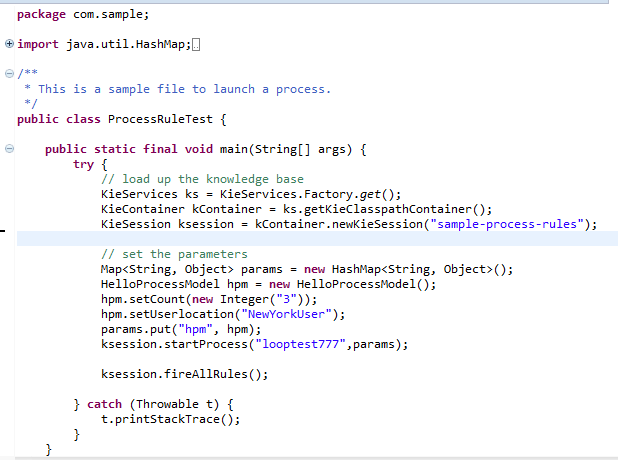
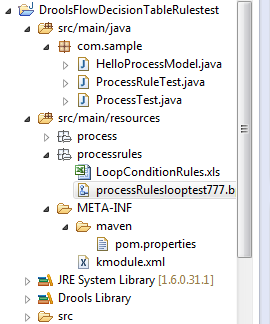
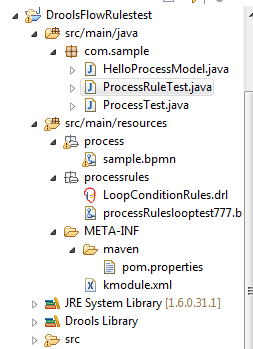
This example has a bpmn file (processRuleslooptest777.bpmn), model file (HelloProcessModel.java), rules file (LoopConditionRules.xls) and a test file (ProcessRuleTest.java).
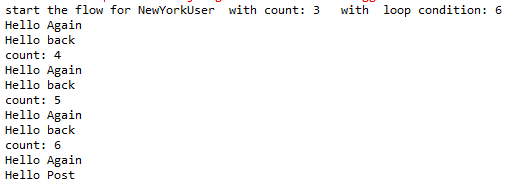
After running ProcessRuleTest successfully, following results can be seen.
This example shows how to use a 'Rule Task' component within a jBPM6 process using the example shown in JBPM5 - RuleTask Example Using a Rule File and it is illustrated using drools/jbpm Eclipse plugin (Drools 6 - Eclipse Plugin Installation and Hello World Example).
This example has a loop condition which is determined using the rules based on the location of the user and the starting condition.This example has a loop condition which is determined using the rules based on the location of the user and the starting condition.
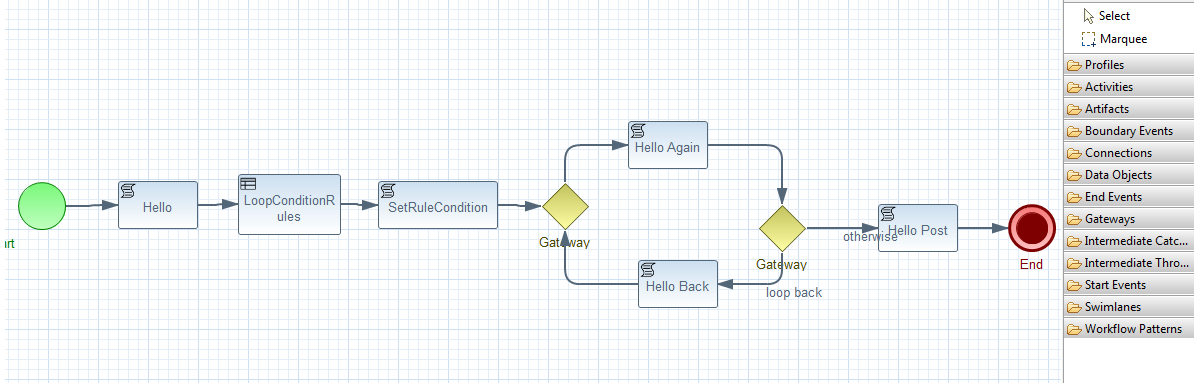
'LoopConditionRules' is a 'Rule Task' component and it needs to have a valid RuleFlowGroup name (e.g., EvalLoopcondistion as shown below).

The RuleFlowGroup set in the previous step has to match with the 'ruleflow-group' name in the 'drl' rules file as shown below.
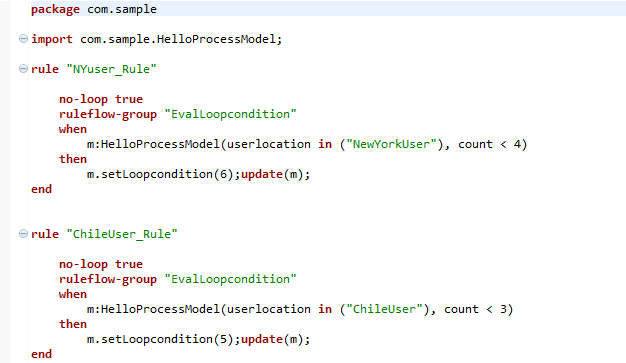
Here is the sample test code to start the process after setting the initial parameters.
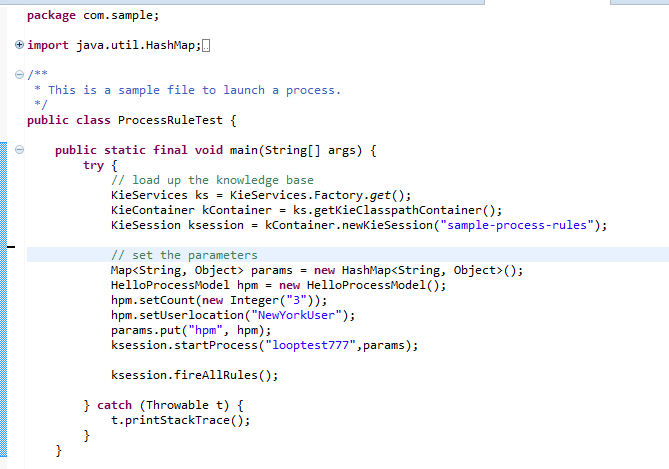
This example has a bpmn file (processRuleslooptest777.bpmn), model file (HelloProcessModel.java), rules file (LoopConditionRules.drl) and a test file (ProcessRuleTest.java). After running ProcessRuleTest successfully, following results can be seen.

Here are the manual steps to install Drools 6 plug-in and run a sample example in Eclipse.
1.) Download Eclipse Juno:
Unzip this into a directory, say DROOLS6
2.) Download Drools and JBPM6 plug-in, i.e.,:
http://download.jboss.org/drools/release/6.0.0.Final/droolsjbpm-tools-distribution-6.0.0.Final.zip
Unzip this plugin to a temp directory, say TEMP\drools-update-site. Copy 'features' and 'plugins' directories from TEMP\drools-update-site into
DROOLS6\eclipse
It is required to have a runtime dependant libraries that a Drools project can use.
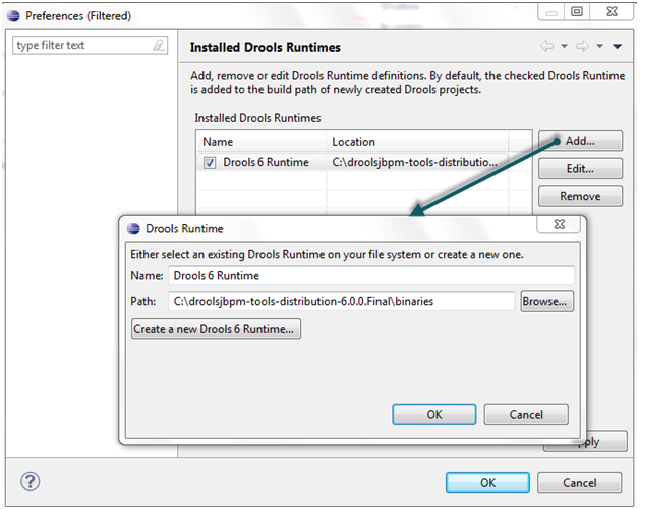
3.) Set 'Installed Drools Runtimes' to the runtime directory as shown below (Window->Preferences->Installed Drools Runtimes)
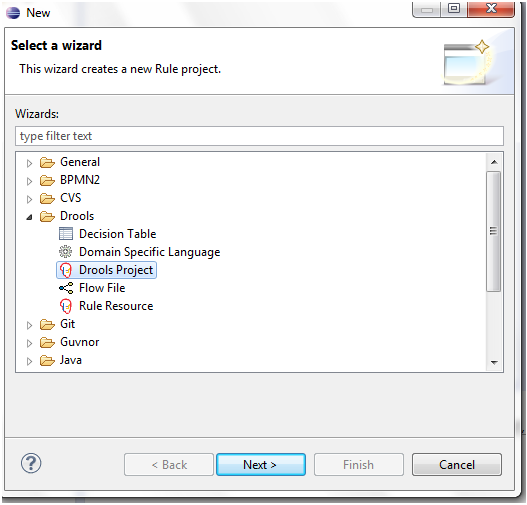
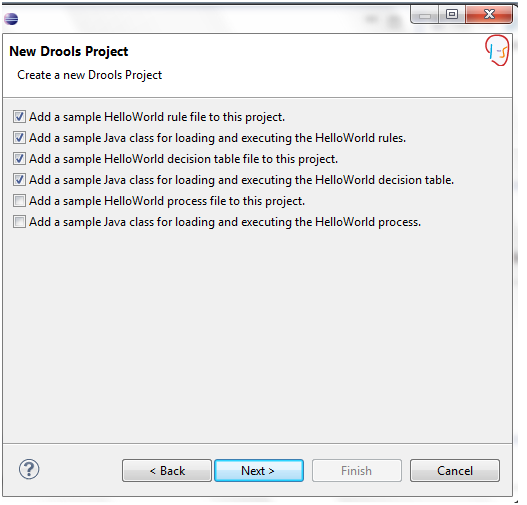
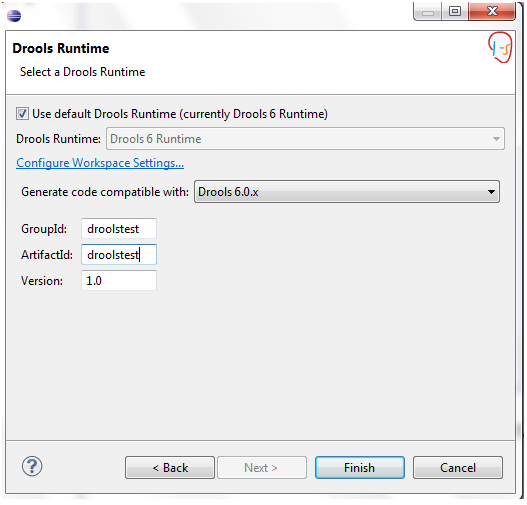
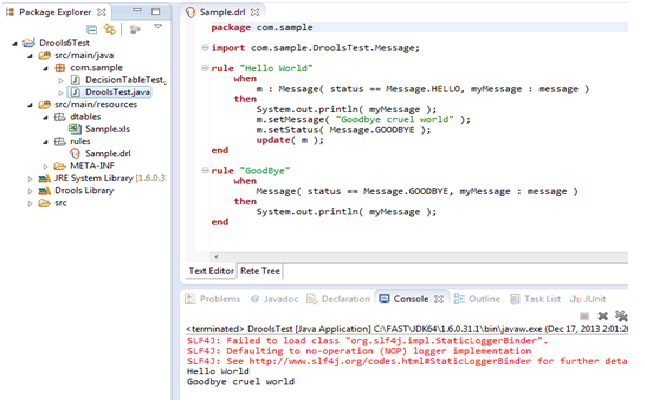
4.) Create a new Drools sample project in Eclipse.
Here are the manual steps to install jBPM6 Modeler and run a sample example in Eclipse.
1.) Download Eclipse Juno:
Unzip this into a directory, say jbpm6
2.) Download Drools and jBPM6 plugin, i.e.,:
http://download.jboss.org/drools/release/6.0.0.Final/droolsjbpm-tools-distribution-6.0.0.Final.zip
Unzip this plugin to a temp directory, say TEMP\droolsjbpm-tools-distribution-6.0.0.Final. Copy 'features' and 'plugins' directories from TEMP\droolsjbpm-tools-distribution-6.0.0.Final into
JBPM6\eclipse
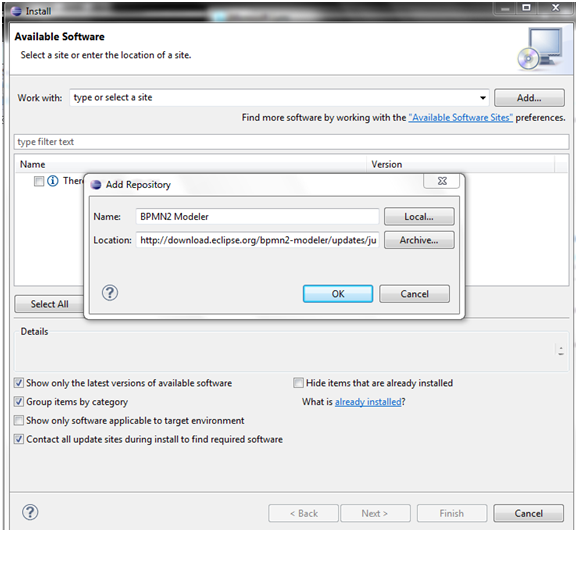
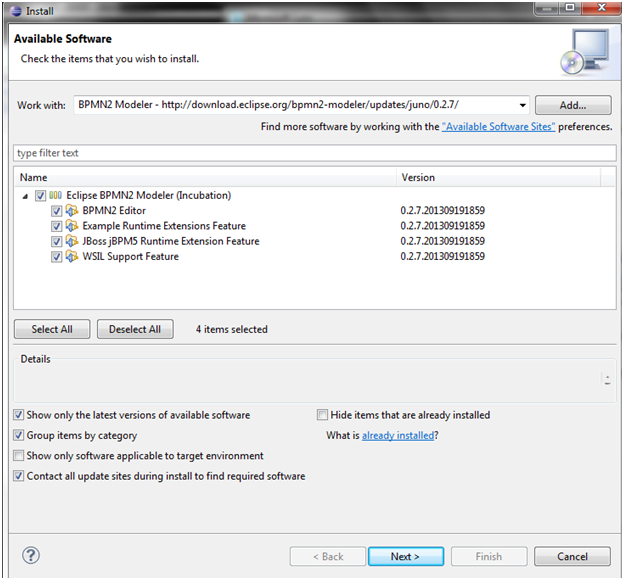
3.) Install the BPMN 2 plug-in (http://projects.eclipse.org/projects/soa.bpmn2-modeler) using the update link http://download.eclipse.org/bpmn2-modeler/updates/juno/0.2.7/
It is required to have a runtime dependant libraries that a jBPM6 sample can use.
4.) Download the libraries (jbpm-6.0.0.Final-bin.zip ) from
and unzip into a directory, say JBPM6\runtime.
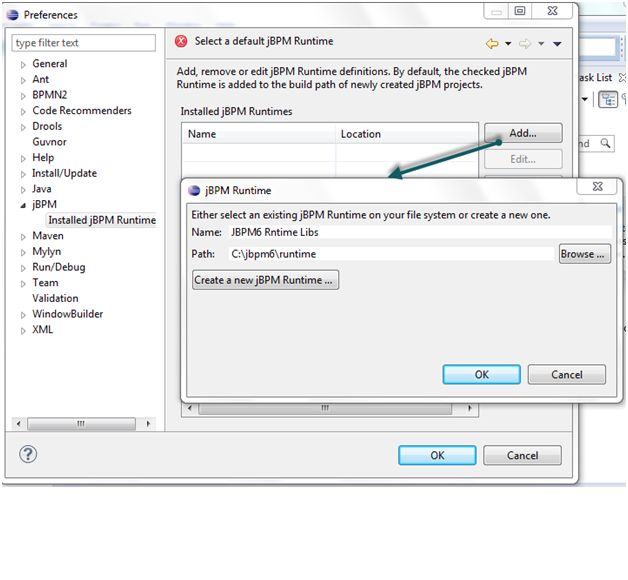
Set 'Installed jBPM Runtimes' to the runtime directory as shown below (Window->Preferences->Installed jBPM Runtimes)
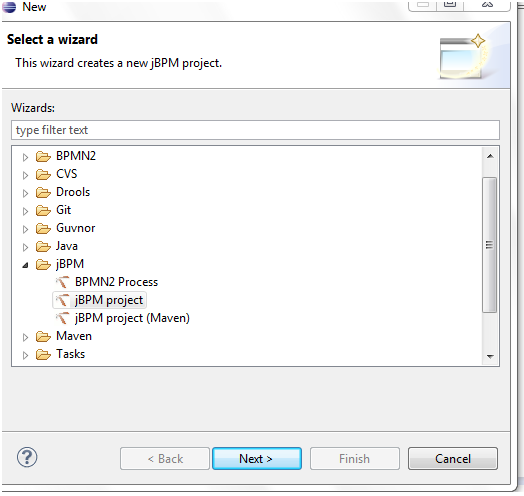
5.) Craete a sample jBPM Project using File->New->Project->jBPM->jBPM Project

Here is example that shows how to use Local Human Task for task sevice in a web application instead of using task service based on Mina server.
This blog uses the same example shown in http://community.jboss.org/people/bpmn2user/blog/2011/09/21/jbpm5-web-example.

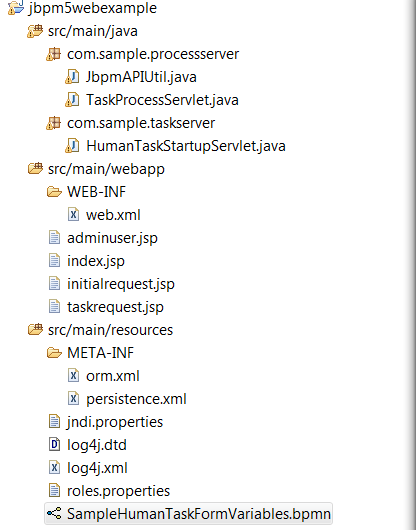
This example has the following files as shown below.
TaskProcessServlet performs various actions (such as retrieving and completing the tasks etc) using the JBPM API (JbpmAPIUtil).

It should also be noted that this example uses 'DefaultUserGroupCallbackImpl' for user group managemnet. Any custom user group managemnt, such as LDAP etc, can be used.
![]()
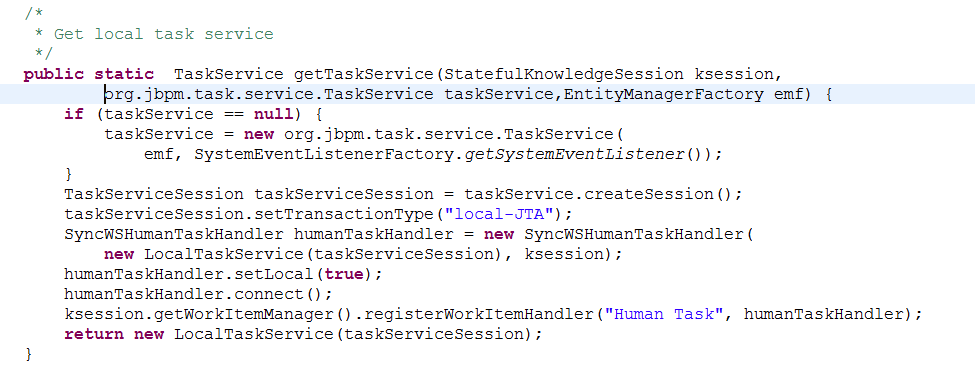
Here is the sample code to create the task service using Local Human Task.
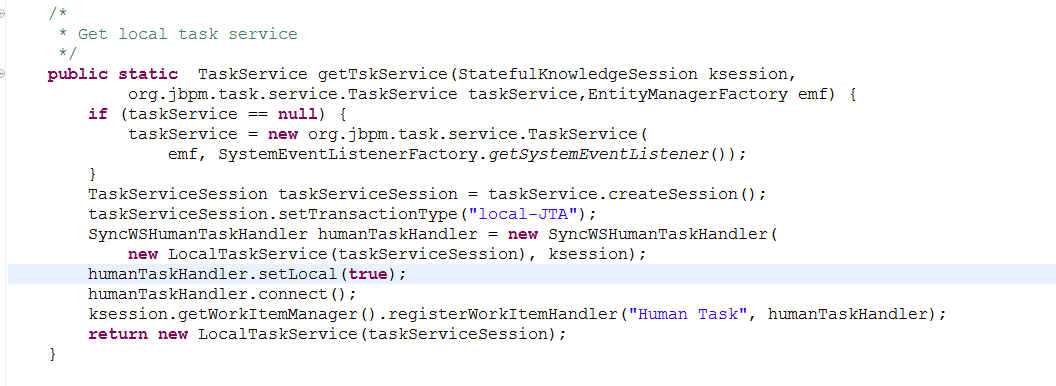
How to run and deploy in web container, e.g., Tomcat?
Use maven to create a war file (e.g., mvn package) and copy the war file to TOMCAT_HOME/webapps
A successful deployment shows the following page (e.g., http://localhost:8080/jbpm5webexample/)
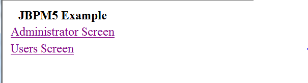
A process instance can be created by selecting 'CreateProcess' button.

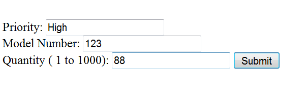
The tasks for the first user can be retrieved by selectig the button 'Select User'.
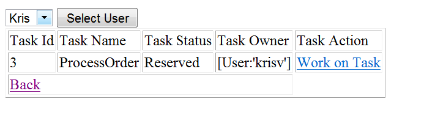
After completing the task as the first user, krisv, it would wait at the second task, that needs to be approved by 'john'.
It is also required to set datasource JNDI.
Refer to http://community.jboss.org/people/bpmn2user/blog/2011/01/21/test for the settings in Tomcat.
Here are the main steps:
1.) Copy the following libraries to TOMCAT_HOME/lib
btm-1.3.1.jar
btm-tomcat55-lifecycle-1.3.3.jar
slf4j-api-1.5.2.jar
slf4j-jdk14-1.5.2.jar
btm-1.3.1.jar
jta-1.1.jar
h2-1.3.155.jar
a.) Create the following btm-config.properties in TOMCAT_HOME/conf
bitronix.tm.serverId=tomcat-btm-node0
bitronix.tm.journal.disk.logPart1Filename=${btm.root}/work/btm1.tlog
bitronix.tm.journal.disk.logPart2Filename=${btm.root}/work/btm2.tlog
bitronix.tm.resource.configuration=${btm.root}/conf/resources.properties
b.) Add transaction and Resource information after 'WatchedResource' line in TOMCAT_HOME/conf/context.xml as shown below.
.........
..........
<WatchedResource>WEB-INF/web.xml</WatchedResource>
<Transaction factory="bitronix.tm.BitronixUserTransactionObjectFactory" />
<Resource name="jdbc/jbpm-ds" auth="Container" type="javax.sql.DataSource"
maxActive="15" maxIdle="2" maxWait="10000"
logAbandoned="true"
username="sa" password=""
driverClassName="org.h2.jdbcx.JdbcDataSource"
url="jdbc:h2:tcp://localhost/~/test"/>
..........
.........
c.) Create 'resource.properties' in TOMCAT_HOME/conf as shown below.
resource.ds1.className=bitronix.tm.resource.jdbc.lrc.LrcXADataSource
resource.ds1.uniqueName=jdbc/testDS1
resource.ds1.minPoolSize=0
resource.ds1.maxPoolSize=5
resource.ds1.driverProperties.driverClassName=org.h2.jdbcx.JdbcDataSource
d.) Modify TOMCAT_HOME/conf/server.xml to include BTMLifecycleListener after the line that has GlobalResourcesLifecycleListener as shown below.
.........
<Listener className="org.apache.catalina.mbeans.GlobalResourcesLifecycleListener" />
<Listener className="bitronix.tm.integration.tomcat55.BTMLifecycleListener" />
Update: This example has been updated for the version 5.4 and the modified code is included in the following attachment jbpm5.4webexample.zip.
A local version of task service (LocalTaskService) is supported in the version 5.4 and it is integrated with the transaction of the process engine.
Here is an example that shows the usage of local task service instead of using Mina server as shown in http://community.jboss.org/people/bpmn2user/blog/2011/04/03/jbpm5-human-task-api-usage-example.
This approach would give the ability to run the both task service and BPM processes in the same JVM, i.e., it does not require over the network Mina task service execution calls.
This example requires JBPM5.2 release.
How to install and run this example?
Start with the JBPM plug-in setup as shown in http://community.jboss.org/people/bpmn2user/blog/2011/02/27/eclipse-plug-in-installation-for-jbpm5. Make sure jBPM5.2 libraries are used. Import the attached files into a JBPM project as shown below.
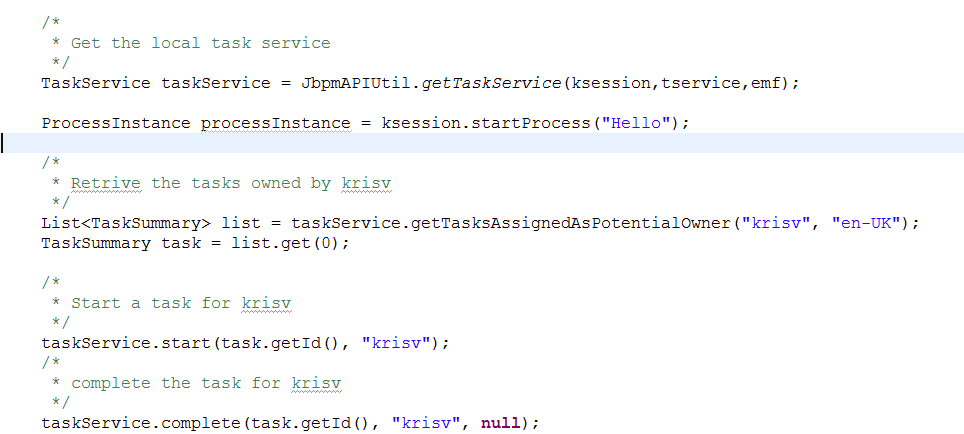
Here is a simple human task that is processed using local task service.
A local task service can be created as shown below.
A task can be started and completed using the API as shown below. It has a few API changes. For example
Following results can be seen after running the example successfully.

Update for the version 5.4:
This example has been modified for the version 5.4 and included in the attachment JBPM5.4LocalTaskExample.zip.
It has a few API changes. For example, SyncWSHumanTaskHandler in JBPMAPIUtil.java is replaced with LocalHTWorkItemHandler.
Here is an example that shows how to embed jBPM5 in a simple web application.
This example uses the same bpmn file used in the example -http://community.jboss.org/people/bpmn2user/blog/2011/02/21/jbpm5-example-for-forms-with-variables where JBPM5 console is used.
This example uses simple jsp/servlets to access BPM engine.
One should note that any front-end (such as jsp,SpringMVC,Swing,GWT,Flex etc) can be used to access the jBPM engine using the API.
Recommended reading:
1.) http://community.jboss.org/people/bpmn2user/blog/2011/04/03/jbpm5-human-task-api-usage-example
2.) http://community.jboss.org/people/bpmn2user/blog/2011/03/25/jbpm5--persistence-hello-process-example
This example has the following files as shown below.
TaskProcessServlet performs various actions (such as retrieving and completing the tasks etc) using the JBPM API (JbpmAPIUtil.)
HumanTaskStartupServlet starts a sample database (H2) and Mina server for the illustration purpose. It should be noted that Mina server is typically started as a separate process.
How to run and deploy in web container, e.g., Tomcat?
Use maven to create a war file (e.g., mvn package) and copy the war file to TOMCAT_HOME/webapps
A successful deployment shows the following page (e.g., http://localhost:8080/jbpm5webexample/)
A process instance can be created by selecting 'CreateProcess' button.

The tasks for the first user can be retrieved by selectig the button 'Select User'
After completing the task as the first user, krisv, it would wait at the second task, that needs to be approved by 'john'
 .
.
It is also required to set datasource JNDI.
Refer to http://community.jboss.org/people/bpmn2user/blog/2011/01/21/test for the settings in Tomcat.
Here are the main steps:
1.) Copy the following libraries to TOMCAT_HOME/lib
btm-1.3.1.jar
btm-tomcat55-lifecycle-1.3.3.jar
slf4j-api-1.5.2.jar
slf4j-jdk14-1.5.2.jar
btm-1.3.1.jar
jta-1.1.jar
h2-1.3.155.jar
a.) Create the following btm-config.properties in TOMCAT_HOME/conf
bitronix.tm.serverId=tomcat-btm-node0
bitronix.tm.journal.disk.logPart1Filename=${btm.root}/work/btm1.tlog
bitronix.tm.journal.disk.logPart2Filename=${btm.root}/work/btm2.tlog
bitronix.tm.resource.configuration=${btm.root}/conf/resources.properties
b.) Add transaction and Resource information after 'WatchedResource' line in TOMCAT_HOME/conf/context.xml as shown below.
.........
..........
<WatchedResource>WEB-INF/web.xml</WatchedResource>
<Transaction factory="bitronix.tm.BitronixUserTransactionObjectFactory" />
<Resource name="jdbc/testDS1" auth="Container" type="javax.sql.DataSource"
maxActive="15" maxIdle="2" maxWait="10000"
logAbandoned="true"
username="sa" password=""
driverClassName="org.h2.jdbcx.JdbcDataSource"
url="jdbc:h2:tcp://localhost/~/test"/>
..........
.........
c.) Create 'resource.properties' in TOMCAT_HOME/conf as shown below.
resource.ds1.className=bitronix.tm.resource.jdbc.lrc.LrcXADataSource
resource.ds1.uniqueName=jdbc/testDS1
resource.ds1.minPoolSize=0
resource.ds1.maxPoolSize=5
resource.ds1.driverProperties.driverClassName=org.h2.jdbcx.JdbcDataSource
d.) Modify TOMCAT_HOME/conf/server.xml to include BTMLifecycleListener after the line that has GlobalResourcesLifecycleListener as shown below.
.........
<Listener className="org.apache.catalina.mbeans.GlobalResourcesLifecycleListener" />
<Listener className="bitronix.tm.integration.tomcat55.BTMLifecycleListener" />
Also look into the following link to run this example using jBPM5.2
JBPM5 provides a web based console for human task management. One can develop forms using ftl templates using FreeMarker (http://freemarker.sourceforge.net/) and provide human task management (e.g., http://community.jboss.org/people/bpmn2user/blog/2011/02/21/jbpm5-example-for-forms-with-variables?page=2).
It should also be noted that one can process the human tasks through JBPM5 API. This gives the flexibility to use any front-end user interface that can interact with the JBPM5 runtime environment using API.
Here is a simple example that shows how to query the tasks, complete the task etc using the API.
How to install and run this example?
Start with the JBPM plug-in setup as shown in http://community.jboss.org/people/bpmn2user/blog/2011/03/25/jbpm5--persistence-hello-process-example. Import the attached files into a JBPM project as shown below. It has three Java files (JbpmAPIUtil.java has general API methods that are used in JBPM console, TaskServer.java for Mina human task server and ProcessTaskAPITest.java for making human task management API calls).
Here is a simple human task that has input map data. This data typically entered in form. In this example, this data is sent using an API call.
The list of tasks assigned to a user can be obtained using the following method.
A task can be completed using the following method using taskid, user and data.
Start the TaskServer.java first and then run ProcessTaskAPITest.java to see the following results.
 '
'
Actions
Filter Blog
By date:
By tag: