A common use case for an ESB is to use it for transforming incoming and outgoing XML messages via XSLT. One example use case for this is versioning of web services.
Let's say we have one web service in our system that we want to proxy and expose via the ESB. Now we decide that we'd like to make a change to our web service, but don't want to break all the clients that are using the old version of the web service. Since we are mediating the web service via the ESB, we can expose both the old and new interfaces on the ESB. The new interface will just delegate to the new web service implementation. The old interface on the ESB can transform the old request to the new request, delegate to the new implementation, and then transform the new response to the old response to return to the old client.
This article is an attempt to show how to do the XSLT portion of this scenario on SOA-P 4.3 using Smooks.
Prerequisites:
Install Java 1.5
Install SOA-P 4.3 GA
Install JBDS 2.0.0.CR1
Configure SOA-P as a server in JBDS
We are going to do three main steps in this example:
1.) Create a simple ESB service that picks up an XML file from the filesystem and prints out its contents.
2.) Add an XSLT to the service to transform the XML file and print out the result.
3.) Add a second XSLT to the service to transform the XML again and print out the results - this will show a second way of configuring XSLTs with Smooks.
Step #1
First, we need to use JBDS to create a new ESB Project


Now, we want to create a file gateway and configure a new service to use it. So, we'll right-click on the "Providers" and add a new "FS Provider".


Now, we'll configure the FilePoller's filter to pull files with a given suffix from a directory that we specify.

Now, we need to create a new ESB service, so right-click on Services folder and select "Add Service"

Make sure we set the InVM Scope of the service to "GLOBAL" so that we can use the InVM listener instead of having to configure an additional non-gateway listener.

Right-click on the "Listeners" folder under the new service and add a new "FS Listener" that points to the provider we already configured.

Make sure to set this listener's "Is Gateway" to "true" so that we can pass it any kind of message we want, not just ESB Aware messages.

Now, we right-click on "Actions" and add a new System Println action that will display whatever files we drop in our polling directory.


That's pretty much it, now we need to "save" and right-click on our server and add this ESB project to it.


Now, we're going to drop a file (test.xml) in the directory we specified. Here are the contents of the file. If you're going to use the same XSLTs that I use later on, you'll need to use this same file. If you're going to write your own XSLTs, you can use whatever file you like. I took this file and one of the example XSLTs from this website: http://www.devasp.com/samplechapters/3579/default2.asp
------------------------------------------------------
<?xml version="1.0" encoding="utf-8" standalone="yes"?>
<Catalog>
<Book>
<Title>Designing Distributed Applications</Title>
<Authors>
<Author>Stephen Mohr</Author>
</Authors>
<PubDate>May 1999</PubDate>
<ISBN>1-861002-27-0</ISBN>
<Price>$49.99</Price>
</Book>
<Book>
<Title>Professional ASP 3.0</Title>
<Authors>
<Author>Alex Homer</Author>
<Author>Brian Francis</Author>
<Author>David Sussman</Author>
</Authors>
<PubDate>October 1999</PubDate>
<ISBN>1-861002-61-0</ISBN>
<Price>$59.99</Price>
</Book>
</Catalog>
------------------------------------------------------
Once we drop that file in the directory we specified, we should see something like this in the server console.
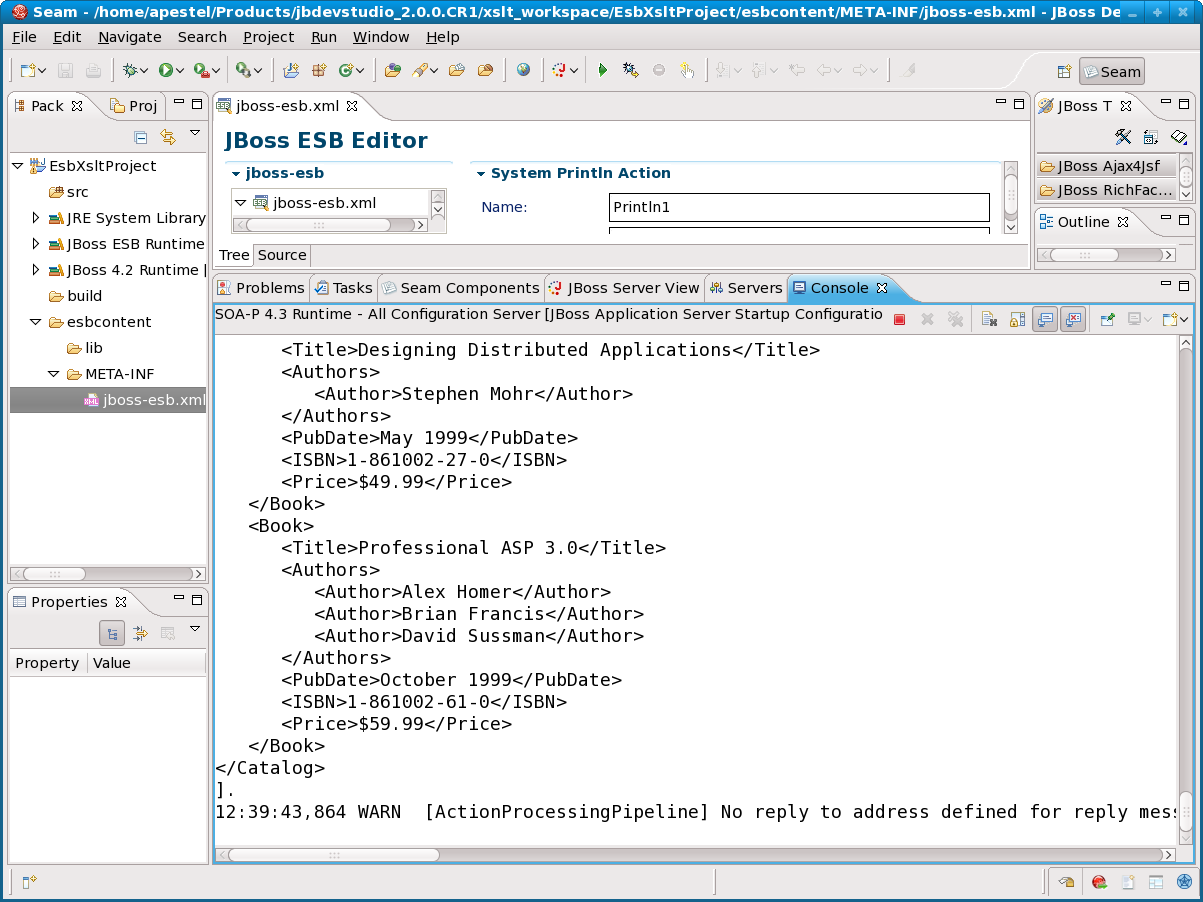
That's it, our XML message is on the bus, now it's finally time to add some XSLT...
Step #2
The first thing we need to do is right-click on our service's action folder and add a new generic action.

We now need to right-click on this new transformer action and add a property to point it to the smooks.xml file that we are going to create soon.


Now, we better create that file, so let's right-click on the "esbcontent" folder in the main "Package" view tree on the left and add a new file called smooks.xml.

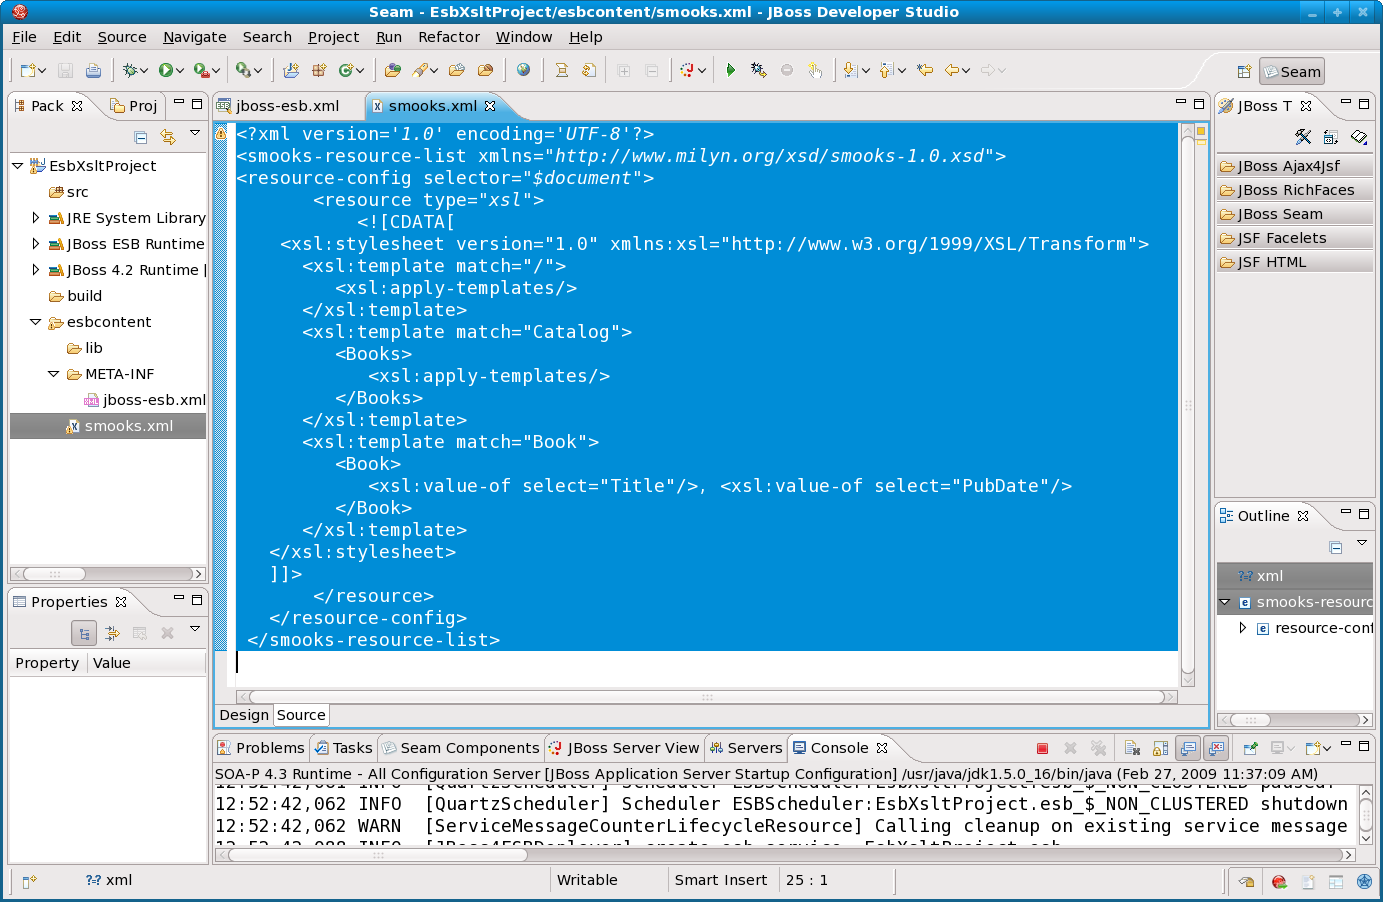
Here is what we want to put in that file. You'll notice that we are embedding the XSLT in the Smooks configuration file, we'll see a different way to do this later.
-----------------------------------------------
<?xml version='1.0' encoding='UTF-8'?>
<smooks-resource-list xmlns="http://www.milyn.org/xsd/smooks-1.0.xsd">
<resource-config selector="$document">
<resource type="xsl">
<![CDATA[
<xsl:stylesheet version="1.0" xmlns:xsl="http://www.w3.org/1999/XSL/Transform">
<xsl:template match="/">
<xsl:apply-templates/>
</xsl:template>
<xsl:template match="Catalog">
<Books>
<xsl:apply-templates/>
</Books>
</xsl:template>
<xsl:template match="Book">
<Book>
<xsl:value-of select="Title"/>, <xsl:value-of select="PubDate"/>
</Book>
</xsl:template>
</xsl:stylesheet>
]]>
</resource>
</resource-config>
</smooks-resource-list>
-----------------------------------------------
Lastly, we'll go back to our jboss-esb.xml, and right-click on the "Actions" folder to add an second System Println to print the ESB message now that it has gone through the Smooks transformer.


That's it! Now, we do "File | Save All" and republish to the server. Once that's finished, we can drop the same XML file in the polling directory and we will see that Println1 shows the message before the transformation (as before) and Println2 shows the message after the XSLT transformation - whoohoo!

Step #3
You might ask, do I have to embed my XSLT in the Smooks config file? What if I have multiple XSLTs, do I have to have multiple Smooks config files? The answer is no to both questions. Now, we will see how to configure multiple transformations in one Smooks config file and how to have the Smooks config file reference a separate XSLT file.
Now, we're going to add a second transformation to transform the XML that resulted from the first transformation. In the case of WS versioning, you would probably have one XSLT transforming the request coming in before forwarding to HTTP router (or however you send to your back end WS) and a second XSLT transforming the response coming back from the back end web service.
So first, let's right-click on the service's actions and create another generic action.

We need to add a property to this action to point to the existing Smooks config file. We could have a second Smooks config file, but we'll see below that this is not necessary.


Let's right-click on the Actions folder and add a third System Println action so that we can see the ESB Message after the second transformation.

Now, we need to create a new XSLT file, similiar to how we created the Smooks file. Right-click on "esbcontent" and add a new file.

Here's the XSLT that we're going to put in that file (transform2.xsl) to do our second transformation:
------------------------------------------------
<xsl:stylesheet version="1.0" xmlns:xsl="http://www.w3.org/1999/XSL/Transform">
<xsl:template match="/">
<Library>
<xsl:apply-templates/>
</Library>
</xsl:template>
<xsl:template match="Books">
<xsl:apply-templates/>
</xsl:template>
<xsl:template match="Book">
<LibraryBook>
<xsl:value-of select="."/>
</LibraryBook>
</xsl:template>
</xsl:stylesheet>
------------------------------------------------

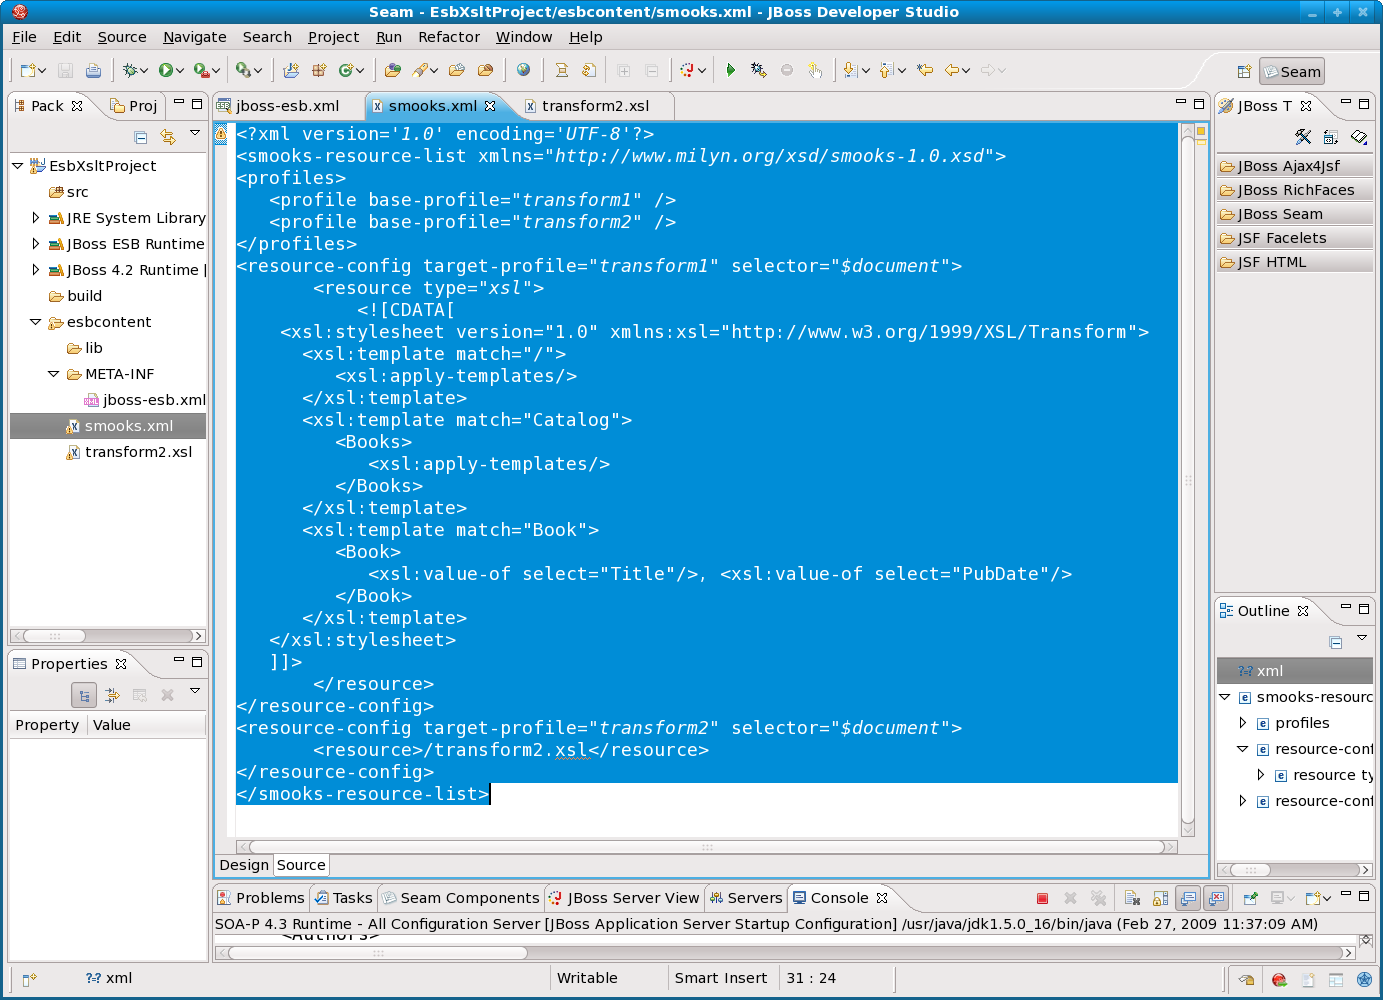
Now, this is where it gets interesting. We're going to go back to our smooks.xml file and change it. We're going to add a new section called "profiles" which basically allows us to specify that this Smooks file has multiple transformations in it. We also have to add a "target-profile" to each of the resource-configs so that can specify which transformation belongs to which profile. Also note that we added a second "resource-config" (aka transformation) that instead of embedding the XSLT, just references the separate XSLT file that we created. So, you can do it either way. You could embed all your XSLT transformations in one Smooks file, or you could have all your transformations in separate files and just configure Smooks to reference the separate files, or you could do a combination of both like we do below. Here is our new smooks.xml file:
-------------------------------------------------
<?xml version='1.0' encoding='UTF-8'?>
<smooks-resource-list xmlns="http://www.milyn.org/xsd/smooks-1.0.xsd">
<profiles>
<profile base-profile="transform1" />
<profile base-profile="transform2" />
</profiles>
<resource-config target-profile="transform1" selector="$document">
<resource type="xsl">
<![CDATA[
<xsl:stylesheet version="1.0" xmlns:xsl="http://www.w3.org/1999/XSL/Transform">
<xsl:template match="/">
<xsl:apply-templates/>
</xsl:template>
<xsl:template match="Catalog">
<Books>
<xsl:apply-templates/>
</Books>
</xsl:template>
<xsl:template match="Book">
<Book>
<xsl:value-of select="Title"/>, <xsl:value-of select="PubDate"/>
</Book>
</xsl:template>
</xsl:stylesheet>
]]>
</resource>
</resource-config>
<resource-config target-profile="transform2" selector="$document">
<resource>/transform2.xsl</resource>
</resource-config>
</smooks-resource-list>
-------------------------------------------------
So, you might be thinking... How do the Smooks transformation actions know which of the two transformations in smooks.xml they should use? Good question. Right now, they don't know, we need to tell them. To do that, we'll go back to each transformation action and add a new property.

This property for the first transformation action points to the "transform1" part of smooks.xml (the XSLT embedded in smooks.xml).

This property for the second transformation points to "transform2", which is defined in smooks.xml to point to the separate XSLT file that we created.

Now we should have added this new "messageProfile" property to both Smooks actions.

The only thing left to do is "File | Save All", republish the ESB project to our server, and put the same original XML file back in the file poller directory.
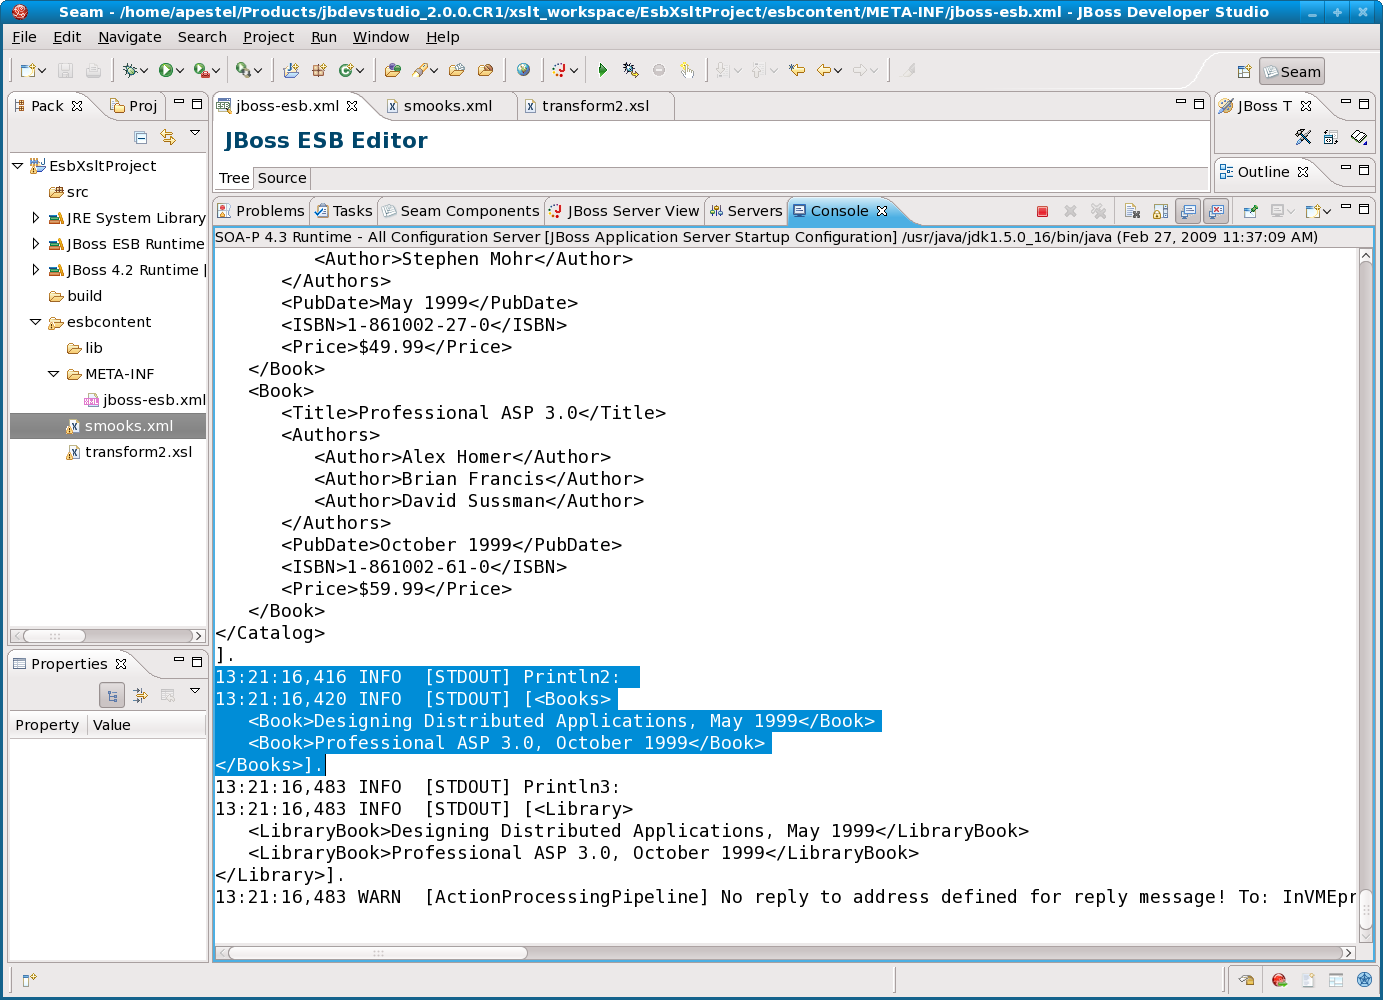
Now in our console (shown above), we should see the first println display the orginal XML (above the blue highlight), the second println should display the ESB message after the first transformation (blue highlight), and the third println should display the ESB message after the second transformation (below the blue highlight).
That's it! We've easily integrated XSLT into JBoss SOA-P 4.3 via JBDS and never wrote a line of Java code, just the XSLT XML and Smooks XML.
Notes:
1.) Smooks can do much more than just XSLT. It can do Java to XML, XML to Java, Java to Java, XML to CSV, etc. Please refer to the quickstarts in the SOA-P 4.3 distribution for more examples.
2.) How would this be different if we were doing these XSLTs to version web services? Not much. Here would be the basic approach: A.) Create a service where the first action transforms the incoming request to the new web service schema. B.) Invoke the new web service (HttpRouter for example). C.) HttpRouter will put the response from the new web service back in the ESB default message body. D.) Probably need to add another transform after the router action to transform the response as well (assuming its schema changed like the request schema changed). That's it. But what about a new WSDL? Shouldn't there be one WSDL for the old version that is on the ESB and one WSDL for the new version that the ESB is delegating to? Yes, there will be two different WSDLs, but if you are using the JBR HTTP Router on the ESB, it will not generate a WSDL for you. You probably already have it because it's the same WSDL (except for maybe host/port changes) as the old web service that you were delegating to before the version change.
Comments